Van's Air Force
You are using an out of date browser. It may not display this or other websites correctly.
You should upgrade or use an alternative browser.
You should upgrade or use an alternative browser.
Show us the status of your 7/7A project!
- Thread starter DeltaRomeo
- Start date

PaulvS
Well Known Member
Horton Aircraft Deconstruction Service..."State of the Art in Takin' Apart"
.
That's a Good Start, but not for the Faint of Heart.
[email protected]
Well Known Member
A Painful Setback!
Let me just say right up front that Jimmy Broad at JB Aircraft Engines in Sebring, FL did me right in the end!
Back in August, I was just days away from my scheduled DAR inspection. As I prepared for the inspection by doing engine runs, etc., I just couldn't get the prop to cycle. We then proceeded to do all the troubleshooting to figure out why the prop wouldn't cycle. From removing the prop and checking the plugs to checking the governor, hi-pressure oil line, etc., and nothing!
In the end, I had to remove the engine and send it back to Jimmy for an internal fix in the engine. During that time, the hurricane hit and the engine return was delayed two more weeks.
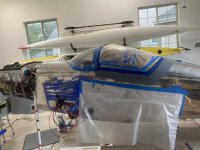
After ~5 full days of work, I was able to re-hang the engine and reconnect everything! Of course I was happy that everything just fit this time around.
Last weekend I started the engine and hearing that prop cycle was glorious music to my ears! So, now I'm working to reschedule the DAR.
Just when you think your done bleeding for your plane...NO! This was a painful experience to go through, but I'm grateful for Jimmy for making it right. It had been nearly two years previous that I purchased the engine from JB Aircraft engines. But still, they made it right for me in the end.
I almost considered just going with a fixed-pitch prop, instead of going through the process to remove and send back the engine. Glad I listened to everyone who told me that would be a big mistake!
My RV-7 is back on track now and soon it should be flying. I learned a lot through this process. The picture here shows the engine re-attached to my plane. Stay tuned for more.
Ryan
Let me just say right up front that Jimmy Broad at JB Aircraft Engines in Sebring, FL did me right in the end!
Back in August, I was just days away from my scheduled DAR inspection. As I prepared for the inspection by doing engine runs, etc., I just couldn't get the prop to cycle. We then proceeded to do all the troubleshooting to figure out why the prop wouldn't cycle. From removing the prop and checking the plugs to checking the governor, hi-pressure oil line, etc., and nothing!
In the end, I had to remove the engine and send it back to Jimmy for an internal fix in the engine. During that time, the hurricane hit and the engine return was delayed two more weeks.
After ~5 full days of work, I was able to re-hang the engine and reconnect everything! Of course I was happy that everything just fit this time around.
Last weekend I started the engine and hearing that prop cycle was glorious music to my ears! So, now I'm working to reschedule the DAR.
Just when you think your done bleeding for your plane...NO! This was a painful experience to go through, but I'm grateful for Jimmy for making it right. It had been nearly two years previous that I purchased the engine from JB Aircraft engines. But still, they made it right for me in the end.
I almost considered just going with a fixed-pitch prop, instead of going through the process to remove and send back the engine. Glad I listened to everyone who told me that would be a big mistake!
My RV-7 is back on track now and soon it should be flying. I learned a lot through this process. The picture here shows the engine re-attached to my plane. Stay tuned for more.
Ryan
Attachments
Planecrazy232
Well Known Member
Let me just say right up front that Jimmy Brod at JB Aircraft Engines in Sebring, FL did me right in the end!
Ryan
Jimmy is good people. Glad it worked out for you.
Desert Rat
Well Known Member
PilotjohnS
Well Known Member
I know...
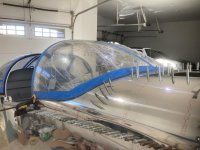
I know you think you are done, I did too at this stage, but...
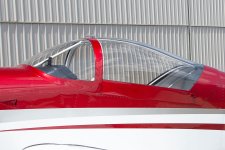
I think if you trim the curve where the canopy transitions from the fuselage sides to the top, it might remove some pressure off the clamps at the roll bar. I don't know for sure because I cant tell from the picture how much force those clamps exert on the plexiglass. Just a thought.
My next airplane will have a solid aluminum canopy and I'll fly by hanging my head out the window like a golden retriever, but it's trimmed, clipped, clamped, and fits as it should.
I know you think you are done, I did too at this stage, but...
I think if you trim the curve where the canopy transitions from the fuselage sides to the top, it might remove some pressure off the clamps at the roll bar. I don't know for sure because I cant tell from the picture how much force those clamps exert on the plexiglass. Just a thought.
Desert Rat
Well Known Member
I know you think you are done, I did too at this stage, but...
I think if you trim the curve where the canopy transitions from the fuselage sides to the top, it might remove some pressure off the clamps at the roll bar. I don't know for sure because I cant tell from the picture how much force those clamps exert on the plexiglass. Just a thought.
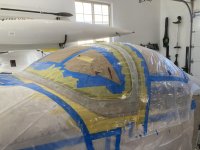
Thanks for the thought, but the picture shows it "in process." There was a lot more trimming that happened after that.
The irony is that it's fitting perfectly at this point but it's all coming apart in a day or two because I'm not riveting the skin until after I hang the engine. I just wanted to final trim the windscreen before it got cold and get a final position marked so I could locate holes in the skin for defrost fans and a couple of antenna.
Last edited:
Share the pain...
Just out of curiosity, and perhaps provide guidance to others, what was the "Internal Fix?"
Glad to hear everything worked out -- you're going to have sooooo much fun with the -7.
Cheers,
In the end, I had to remove the engine and send it back to Jimmy for an internal fix in the engine.
Just out of curiosity, and perhaps provide guidance to others, what was the "Internal Fix?"
Glad to hear everything worked out -- you're going to have sooooo much fun with the -7.
Cheers,
wirejock
Well Known Member
My next airplane will have a solid aluminum canopy and I'll fly by hanging my head out the window like a golden retriever, but it's trimmed, clipped, clamped, and fits as it should.
Looks good Terry. Congratulations.
Agree. Plexi is a "right of passage" I could skip as well. Sure feels good when that part is done.
[email protected]
Well Known Member
First engine start
Check out the video below which shows my son and I doing the engine start for the first time. It fired up first go and ran very good.
https://flic.kr/ps/3TnTEo
We have since taxied it around the airport and also calibrated the magnetometer in the Advance Flight ADAHRS.
Check out the video below which shows my son and I doing the engine start for the first time. It fired up first go and ran very good.
https://flic.kr/ps/3TnTEo
We have since taxied it around the airport and also calibrated the magnetometer in the Advance Flight ADAHRS.
Check out the video below which shows my son and I doing the engine start for the first time. It fired up first go and ran very good.
https://flic.kr/ps/3TnTEo
We have since taxied it around the airport and also calibrated the magnetometer in the Advance Flight ADAHRS.
Woo hoo, go Gordon!!
motodave
Well Known Member
25 hours in Phase 1 and still grinning! Flying great with no trim required after wheel pants and leg fairings:
 Untitled by Dave Hock, on Flickr
Looking pretty") it's been cold in CO. Was not expected much heat from the standard heat muff and happy to report that it puts out a TON of heat. I've been flying with it just cracked a small amount with a very pleasant cockpit with the OAT's below freezing.
it's been cold in CO. Was not expected much heat from the standard heat muff and happy to report that it puts out a TON of heat. I've been flying with it just cracked a small amount with a very pleasant cockpit with the OAT's below freezing.
 Untitled by Dave Hock, on Flickr
Untitled by Dave Hock, on FlickrLooking pretty
it's been cold in CO. Was not expected much heat from the standard heat muff and happy to report that it puts out a TON of heat. I've been flying with it just cracked a small amount with a very pleasant cockpit with the OAT's below freezing. Untitled by Dave Hock, on FlickrFirst flight
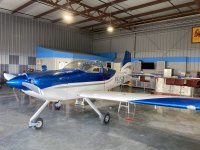
On Monday VH-NAK took to the sky for the first time with Glenn Bridgland at the controls. Glenn is a Flight safety Advisor (FSA) with the SAAA. I took advice that the builder should not do the first flight and Glenn has many hours on RV's.
Check out the photo below for the RV grins, especially on one happy old builder
https://flic.kr/p/2ob53Go
Then watch the video below. After I took it I realised that I probably should have zoomed in.
https://flic.kr/p/2ob4PRR
The aircraft flew well but I do have a heavy left wing that needs correction.
Caummisar
Well Known Member
Starting on the canopy , God help me please
Schedule warm weather to do this!
On Monday VH-NAK took to the sky for the first time with Glenn Bridgland at the controls.
Congratulations Gordon, that's fantastic!!!
wirejock
Well Known Member
Status update
Holy cow! Finally all the wire is run. Well except for the stuff coming from the wings. That's no problem. There's plenty of room in the outboard snap bushings. The middle ones are seriously packed.
That ADAHRS cable is a honker! That one and one coax really ate up space. Thankfully, it all fits and I didn't have to drill new holes in the Center Section. Antenna doublers are riveted.
Finally I can move on to the last million little jobs to complete this lady. Too many little tasks to think about.
I'm taking a two week hiatus for a VaCay then back in the factory. We have a Great Grandaughter on the way next week. Gotta go see the baby. Someday maybe she will ride with the old guy.
Desert Rat
Well Known Member
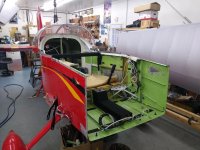
Working on the F-7106 Fwd Top Skin. This is the last skin to be installed and I held off until all of the stuff behind the panel was done.
I've pretty much hit the limit of what I can conveniently rivet by myself, so I'll have to find something else to do until my rivet partner comes back from a business trip next week.
I've pretty much hit the limit of what I can conveniently rivet by myself, so I'll have to find something else to do until my rivet partner comes back from a business trip next week.
Attachments
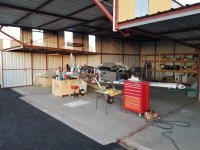
OK...been a while...but...
So...I've been putting the SLOW in slow-build, but hit a pretty big milestone this weekend.
It's flipped...and on the cart.

So...I've been putting the SLOW in slow-build, but hit a pretty big milestone this weekend.
It's flipped...and on the cart.
wirejock
Well Known Member
Status
Wow. Finally. Interior and all those electrons are done.
Seats are temporarily installed. Someone will no doubt notice the snaps.
I just couldn't wait any longer and Sweetie wants her spare bedroom back!
We sat inside for quite a while making airplane noises.
Closing up the cockpit and moving on.
Prop Spinner, Empennage Fairing and she goes to the hangar for final assembly. Creeping up on that Airworthyness thingy.
Last edited:
Wow. Finally. Interior and all those electrons are done.
Seats are temporarily installed. Someone will no doubt notice the snaps.
I just couldn't wait any longer and Sweetie wants her spare bedroom back!
We sat inside for quite a while making airplane noises.
Closing up the cockpit and moving on.
Prop Spinner, Empennage Fairing and she goes to the hangar for final assembly. Creeping up on that Airworthyness thingy.
View attachment 49472
View attachment 49473
Looking Good!
Desert Rat
Well Known Member
Thats really great Larry.
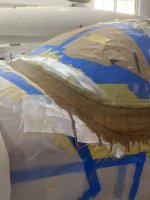
On a related note, I just wrapped up the canopy skirt by following Larrys excellent series of articles in Kitplanes. Next up is the windscreen.
Thanks a ton Larry for the effort you put in to share that info with everybody.
On a related note, I just wrapped up the canopy skirt by following Larrys excellent series of articles in Kitplanes. Next up is the windscreen.
Thanks a ton Larry for the effort you put in to share that info with everybody.
Attachments
wirejock
Well Known Member
Canopy skirt
Wow! That looks nice. Don't you love the sound when the canopy closes?
Thats really great Larry.
On a related note, I just wrapped up the canopy skirt by following Larrys excellent series of articles in Kitplanes. Next up is the windscreen.
Thanks a ton Larry for the effort you put in to share that info with everybody.
Wow! That looks nice. Don't you love the sound when the canopy closes?
Desert Rat
Well Known Member
Yup, it's quite a feeling.
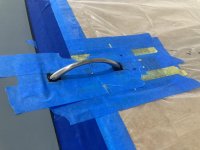
In my case, it was followed immediately by discovering how hard it is to open again from the outside, even though I had put a tab at the aft left corner, so I took it back off and spent today installing a pull handle on the spine
In my case, it was followed immediately by discovering how hard it is to open again from the outside, even though I had put a tab at the aft left corner, so I took it back off and spent today installing a pull handle on the spine
Attachments
wirejock
Well Known Member
Knob
Yep. Same problem. I put a knob on each side.
Sitting inside today, it's really sealed up.
Yup, it's quite a feeling.
In my case, it was followed immediately by discovering how hard it is to open again from the outside, even though I had put a tab at the aft left corner, so I took it back off and spent today installing a pull handle on the spine
Yep. Same problem. I put a knob on each side.
Sitting inside today, it's really sealed up.

Painted the RV-7 this week in the garage
RV-7 SN 75068. Paint!
https://youtu.be/9_fDLtFGVgQ
Painted the wings and control surfaces this week! Came out good. I posted a YouTube video on the how to. Thanks to those who have done this before me. I learned a lot.
Toolman
RV-7 SN 75068. Paint!
https://youtu.be/9_fDLtFGVgQ
Painted the wings and control surfaces this week! Came out good. I posted a YouTube video on the how to. Thanks to those who have done this before me. I learned a lot.
Toolman
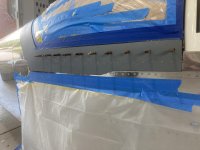
Paint!
painted the wings, fairings, and control surfaces last week. Came out good but still have some paint correction to do. plan to box all these parts and take them to the airport while I work on the finish kit and engine this winter.
tool man


 [/ATTACH]
painted the wings, fairings, and control surfaces last week. Came out good but still have some paint correction to do. plan to box all these parts and take them to the airport while I work on the finish kit and engine this winter.
tool man
[/ATTACH]
Desert Rat
Well Known Member
Desert Rat
Well Known Member
Thanks man.
I have to admit, that when I'm tempted to just live with a lump or ripple and have the paint shop deal with it later, I go back to the pictures in your kit planes article and say to myself; "if Larry can make gloss black look that good, surely I can do better than this in primer gray."
I have to admit, that when I'm tempted to just live with a lump or ripple and have the paint shop deal with it later, I go back to the pictures in your kit planes article and say to myself; "if Larry can make gloss black look that good, surely I can do better than this in primer gray."
Dad's RV-10
Well Known Member
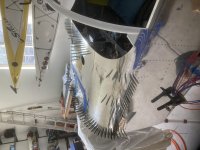
First part wrapped. There's no Vinyl thread so shoot me an e-mail or check my blog for tips. I found some neat tools to make the job much easier. Nice thing is no Cut & Buff needed.
Sorry. I can't figure out how to post a vertical photo.
Image rotated:

rph142
Well Known Member
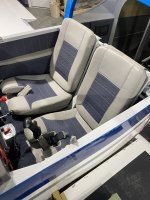
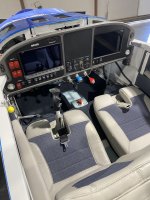
I just finished installing my Classic Aero interior sportsman seats, floor and center carpet. I sent them a hide from Moore and Giles and requested diamond stitch using thread that matches the interior paint. Fantastic results!
I’ll be adding carbon inserts from dragon plate on the center console and canopy side rails.

I’ll be adding carbon inserts from dragon plate on the center console and canopy side rails.

Freakshow108
Well Known Member
Final assembly
Larry, do you have a timeframe for final assembly? First flight?
She is looking good!!Wrapped up the fuse.
I still have wings, ailerons and flaps, but those are flat and easy.
View attachment 53689
Larry, do you have a timeframe for final assembly? First flight?
wirejock
Well Known Member
Final assembly
Thanks
I'm really pushing to get her in the air when weather warms up. Fingers crossed.
She is looking good!!
Larry, do you have a timeframe for final assembly? First flight?
Thanks
I'm really pushing to get her in the air when weather warms up. Fingers crossed.
Thanks man.
I have to admit, that when I'm tempted to just live with a lump or ripple and have the paint shop deal with it later, I go back to the pictures in your kit planes article and say to myself; "if Larry can make gloss black look that good, surely I can do better than this in primer gray."
That's what I did... I was fussing over the fiberglass when my paint shop said: you get it in the air, we'll make it pretty. That saved a lot of hand wringing and work!
That's a fiberglass one piece canopy skirt. It was OK before paint but the shop made it perfect.
Attachments
wirejock
Well Known Member
Paint finish
That's purdy!
That's what I did... I was fussing over the fiberglass when my paint shop said: you get it in the air, we'll make it pretty. That saved a lot of hand wringing and work!
That's a fiberglass one piece canopy skirt. It was OK before paint but the shop made it perfect.
That's purdy!
alpinelakespilot2000
Well Known Member
Looks really nice, Larry! How do you lay vinyl when you have items protruding from the flat surfaces, such as your step and rudder stops? Do you just have to guess where the vinyl will lay and cut a slit or is there some other strategy?Wrapped up the fuse.
I still have wings, ailerons and flaps, but those are flat and easy.
View attachment 53689
wirejock
Well Known Member
Vinyl
Yes. Sort of.
Slit the vinyl. Example is the step. A slit right along the step pipe allows it to lay down enough to squeegee into all the corners. The knifeless tape is the gift from the vinyl gods. That is put in place before applying any vinyl. Once it's all applied, pull the string. Not quite that simple but basically how it's done
Looks really nice, Larry! How do you lay vinyl when you have items protruding from the flat surfaces, such as your step and rudder stops? Do you just have to guess where the vinyl will lay and cut a slit or is there some other strategy?
Yes. Sort of.
Slit the vinyl. Example is the step. A slit right along the step pipe allows it to lay down enough to squeegee into all the corners. The knifeless tape is the gift from the vinyl gods. That is put in place before applying any vinyl. Once it's all applied, pull the string. Not quite that simple but basically how it's done
Tiger28760
Member
Larry, Let’s say a guy would like to practice applying vinyl before actually doing the plane. Do you have any recommendations as to how to go about getting your feet wet before the big event?


I am the 3rd owner of this kit that started life in 2002. Bought it in Modesto, CA in Dec 2021, trucked it back to Phoenix, and started work in Feb 2022. I did most of the paint in the summer of 2022, overhauled the IO-360 A1B6, and am now awaiting the inspection from the Phoenix MIDO in the next couple of weeks.
Attachments