
Van's Air Force
You are using an out of date browser. It may not display this or other websites correctly.
You should upgrade or use an alternative browser.
You should upgrade or use an alternative browser.
RV-6A Very Slow Build, Western Australia
- Thread starter PaulvS
- Start date

PaulvS
Well Known Member
More grins on the way
Thanks Dan, et al for PMs. What started out as 1 day job for SB 06-2-23 has blown out to be a much bigger job. I need to remind myself that one day this will all be worth it.
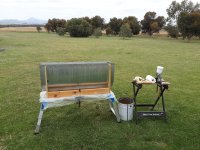
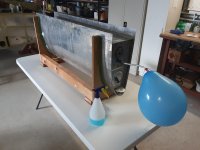
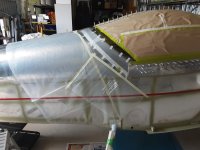
I made some more progress cleaning out the softened Proseal, using a spray gun with solvent and a stiff brush, supporting the tank on its nose in a stand. I moved everything outside in the yard to reduce the fumes and fire hazard.
It's become more evident that much of the sealant in the faying surface joints between the stiffeners, ribs and skins has also softened and reverted to goo. I tentatively removed the pop rivets between the baffle and flanges on an internal rib and was able to push a feeler gauge through the soft Proseal. I think therefore that the tanks need to come apart completely (approx 4-500 rivets to drill out!) for total cleaning and then re-assembly. This is because I'm not confident about the long term performance of new sealant over the old sealant that is still in the seams, in case it contaminates the new sealant.
For the record, my work log shows that it took 5 months to build the tanks in 1995.
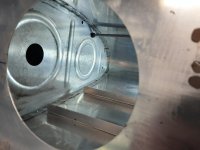
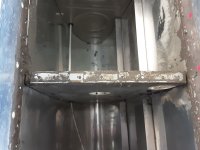
** Edit/update
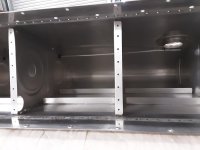
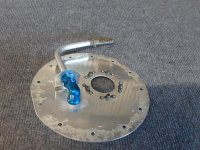
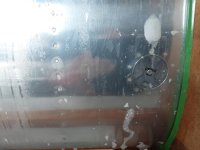
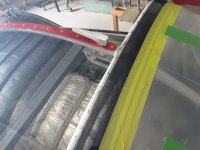
Added picture after removing tank baffle. Definitely needed to come off for repair, the Proseal underneath is a soft mess. Next step is to de-rivet and disassemble the tank ribs and stiffeners.
Thanks Dan, et al for PMs. What started out as 1 day job for SB 06-2-23 has blown out to be a much bigger job. I need to remind myself that one day this will all be worth it.
I made some more progress cleaning out the softened Proseal, using a spray gun with solvent and a stiff brush, supporting the tank on its nose in a stand. I moved everything outside in the yard to reduce the fumes and fire hazard.
It's become more evident that much of the sealant in the faying surface joints between the stiffeners, ribs and skins has also softened and reverted to goo. I tentatively removed the pop rivets between the baffle and flanges on an internal rib and was able to push a feeler gauge through the soft Proseal. I think therefore that the tanks need to come apart completely (approx 4-500 rivets to drill out!) for total cleaning and then re-assembly. This is because I'm not confident about the long term performance of new sealant over the old sealant that is still in the seams, in case it contaminates the new sealant.
For the record, my work log shows that it took 5 months to build the tanks in 1995.
** Edit/update
Added picture after removing tank baffle. Definitely needed to come off for repair, the Proseal underneath is a soft mess. Next step is to de-rivet and disassemble the tank ribs and stiffeners.
Attachments
Last edited:
PaulvS
Well Known Member
Clean tanks
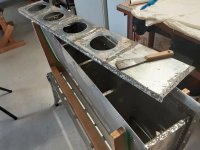
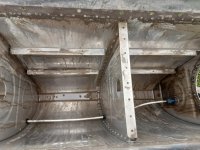
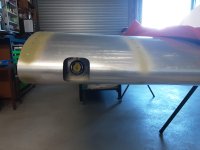
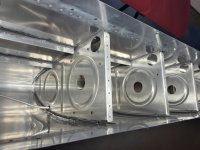
Both tanks are finally cleaned out, following removal of the aft baffles.
I now believe it won't be necessary to completely disassemble all of the ribs and stiffeners, because I've been able to wash out all of the Proseal goo using several litres of solvent. The most effective solvents were gun wash and acrylic enamel reducer, both have a high percentage of toluene. Acetone was partially effective and several other solvents that I tried did not work at all. I took the job outside due to the fumes and risk of fire.
The still hardened Proseal on the outside of the tank that was not affected by the avgas vapor was very difficult to remove and the only thing that would take it off was paint stripper containing methylene chloride. It took 4 or 5 applications and lots of scraping with a wooden stick to remove the sealant.
I can't say this has been the most fun period on the project but at least the worst part of cleaning is done. Thankfully a couple of buddies have helped me to hang on to my sanity during some dark moments!
The sealant that I ordered has arrived and I've got the .040 aluminum sheet to make the access covers. I will certainly not be putting any fuel into the tanks for leak testing this time round!
Attachments
Last edited:
Zero4Zulu
Well Known Member
My tanks had slosh loose. I initially thought I could clean them myself. I removed the rear panel which wasn’t really difficult. After getting started and realizing how much chemical exposure I would have to endure, I started looking for options. I found a chemical stripping company locally. They dipped my tanks and they came out nice.
I re-applied Proseal around all the ribs and rivets and re-install the rear panels. So far a few years since then, no leaks. For others needing to do this, maybe you can locate a chemical stripping outfit near you. Of course you would have to repaint the tanks too.
I re-applied Proseal around all the ribs and rivets and re-install the rear panels. So far a few years since then, no leaks. For others needing to do this, maybe you can locate a chemical stripping outfit near you. Of course you would have to repaint the tanks too.
Last edited:
PaulvS
Well Known Member
Wing lighting
The tanks are fully cleaned and ready for re-sealing and while waiting for the rest of the sealant to ship I worked on the wing lighting.
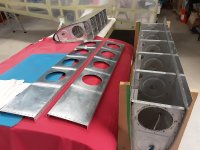
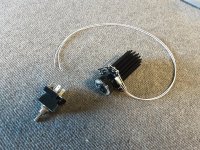
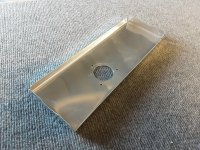
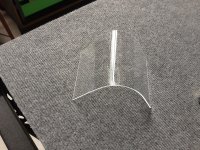
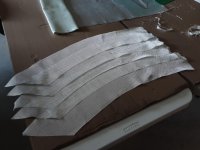
There will be one Flyleds Single Spotlight in the leading edge of each wing, powered by an integrated wig-wag toggle switch on the panel. I fabricated aluminum brackets to mount the lights in the wings and made the curved plexi lenses using the tank leading edge as a form.
The lights are compact and weigh about 100g each and the hole in the leading edge is 2.5" square, which is adequate for the narrow beam.
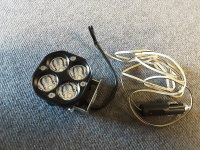
Another lighting option that I considered was eBay Baja style 4000 (claimed) lumen spotlights, however these are heavier and more difficult to mount and seem to produce not much more light than the Flyleds 1200 lumen lights. As an added bonus, Flyleds are made down under, so there was no international shipping!
This lighting solution is for day VFR, using the wig-wag function to enhance awareness.
The tanks are fully cleaned and ready for re-sealing and while waiting for the rest of the sealant to ship I worked on the wing lighting.
There will be one Flyleds Single Spotlight in the leading edge of each wing, powered by an integrated wig-wag toggle switch on the panel. I fabricated aluminum brackets to mount the lights in the wings and made the curved plexi lenses using the tank leading edge as a form.
The lights are compact and weigh about 100g each and the hole in the leading edge is 2.5" square, which is adequate for the narrow beam.
Another lighting option that I considered was eBay Baja style 4000 (claimed) lumen spotlights, however these are heavier and more difficult to mount and seem to produce not much more light than the Flyleds 1200 lumen lights. As an added bonus, Flyleds are made down under, so there was no international shipping!
This lighting solution is for day VFR, using the wig-wag function to enhance awareness.
Attachments
Dan 57
Well Known Member
Flyleds are made down under, so there was no international shipping
Plus Paul offers first class service with top quality products
I upgraded my old halogen light with a combo leading edge landing / taxi, and I'm very happy.
Good work on those tanks, nice to follow your progress
PaulvS
Well Known Member
Re-sealing the tanks
Both tanks have finally been internally re-sealed, after cleaning out all of the old failed sealant, which I really never want to do again. I applied polysulfide CS3204 B2 to all of the internal seams in the tank. The final step this week will be to re-install the rear baffles.
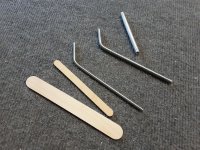
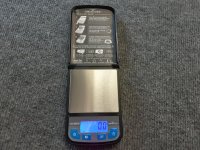
The re-sealing process that I followed was to force new sealant into all of the internal seams in the tanks. This was a little different to initial assembly, since the faying surfaces were already riveted. I trialled several tools for applying the sealant and the most effective was a length of bent rod, similar to what my old dentist used when making amalgum fillings. That 's a spin-off benefit from seeing the dentist! The small jewellers scale is graduated in 0.1g increments, which makes it easy to mix small batches when working slowly.
The smell of polysulfide sealant is unique and I'd forgotten all about it, however the memory came back instantly after 20 years.
I also fitted the Vans anti-rotation bracket on the fuel pickup tubes, this was actually the reason for opening the tanks several months ago, which then led to the whole unexpected repair job detour.
Scott McDaniels fuel tank construction videos on Youtube have been very helpful indeed.
Both tanks have finally been internally re-sealed, after cleaning out all of the old failed sealant, which I really never want to do again. I applied polysulfide CS3204 B2 to all of the internal seams in the tank. The final step this week will be to re-install the rear baffles.
The re-sealing process that I followed was to force new sealant into all of the internal seams in the tanks. This was a little different to initial assembly, since the faying surfaces were already riveted. I trialled several tools for applying the sealant and the most effective was a length of bent rod, similar to what my old dentist used when making amalgum fillings. That 's a spin-off benefit from seeing the dentist! The small jewellers scale is graduated in 0.1g increments, which makes it easy to mix small batches when working slowly.
The smell of polysulfide sealant is unique and I'd forgotten all about it, however the memory came back instantly after 20 years.
I also fitted the Vans anti-rotation bracket on the fuel pickup tubes, this was actually the reason for opening the tanks several months ago, which then led to the whole unexpected repair job detour.
Scott McDaniels fuel tank construction videos on Youtube have been very helpful indeed.
Attachments
PaulvS
Well Known Member
Tanks fixed
I haven't updated here in a while but there has been steady progress, this is has definitely been a marathon and not a sprint.
The tanks passed the leak test and the only bubbles were from the fuel caps between the strips of packing tape. Overall the tank repairs set me back about 2 months.
Then there was some home maintenance that needed to be done and that also took a couple of months. By then it was winter and too cold to resume work on the canopy.
Attachments
Last edited:
PaulvS
Well Known Member
Panel work
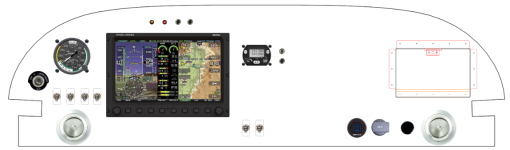
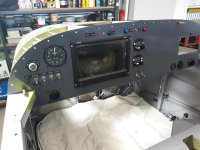
I wanted to keep the panel relatively simple, in keeping with the RV original concept, but now modernised. I fly day VFR only and most flying is local flights and that doesn't need an extensive panel.
I learned to fly in aircraft with analogue instruments and when I started flying our club RV-9A I referred only to those gauges and completely ignored the D100 EFIS that was also in the panel.
My low-n-slow Aeroprakt Foxbat forced me to use digital instrumentation because the panel has only a Dynon D180 EFIS, Garmin 296 GPS and a radio head. It is minimal, but fully functional.
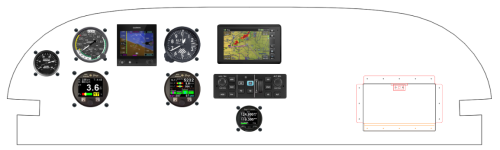
The panel concept for the RV-6A went through several iterations and I did the initial layout with the online panel designer, then scale drawing in CAD, and finally cardboard cutout mock-up in the cockpit.
The steam ASI is a backup in case everything else fails, and for old times comfort.
There is a map box in the panel also, I got that recent kit from Ralph Inkster on VAF. It is the only punched part on the plane.
I wanted to keep the panel relatively simple, in keeping with the RV original concept, but now modernised. I fly day VFR only and most flying is local flights and that doesn't need an extensive panel.
I learned to fly in aircraft with analogue instruments and when I started flying our club RV-9A I referred only to those gauges and completely ignored the D100 EFIS that was also in the panel.
My low-n-slow Aeroprakt Foxbat forced me to use digital instrumentation because the panel has only a Dynon D180 EFIS, Garmin 296 GPS and a radio head. It is minimal, but fully functional.
The panel concept for the RV-6A went through several iterations and I did the initial layout with the online panel designer, then scale drawing in CAD, and finally cardboard cutout mock-up in the cockpit.
The steam ASI is a backup in case everything else fails, and for old times comfort.
There is a map box in the panel also, I got that recent kit from Ralph Inkster on VAF. It is the only punched part on the plane.
Attachments

Last edited:
PaulvS
Well Known Member
Seat cushions
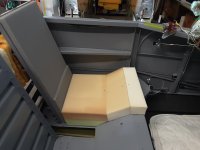
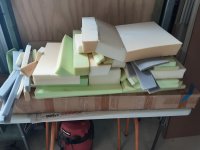
We are having a go at making our own seat cushions. My wife knows how to sew, mainly clothing though, so this is a bit of an experiment.
The white memory foam is cut from an Ikea mattress topper and all the shaping has been done using an electric carving knife. There were a few iterations to get the base thickness right and also the density for the back and it know feels quite comfortable.
I flame tested some fabric samples from the upholstery shop and they burned readily and continuously so plan B is to use rated 100% wool fabric. Still deciding on colors and whether to pick something conservative or a bit livelier.
Attachments
Last edited:
PaulvS
Well Known Member
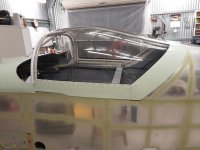
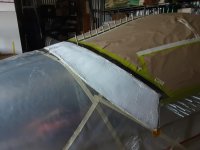
Canopy part II
I resumed working on the canopy, it had been packed away for winter (too cold in shop for plexi work).
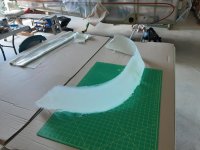
The side skirts worked out OK in metal, per the plans, but it didn't look to promising to use metal for the rear skirts because the canopy frame is too high at the centre, which would cause a gap. And I already had more than enough frustration with the canopy frame to not want to fight with metal anymore.
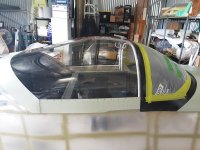
I used fibreglass and epoxy instead and moulded it directly on the fuselage with the canopy closed. The gap between the skin and the plexi was bridged with some tough plastic sheet for moulding over. The aft skirt is attached with rivets and I moulded in the locations by placing temporary marker rivets in the plexi holes.
There is still a small amount of sanding and filling to do when I paint it.
Next job on the list is the windscreen and I need to figure out if the skirt will be metal or fibreglass or a combo and maybe moulded directly onto the plexi or perhaps to be popped
off and finished off the plane and then re-attach.
I resumed working on the canopy, it had been packed away for winter (too cold in shop for plexi work).
The side skirts worked out OK in metal, per the plans, but it didn't look to promising to use metal for the rear skirts because the canopy frame is too high at the centre, which would cause a gap. And I already had more than enough frustration with the canopy frame to not want to fight with metal anymore.
I used fibreglass and epoxy instead and moulded it directly on the fuselage with the canopy closed. The gap between the skin and the plexi was bridged with some tough plastic sheet for moulding over. The aft skirt is attached with rivets and I moulded in the locations by placing temporary marker rivets in the plexi holes.
There is still a small amount of sanding and filling to do when I paint it.
Next job on the list is the windscreen and I need to figure out if the skirt will be metal or fibreglass or a combo and maybe moulded directly onto the plexi or perhaps to be popped
off and finished off the plane and then re-attach.
Attachments
Last edited:
PaulvS
Well Known Member
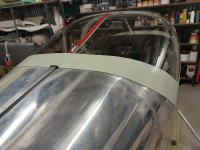
Windscreen complete
Hi Dan, we'll see if mine seals OK in flight! There are some historical posts on VAF about how to seal if there is a gap and somebody posted success by using a piece of soft vinyl adhesive strip that is loose on one edge, kind of like the baffle seals in the engine bay. The air pressure pushes the vinyl against the fuselage skin to make an effective seal.
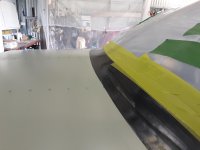
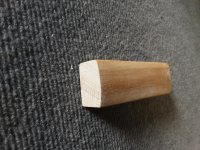
I've completed the windscreen and did it the traditional way per the plans using screws and fiberglass and epoxy for all of the fairings. It was very time consuming between waiting overnight for epoxy to cure and then subsequent sanding and filling. The epoxy is tinted black so that the underside that is visible from the inside is inconspicuous. Most of the sanding was done with a small 1.5" wide wooden block that has one face shaped to a 4" radius. I didn't want to use a full round 4 or 5 inch pipe due to the risk of inadvertently scratching the plexi.
If I was too do anything different "next time" (i.e. never!) I would lay up the fairing foundation with a couple of 1.5 strips of very fine bias or crow foot fabric. I found it a bit awkward following the plan recommendations to start with a narrow strip of fabric and then put on progressively wider strips of fabric. The final widest strip of fabric is intended to butt up against the electrical tape border and that is a bit tricky do a neat job with the 6 oz or 9 oz cloth.
The windscreen was initially glued in at the sides on the inside face with Fixtech FS200 adhesive (similar to Silpruf) to hold it in place while being glassed in. The glareshield was painted black before attaching the windscreen.
Th next task on the list is the empennage fairing.
Nice work on that skirt Paul.
Mine were made using aluminum, and don’t fit the contour as closely as yours… the resultant being water getting sucked in when flying thru wet atmospheric conditions. I’m still working on the most suitable seal.
Hi Dan, we'll see if mine seals OK in flight! There are some historical posts on VAF about how to seal if there is a gap and somebody posted success by using a piece of soft vinyl adhesive strip that is loose on one edge, kind of like the baffle seals in the engine bay. The air pressure pushes the vinyl against the fuselage skin to make an effective seal.
I've completed the windscreen and did it the traditional way per the plans using screws and fiberglass and epoxy for all of the fairings. It was very time consuming between waiting overnight for epoxy to cure and then subsequent sanding and filling. The epoxy is tinted black so that the underside that is visible from the inside is inconspicuous. Most of the sanding was done with a small 1.5" wide wooden block that has one face shaped to a 4" radius. I didn't want to use a full round 4 or 5 inch pipe due to the risk of inadvertently scratching the plexi.
If I was too do anything different "next time" (i.e. never!) I would lay up the fairing foundation with a couple of 1.5 strips of very fine bias or crow foot fabric. I found it a bit awkward following the plan recommendations to start with a narrow strip of fabric and then put on progressively wider strips of fabric. The final widest strip of fabric is intended to butt up against the electrical tape border and that is a bit tricky do a neat job with the 6 oz or 9 oz cloth.
The windscreen was initially glued in at the sides on the inside face with Fixtech FS200 adhesive (similar to Silpruf) to hold it in place while being glassed in. The glareshield was painted black before attaching the windscreen.
Th next task on the list is the empennage fairing.
Attachments
PaulvS
Well Known Member
Pants on 380x150-5
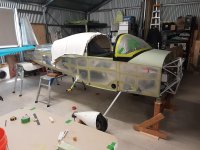
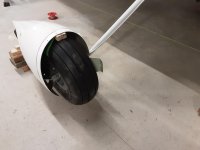
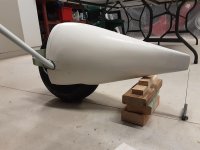
The empennage fairing is done and I'm now working on fitting the wheel pants to the oversize 380x150-5 tires. It's easier to do this now before the engine is mounted, since that would make the fuselage heavier to lift off the ground.
There's a fair bit of trimming and fiddling to get the pants aligned and mounted onto the brackets. It looks like a significant gap greater than 1/4" between the inner brackets (U-810) and the fiberglass so that will need either fiberglass buildup or modifications to the brackets.
The wheel pants are going to fit OK over the bigger tires. I've made the top clearance spacer block 3/4" instead of 1" and the centre line of the pants is 9.25" above the floor instead of 8 5/8".
It's Xmas Eve here, so festive greetings to everyone who is celebrating!
Attachments
PaulvS
Well Known Member
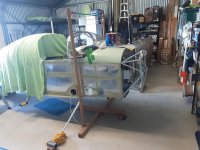
The wheel pants have been fitted and the intersection fairings were also made while it was easy to lift the fuselage and align everything in the flying position. I'll make another post with photos of the details. I'm glad to be doing something other than fiberglass next. I don't mind the process too much other than it is very time consuming.
Today I got ready to start working on the engine installation. The shop has been rearranged for better access to the fwd end and I shifted the engine from the store room to the workshop. This is a mid-time O-320 that has been rebuilt a while ago and I need to refresh the fuel pump, carburetor and magnetos.


Today I got ready to start working on the engine installation. The shop has been rearranged for better access to the fwd end and I shifted the engine from the store room to the workshop. This is a mid-time O-320 that has been rebuilt a while ago and I need to refresh the fuel pump, carburetor and magnetos.

