

georgemohr
Well Known Member
Hi team RV,
As a new builder, one of the scariest decisions we make is our solution to the "primer wars". I want to report my results for our approach, which TLDR; turned out great.
Lets assume you have decided to prime. You are now confronted with the following challenges:
After some experimentation with other products, my partner and I settled on this product.
https://www.semproducts.com/product/self-etching-primer/primer
Here are the advantages vs other primers:
The negatives are limited to cost. The spray cans can be had for about $20 as of this writing. You will need a lot of them")
The best part of this approach is convenience. You will discover that priming is not a monolithic step comfortably stuck in the middle of a component build. It is instead better understood as an incremental step in the preparation of a part or set of parts. There will be times when you'd love to prime just one or two items, but have a ton more work to do before you can arrange a big batch. Sometimes you might want to prime just one area of a full part. Are you really going to go mix a batch, prep the gun, clear out the spray facility, shoot it, clean the gun, clean the booth, blah blah? Primer convenience is really important!
Second, and this is pure personal choice, we decided to spray all internals (ribs, spars, stringers, etc.) but only prime skins on the faying surfaces. And a really nice way of applying the primer to the skins is a disposable foam brush. SEM comes in both forms, so it's perfect here.
Our process is:
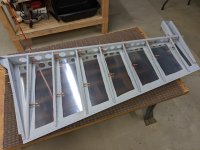
I've attached a couple of photos to show our results. Obviously I can't provide any long term data on durability or corrosion prevention, but I have faith based on my testing that this primer is really adhered well and should meet our needs.
Hope this helps someone stuck in analysis paralysis like I was!
-George
As a new builder, one of the scariest decisions we make is our solution to the "primer wars". I want to report my results for our approach, which TLDR; turned out great.
Lets assume you have decided to prime. You are now confronted with the following challenges:
- What equipment and facilities will I need access to in order to apply primer?
- How toxic is this stuff?
- How durable is this stuff?
- How quickly does it dry to a 'handling' state?
- How will I integrate priming into my construction workflow
- How hard is it to source this stuff?
After some experimentation with other products, my partner and I settled on this product.
https://www.semproducts.com/product/self-etching-primer/primer
Here are the advantages vs other primers:
- No gun to setup, calibrate, clean, fuss with (but you can shoot it through a gun if you insist)
- No need to mix or thin, which to me is an occult skill akin to witchcraft
- Very quick and convenient to turn around a primed part in small batches
- Ability to partially prime, or touch-up prime a part
- VERY durable finish
- Extremely easy to apply
- Fast handling time (10 min or so!)
- Can be sprayed with a 3M respirator safely
- Available in cans for brush application
- Available for purchase almost anywhere, Amazon, Walmart, etc.
- Two coats are just translucent enough to still see all of your markings under the primer (this is not a small thing!)
The negatives are limited to cost. The spray cans can be had for about $20 as of this writing. You will need a lot of them
The best part of this approach is convenience. You will discover that priming is not a monolithic step comfortably stuck in the middle of a component build. It is instead better understood as an incremental step in the preparation of a part or set of parts. There will be times when you'd love to prime just one or two items, but have a ton more work to do before you can arrange a big batch. Sometimes you might want to prime just one area of a full part. Are you really going to go mix a batch, prep the gun, clear out the spray facility, shoot it, clean the gun, clean the booth, blah blah? Primer convenience is really important!
Second, and this is pure personal choice, we decided to spray all internals (ribs, spars, stringers, etc.) but only prime skins on the faying surfaces. And a really nice way of applying the primer to the skins is a disposable foam brush. SEM comes in both forms, so it's perfect here.
Our process is:
- Prep parts by drilling, deburring, fluting, dimpling etc. to the greatest extent possible before riveting anything together
- Scuff the parts with scotchbright or sandpaper. You can skip this step and still get an acceptable result for internal parts but go through effort and scuff for greater adhesion
- Wash the parts in dawn and water, and let THOROUGHLY dry
- Cart the parts outside to a cheap plastic table
- Shoot (or brush) two coats on all surfaces about 10 min apart
- Let cure, if possible overnight
- Proceed to rivet
I've attached a couple of photos to show our results. Obviously I can't provide any long term data on durability or corrosion prevention, but I have faith based on my testing that this primer is really adhered well and should meet our needs.
Hope this helps someone stuck in analysis paralysis like I was!
-George
Attachments


Last edited:

