What's new
Van's Air Force

Don't miss anything! Register now for full access to the definitive RV support community.

Strategy needed for part identification that survives priming

DonMcKee

Member
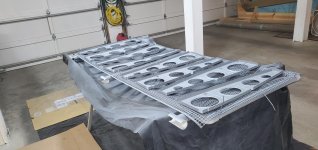
The parts for my vertical and horizontal stabilizers are ready for priming and assembly. I'm planning to start with Stewart Systems water-based EkoPrime.

I have no experience using a spray gun, and it's been awhile since I've done any practice riveting, so I decided to build another practice kit (flap) to test my end-to-end process. I've been diligent about marking my parts as I go with blue Sharpie (part #s, witness marks, etc.), and was worried what would happen when I got to the priming step. Well, I found out. :(

I need a strategy for IDing parts that survives priming.

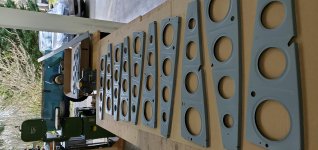
First, here's what I did: mark my parts; scuff for priming; re-mark my parts; clean for priming; re-mark my parts; etch for priming; re-mark my parts; solvent wipe for priming; re-mark my parts (where I could discern my old marks, anyway); spray primer; try to figure out what's what. :eek:

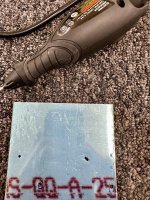
After spraying, I had a few parts that I could just barely make out my marks. I don't know if that was just the right amount of primer to use, or not enough. If the later, I suppose that I could add more "marking" steps between light dustings of primer, but there's gotta be a better way.

Do you have any suggestions, or pointers to suggestions?
 
1. After clean and prep, just before spraying primer, write the part number on with blue sharpie ( I don't know why, but blue works best). Let it dry for a couple of seconds. Now it will bleedthrough self-etching primer like SEM.

2. To identify left from right mirror image twins, put a single light punch mark in a conspicuous location on one. (I always put it on the left).

3. Spray in sets (all left set, all right set, etc...) keep the parts separated till primer is dry. Then remark part # with sharpie.
 
I placed the parts for spraying in the logical way they went together.
Left rib is on the left, right rib on the right, yada yada....
 
I use Ekoprime as well (love it). It does indeed cover Sharpie marks more than every other primer I've tried though. I originally bought a box of a billion cheap paper tags thinking I'd tag the parts since the Sharpie gets covered up. What a waste of time. It's completely unnecessary. I think I've used two tags. For parts that actually need a mark to keep straight, like ribs, after etching and cleaning I usually just mark them with a number that I also mark on the plans themselves (so ribs are Left 1,2,3,4... and I write on the plans to show if I started "1" on inboard/outboard). I spray in order and lay them down in order on a piece of cardboard that I mark with the number. Then when parts are dry enough, just transfer the mark back to the part. No reason to complicate things.
 

Attachments

  • 20220206_141450.jpg
    20220206_141450.jpg
    255.4 KB · Views: 54
  • 20220206_150845.jpg
    20220206_150845.jpg
    264.4 KB · Views: 45
https://vansairforce.net/community/showthread.php?t=79959

I tried sharpies and tags and punch marks. The vibrating engraver was the most practical way. Marking it as I removed the Vans Tag. Taking the time to think where the best place is for the marking. There is probably some best stylus radius. It’s real easy to lose track of complicated assemblies with similar parts during prep, coating or assembly.
 

Attachments

  • IMG_0229.jpg
    IMG_0229.jpg
    715.1 KB · Views: 52
  • IMG_0230.jpg
    IMG_0230.jpg
    623.4 KB · Views: 63
Last edited:
I took twist-ties, removed the plastic, and then slipped little cardboard labels through them. Marked each cardboard label with what the part was, and looped the twist-tie through one of the part's rivet holes. The label survived priming and once dry, I re-sharpied the part.
 
Labels

Tons of options. P60G2 is translucent so I didn't have issues with marks getting covered.
I marked with sharpie on fay surfaces in two places. My OCD. I don't want labels visible. If one disappeared, the second was visible enough to remark both. They would get pretty light after all the prep steps so I just remarked them before paint.
I used the scrap aluminum tag process with wire a few times too. After a while I realized the only parts that needed markings were identical stuff like ribs. If it was unique, no label is required. It only fits one place.
 
Automatic Center Punch

I used an automatic center punch set to a shallow setting and came up with a simple system of dots.
One dot was left side parts, two dots was right side parts.
Below the first set of dots I had addition dots for 1st, 2nd, 3rd, etc. rib out from the center. It got complicated with the wing ribs; lots of dots.
 
Be very careful where you do the engraving - we don't want cracks to start in our non-LCP parts, now, do we?

Blue Sharpie shows through a thin coat of SEM.

Given today's parts environment, most part number tags include the date made. Good diea to include that with the part number on the part.

Dave
 
Thanks for all of the suggestions. I look forward to incorporating some of them in my next priming session, and figure out what works best for me!
 
Get a box of small multicolored cable ties. Red for left, green for right, etc. Easy to install in rivet holes or whatever is handy.
 
I use small copper wire, masking tape . Mark the masking tape, then cover the masking tape with clear tape. Survives alumni prep and Alodine and the primer falls right off the clear tape. Takes a bit of time but works.
 
Dremel with a small spherical carving tip. Print the p/n lightly near the center of the part. Note parts that might be visible when complete (cockpit interior, etc.) and mark the backside/least visible side of the part.
 
I made a set of number tags with small aluminum squares and number stamps. Drilled a small hole in each tag, then made a wire hook for each tag out of safety wire (Christmas tree ornament hangers work too), and then hung them on each part in the paint booth. I wrote a short list of the parts I was priming and the associated number tag, and then re-marked the parts with Sharpie after the primer had dried/cured.
 
I use a number 40 drill and put the smallest mark that paint won’t fill on the left hand parts only. I pick a position for this that will be between Fay parts. The depression is not sharp after running over with scotch brite not will it affect strength.
 
Back
Top