What's new
Van's Air Force

Don't miss anything! Register now for full access to the definitive RV support community.

STARTER DIODE INSTALLATION.

Graham

Active Member
Folks,

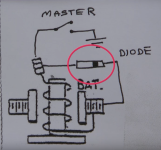
Being close to Engine runs I am belatedly endeavoring to install the Starter Contactor Diode in my VERY slow build RV6.

Somehow, (lost in history) I ended up with an Aircraft Spruce supplied contactor Diode rather than the Vans supplied (Blue) ES DIODE STARTER.

The Spruce supplied diode is too short by about 0.5 inch, being approx. 3.4" long center to center.

I suspect that the VANS supplied Contactor (1999 Kit) is sightly fatter than the "standard" ACS contactor.

Has anybody else come across this situation?

i would be very grateful if somebody plse measure the center-to-center length of a Vans starter Diode for me.

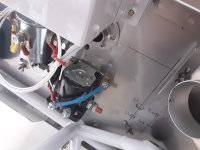
You don't want to know how much fun it WASNT to try & install the diode AFTER engine installation, especially on a taildragger which has a much more complex engine Mount that gets in the way of EVERY tool.

I had to shorten a ratchet ring/open ender, but then when the bolt got wound out a bit the rachet end jammed on the contactor body & of course being a ratchet you can't tighten it up at that stage. Talsk about Catch 22.

Result, need to undo more fasteners at about 45 degrees per turn available........ You probably heard me cussing from the USA.
 
Hi Graham
I have the Van's diode, it is just over 3 inches eye-eye. It was too short and I made up the difference with a bent copper tab strip bolted between the solenoid mounting bolt and the end of the diode.

It's probably not too difficult to make up a diode assembly using the correct spec diode from an electronics shop and some wire, solder, eyes and heat shrink. Nuckolls manual will have the spec I would think.

Regards
Paul
 

Attachments

  • 20231128_134903.jpg
    20231128_134903.jpg
    219.9 KB · Views: 187
Last edited:
Nothing special about the diode that couldn't be sourced from a local hobby store. Someone here will probably know the specifics. If not, call the nice folks at B&C products (bandc.com). They'd probably tell or sell one to you. Theirs appear to be "locally" conveniently sourced with PIDGs terminals crimped on.
 
Diode

Here is a diode that works 1N5404. You can pick 50 up on Amazon for about $5.
 
Can you do this with your diode to make it reach? Digikey sells them for $0.14 each but shipping then kills you. Looking at my receipts, I ordered 10 diodes on eBay for $3 total and I'm sure eBay delivers down there.

Clarification: It's basically the same diode but I ordered 1N5400 when I had the 12v plane and now just ordered 50 of the higher voltage 1N5402 for $5.99 because I have a 28v system plane.
 

Attachments

  • Screenshot 2023-11-28 at 8.42.21 AM.png
    Screenshot 2023-11-28 at 8.42.21 AM.png
    1.5 MB · Views: 39
  • Screenshot 2023-11-28 at 8.44.58 AM.png
    Screenshot 2023-11-28 at 8.44.58 AM.png
    1 MB · Views: 19
Last edited:
Did you see where he lives? What's "conveniently local" for us might not be for him. Does Amazon deliver in New Zealand?

Will guarantee a hobby shop, electronics store, etc. will be an easier source than Spruce, Vans, etc, I'll state again. There's nothing special about the diode.
 
No need to over think this. Cut one lead in the middle, put back together with a 1” long insulated crimp connector.
 
New Zealand and Australia are both semi civilized and industrialised countries with infrastructure.

The 1N5404 diode is available in NZ at local store e.g. Jaycar electronics for $0.48 NZD, if Graham wants to make a new one. I would just use a lug that is matched to the size of the eye on the existing diode assembly (per post #2).

https://www.jaycar.co.nz/1n5404-3a-400v-diode/p/ZR1014
 
STARTEER DIODE INSTALLATION

To build an aircraft you need infinite patience and the ability to "Roll with the punches". You also need some great mates.
Spent several hours this week installing a little (3inch long) wire embodying a Diode, across the coil of my starter solenoid, (contactor).
Of course, I should have done this YEARS ago, but for some reason didn't.
The Diode is wired to ground at one of the two the contactor to firewall attach bolts. Went for the LH bolt as it is not buried under the contactor body like the RH one.
To turn this, I had to cut a 3/8" AF ratchet ring spanner in half but guess what happens as you undo the bolt. The spanner jams agin the body and CANNOT BE MOVED. (And of course, the ring ratchet can't be reversed in situ). So now we need to release the RH contactor bolt after all, which is almost under the body & this requires a ring spanner turning only about 30 deg at a time, plus the access is very bad. Made worse by my Engine Mount having many more tubes than other models as it supports the MLG (being a taildragger). Eventually the contactor detaches from the firewall and the cut down spanner falls out. Then guess what, the diode is too short to attach to the LH bolt anyway.
So, then we tried it on the now released RH bolt, and it JUST fits. Reinstalling the RH bolt partially under the body is very tricky, but Rex managed it after my unsuccessful attempt.
What should have been a 1/2 hr job done at the correct stage took MUCH longer. You may have heard me cussing & the tools falling.
C'est la vie.
 
I built my -7 in 2004.

After reading this thread, I'm 90 percent sure that I don't have a starter diode.

What is its purpose?

sign
Uneducated Diode Person
 
To build an aircraft you need infinite patience and the ability to "Roll with the punches". You also need some great mates.
Spent several hours this week installing a little (3inch long) wire embodying a Diode, across the coil of my starter solenoid, (contactor).
Of course, I should have done this YEARS ago, but for some reason didn't.
The Diode is wired to ground at one of the two the contactor to firewall attach bolts. Went for the LH bolt as it is not buried under the contactor body like the RH one.
To turn this, I had to cut a 3/8" AF ratchet ring spanner in half but guess what happens as you undo the bolt. The spanner jams agin the body and CANNOT BE MOVED. (And of course, the ring ratchet can't be reversed in situ). So now we need to release the RH contactor bolt after all, which is almost under the body & this requires a ring spanner turning only about 30 deg at a time, plus the access is very bad. Made worse by my Engine Mount having many more tubes than other models as it supports the MLG (being a taildragger). Eventually the contactor detaches from the firewall and the cut down spanner falls out. Then guess what, the diode is too short to attach to the LH bolt anyway.
So, then we tried it on the now released RH bolt, and it JUST fits. Reinstalling the RH bolt partially under the body is very tricky, but Rex managed it after my unsuccessful attempt.
What should have been a 1/2 hr job done at the correct stage took MUCH longer. You may have heard me cussing & the tools falling.
C'est la vie.

Get yourself one of these and one of these and a set of these (or similar).

As you've already discovered, there's not a lot of room to maneuver large tools firewall forward, especially behind the conventional gear engine mount.

I'm learning to maintain my plane as I go but I've already determined a good selection of 1/4" drive tools, extensions and various wobbles and universal joints are the key to minimizing frustration.
 
...After reading this thread, I'm 90 percent sure that I don't have a starter diode. What is its purpose?

I didn't have one in the plane I just bought either, but that was the least of my issues with it :D so I ordered some diodes to install.

Here are two videos I saw which explain very clearly yet he places the diode on the positive side, so we'll see what gives after a little more research :

https://youtu.be/bvDuyM2e4gw?si=lSSfQgbyeTPs5VsS

https://youtu.be/7FSK1JblQaE?si=hUb5pDnR-x21AxYU

If your 10% comes through and you end up needing one, PM me your address and I'll throw one in an envelope to you.
 

Attachments

  • Screenshot 2023-11-29 at 8.02.55 AM.png
    Screenshot 2023-11-29 at 8.02.55 AM.png
    1.9 MB · Views: 11
Last edited:
STARTER DIODE INSTALLATION

Folks,

Thanks for your various well thought out responses.

In the end we attached the diode at the RH attachment bolt, rather than the LH one. Although the LH bolt does have better tool access.

Even then it is a real tight fit & the diode is rather close to the Bus bars between contactors.

I have a longer unterminated Diode coming from Vans so shall probably replace the current diode with the longer one & attach it to the LH bolt.

Yes, we do receive stuff regularly from the "rest of the world" & we are VERY civilized. i.e. we DONT drink Bud beer.
 
Back
Top