What's new
Van's Air Force

Don't miss anything! Register now for full access to the definitive RV support community.

SB-00070 Updated to include RV-12iS

greghughespdx

Well Known Member
Advertiser
Van's has updated Service Letter SL-00070 to Revision 1, adding support and approval for the RV-12iS to the document.

Optional Fuel Tank Inspection Fitting
Describes the addition of a fitting to the top of the RV-12 fuel tank to allow for easier inspection of the fuel strainer. Revised 11/7/2023 to include the RV-12iS tank.​
 
Minor correction:

Fig 3 shows the FWD arrow pointing AFT, not FWD.
Pretty obvious for most builders, otherwise a good addition for the iS.

Cheers!
 
Wouldn't you know it. I bought that kit when the SB was first announced, then returned it when I realized it didn't apply to the iS. Now I need to order it again.
 
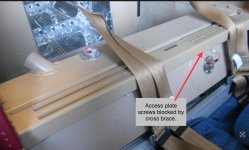
I have to wonder if Van’s has installed this in an iS fuel tank, as a major step has been omitted…. One can not remove the fuel-sender mounting plate without removing the fuel tank. The cross brace blocks access to the upper mounting screws

I had intended to install this when the SL for the ULS came out and ran into this little roadblock. So, if any iS owners figure out a way to do this without having to remove the fuel tank, please share your method, as I’d love to install this.
 

Attachments

  • IMG_1275.jpg
    IMG_1275.jpg
    266.2 KB · Views: 181
Last edited:
I have to wonder if Van’s has installed this in an iS fuel tank, as a major step has been omitted…. One can not remove the fuel-sender mounting plate without removing the fuel tank. The cross brace blocks access to the upper mounting screws. Plus the absence of dimensions for locating the inspection fitting.

I had intended to install this when the SL for the ULS came out and ran into this little roadblock. So, if any iS owners figure out a way to do this without having to remove the fuel tank, please share your method, as I’d love to install this.

In order to remove the fuel float cover from the RV-12iS tank, you will need to detach the tank and move it to allow you to gain access. Similar steps to the RV-12, not identical since they're dimensionally different. This is a one-time requirement. After that, you inspect from above.
 
Last edited:
Thank you for creating this, so the fuel tank doesn’t have to be removed. Much appreciated! :)

On page 2 of 7, the instructions say to look in Section 5, Section 37, but I only see 5.27 FLUID FITTINGS which seems to apply. Or did I miss something?
 
Greg , Another correction to the Service Letter, me thinks:

For the iS -

Step 11 Should read:
"Reinstall the T-1209 Res Sender Plate as described in KAI Section 26iS/U-07 Step 6", NOT Section 37. Section 37 deals with the Cowling.

Cheers!
 
We intentionally updated with the statement that the installation for the 12iS is similar, rather than writing separate instructions. Given everything we are doing here these days that's the best way we can get it out rather than waiting. :)
 
I started building my 12iS fuel tank the day after Van’s released this update, and immediately ordered the kit, but now I’m reconsidering… In the maintenance manual (rev 3.8), I see where it says that we’re to “clean & inspect [the] fuel tank finger strainer … one time per year” with a reference to page 3-8. Page 3-8 doesn’t talk about the strainer, but 3-10 is the only place where I found a mention of this: under “Coarse Fuel Tank Screen Removal,” step 5 says “Clean the screen and inspect same for breakage or separation from fitting.”

The service letter says this new port enables use of a borescope to inspect the screen, but couldn’t I feed that same borescope down the fuel inlet to accomplish the same thing, or does the geometry of the corner at the skin prevent that?

I don’t mind the extra work of installing this port, or the cost of the kit, but I’m concerned about another potential leak spot, especially right where the T-01233 tube will spray it with the returned fuel flow from the engine.

So, 12iS owners who’ve done a few condition inspections: if you were building your tank today, would you install this kit? Have you found crud requiring cleaning, and did you have to remove the tank to do it, or could you remove the screen fitting via the bottom-skin access panel?

Thanks!
 
I’ll share my thoughts with you…. Yes, I would do it now before installing the tank. I have the kit, waiting for another reason to remove the tank from my aircraft before installing it. I have tried three different types of borescopes with no success reaching the finger strainer. I had to replace my fuel sender once, so took the opportunity to scope it then, but that’s the only time I’ve been able to see it. And no debris were seen. I did get a good bit of Scotchbrite particles in the course filter ahead of the pumps, but nothing large enough to stick in the finger strainer.

I see a couple of negatives regarding installing this. First, to get behind the baggage bulkhead for maintenance you’ll be laying or crawling right over this protrusion, so will want to pad it for maintenance. Second is if you go with the full interior package, the baggage compartment cover runs up over the top of the tank, so you’ll need to cut a clearance hole in the carpeting. I plan to do so by temporarily installing the tank after cutting the hole for the fitting, but before installing the fitting and using the hole as the template for marking the underside of the covering from inside the tank.

And I’m not worried about leakage, as it’s pretty high and don’t think the return fuel flow will get close enough to the fitting to worry about pressure leaking at the fitting threads.

Anyway, these are my thoughts, as I would recommend installing the mod before you install the tank.
 
Last edited:
Could anyone who has done this SL-00070 work tell me how you removed the T-1209 Res Sender Plate? The sealant has it attached so securely, I'm afraid I'll destroy it and maybe the tank, trying to get it off.

thanks,
CT Cole
 
Place a putty knife at the edge of the plate and tap it with a hammer to break it loose.
 
Last edited:
Could anyone who has done this SL-00070 work tell me how you removed the T-1209 Res Sender Plate? The sealant has it attached so securely, I'm afraid I'll destroy it and maybe the tank, trying to get it off.

thanks,
CT Cole
Years ago when I had to disassemble my RV-6A tanks someone recommended making a tool from a hacksaw blade. Grind off the teeth and form a rounded but thin, sharp edge. That worked then, and with my RV-12 tank. The KAI says to put a bevel on the back side to facilitate getting a tool in there. My factory tank had no bevel but I eventually found a spot where I could get the tool in. Once you get it started it's not too bad. I tried cutting the hole with the tank upside down but the chips still went everywhere and I had to remove the sender plate anyway.
 
The trick turned out to be HEAT (thanks to an old VAF thread!) -- hair dryer, too hot to touch, then the sharpened putty knife. I'm working in an unheated garage in Duluth.

--CTC
 
Years ago when I had to disassemble my RV-6A tanks someone recommended making a tool from a hacksaw blade. Grind off the teeth and form a rounded but thin, sharp edge. That worked then, and with my RV-12 tank. The KAI says to put a bevel on the back side to facilitate getting a tool in there. My factory tank had no bevel but I eventually found a spot where I could get the tool in. Once you get it started it's not too bad. I tried cutting the hole with the tank upside down but the chips still went everywhere and I had to remove the sender plate anyway.
My 2013 factory-built 12 tank had no space to get a screw driver or putty knife in under the sender plate. The slightly bent hacksaw blade trick mentioned by mbell and recommended by Van's Support worked for me but it still was very tough. I am sure that using spacers to maintain sealant thickness at 1/16" will make future removal much easier.
 
I am building an RV-12iS and the fuel tank was completed several months ago. So, it was already out of the plane and had no fuel in it when I accomplished SL-00070. The screws came off with some effort but I did have the screw driver slip on a few of them. I had put the slope on the edge of the sender plate when building the tank. I sharpened a 1 inch putty knife to a very sharp edge and was able to work it under the plate to remove it. I did not use heat. I was able to remove the sealant with some scotch brite type dremel wheels. They were bought on Amazon and are very cheap. I went through several but it got the sealant off and gave me a nice shiny surface on both parts. I did use new screws to reattach the plate.

The entire job took just over 2 hours. I was very surprised how quickly it went. But again, no tank removal or fuel removal. I re-pressure tested the tank with a rubber glove and all seems well.

Henry
 
Last edited:
Back
Top