What's new
Van's Air Force

Don't miss anything! Register now for full access to the definitive RV support community.

PAINT Aircraft Disassembled Before Flying or After Assembled and Flying or MIx of Both

gmcjetpilot

Well Known Member
I have researched it and 100% going to paint my plane DIY. That is done deal, design, prep, prime, paint materials, equip, most of the technique**..... The question is who has painted BEFORE they flew fully or partially disassemble (before wings going on).
** (Painting bottom or wings, horz stab, bottom fuselage is a bit of a challenge TIPS welcomed, equip and technique ?)

I have been around aircraft paint shops and watched videos over the years. Obviously when painting a plane all flight controls come off, cowls, fairings... etc. get painted separately. That is no different and always done. Far more common to paint assembled in the re-paint industry and I new aircraft manufactures.... So I am leaning towards prime and paint after flying. PS...

Priming whole outside or plane before assembly and flying. I decided against that except for fiberglass cowl and fairings. Why? You need fresh clean primer to paint onto. I would rather start with bare aluminum, prep (etch alodine), prime, top coat process all in one span of time. YES you can scuff up primer, shoot sealer on it, than paint. I don't see too many fully primed RV"s. It is naked or painted typically. What did you do?

SO WHAT sequence did you use to paint, exterior top coat your plane?

PS
Last RV I built I had Pro painted because I did not have time or space, and a good paint shop was on the field. I recall I paid $6K back then (mid 1990's). They quoted $4K but jacked up the price, ended up $6k. I had about $38K into the plane, and yes I flew it naked for a long time. It has one advantage. After flying for a year or more, I changed the cowl induction scoop and airbox, changed gear leg fairings and wheel pants. If I had painted the whole plane right away, it would require re-painting. The $6K at the time felt like too much but the results were excellent. A paint job like that today as I understand it would be $18K to $20K? If it was still $6K I'd pay to have it done. On the other hand I hear horror stories of "pro paint" going really bad. I will DIY this paint because I want to learn (re-learn) and not going to pay $20K for paint. I estimate all materials will be $2k to $3k (I already have good compressor, spray guns). That extra extra money savings is going to be for fuel. :)
 
Last edited:
I built my -4, doing everything DIY including paint. I did all my paint prior to first engine run and flight. Many folks comment on "needing to remove panels" during phase 1" and not damaging paint. If you build correctly, allow the proper gaps where paint will cause issues there is no reason not to. Once your flying and have oil, dirt, ect to clean up after the prep becomes worse. I assembled mine temporarily, did all the rigging and made sure my cowling conflicts were non existent...then took apart and painted. I left my wings and stabilizers attached. I did 3 separate shoots, the first was fuselage with wings, interior and stabilizers masked off, then did the second with fuselage masked and wings/stabilizers being painted. The 3rd shoot was cowlings, flight controls, fairings and panels, ect. 12 years of flying and paint is still pristine, and I would do it that way again. I saved a ton of money and didn't have to take apart a dirty flying airplane.
 
I have researched it and 100% going to paint my plane DIY. That is done deal, design, prep, prime, paint materials, equip, most of the tehnique**..... The question is who has painted BEFORE they flew fully or partially disassemble (before wings going on).
I have done it both ways, RV-8A after Phase One, RV-10 before the airworthiness inspection, RV-8 after Phase One. There are pros and cons for each. But to your specific question all were painted with all control surfaces, fairings and wings removed.

For the fly then paint planes, the fiberglass parts were finished and primed (cowl inside and out). They got a light sanding before final paint. The aluminum was bare. Here pay close attention to cleaning the skins to remove contaminates. If not you will immediately find the bad spots as soon as you hit them with primer.

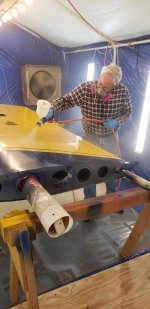
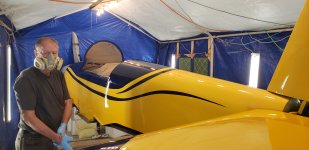
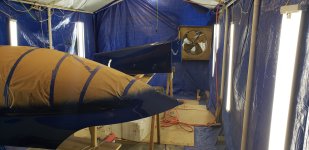
The booth was built in my hangar. It worked very well but was no where near big enough to fit the plane in with wings attached (nor would I want to). I found the bottom of the fuselage to be the biggest PITA, so I can only imagine how bad painting the bottom of the wings while still on the fuselage would be. With the wings off it is easy to flip them around between two tall saw horses to paint each side.

Taking wings off of an RV-10 or 14 is easy, the RV-8 is harder but not impossible. While I painted the first three builds myself, I’m looking for a paint shop that will do the new RV-10.

Side note - the other big pro for flying then painting is if you end up with a weeping gas tank rivet. I only had one (first build) but easy to fix before paint.

Carl
 

Attachments

  • 20201023_110647.jpeg
    20201023_110647.jpeg
    1.2 MB · Views: 55
  • 20201020_203907.jpeg
    20201020_203907.jpeg
    1.2 MB · Views: 53
  • 20201028_220858.jpeg
    20201028_220858.jpeg
    1.5 MB · Views: 51
  • 20201105_133653.jpeg
    20201105_133653.jpeg
    1.5 MB · Views: 51
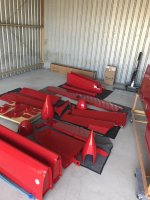
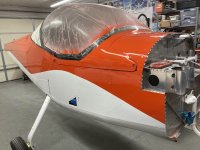
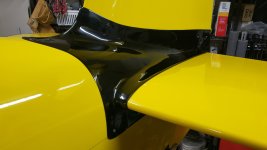
I hate overspray and it was so much fun to put it together when the parts look like this. I didn’t scratch anything. To Carl’s point I did develop a fuel leak after a few hours and the stains are there but on the bottom.
 

Attachments

  • IMG_3792.jpeg
    IMG_3792.jpeg
    1.3 MB · Views: 72
I had a customer one time bring the airplane on a trailer in pieces. Not a single second of flight time. I asked if it would better to fly first just to make sure everything was OK. He told me everything was fine because he built it right. After the job was finished and he started flying, he found that it needed some trim to fly wings level. He tried pinching the trailing edge of one aileron and ended up ruining the part. A new aileron had to be built and he got to spend more money having it painted.

As to priming the airplane or not. If you bring a primed airplane to me for paint I’m going to have to remove all the primer and start over. I have no idea if the primer was or was not applied correctly. To warranty the final product I have to know everything about the entire process. Other shops might do things differently.
 
I am cheap so I pained the entire airplane in the backyard and the driveway before trucking the pieces to the airport. I wasn’t planning to hire a pro so it was an easy choice for me. I see a lot of bare aluminum RV that flew to the Corona paint shop after they were done with their phase 1 .
 
Another data point. It's done, but not airborne. Fiberglass is all painted. Tips and fairings all done. Aluminum is Alodined and vinyl wrapped. Inside of fiberglass is coated with neat epoxy. Cowl was painted inside after the epoxy with 2K epoxy white primer then the fiberfrax and Vans foil.
So far one mess up. I installed the bottom rudder fairing incorrectly and had to refit. I assumed the fairing was correct. Stupid. It was at least 1/2" too low and hit the fuse. So, one part needs a re-paint. Otherwise it's ready.
 
As an amateur, I'd much rather paint in pieces. Much more controllable in small quantities (less masking, less overspray, etc), and if the compressor goes unserviceable during a shoot, you don't lose a bunch of paint.
 
Painted before engine run with wings off and everything apart. Fuselage and each wing on separate rotisserie made very easy to paint in a small home made booth in my hangar. Prep was simple, parts clean when primed/painted, and never worried that I might need to change something that would mess up the paint, and never had too.
I would do it exactly the same if/when I build again.
 
I‘m building my 6th plane and I’m unconventional. Once parts are finalized and fitted I typically prep the aluminum and fiberglass and then epoxy prime and store covered for some builds for years. If there is any storage damage it is easy to fix and then sand for final paint. That way the parts are fully corrosion protected. I then typically finish paint the wings and tail in the Fall and then the fuselage and remaining after Winter work the next Spring. The current 12 is $2800 in materials and over 200 hours in aluminum and fiberglass parts prep and painting. All done except cowling.
 
I painted everything before flying. I built a paint booth and filtered the incoming air and then used paint booth filter material to catch the overspray. One blower was used to pressurize the booth and a second, explosion-proof blower was used to exhaust the paint fumes.

My routine was to do an alkaline rinse with Scotchbrite scuffing and then a thorough cleaning with acetone and/or alcohol. Then PPG adhesion promoter was lightly applied with a sponge, followed by two coats of PPG epoxy primer. Finally, 3 coats of each color PPG paint. The whole process took me about $3k in paint and about 7 months and 400 hours of my time. Because of limited space, I had to paint a few small pieces at a time, and then one wing at a time, and finally the fuselage. Wings and fuselage were painted with a rotisserie.

The RV-14A has been flying for two years and the paint still looks great.
 
Either way is great.
It really depends on how much work comes after you have an oil leak that floods the bottom of your plane, or cowl and you get to deal with that also
It really sucks getting all the contaminants out of everywhere. Just don't put any corrosion inhibitor inside before you paint. You'll never get it all out.
You get to make the decision. Seems like painting wings off fuselage will be the easiest depending on your space.
How good of a builder are you? And did you get it right the first time. Most of us don't.
Hey you can always repaint the parts. I have. At least you'll have the experience to do so.
My luck varies FIXIT
 
I'm facing the same decision, though it seems trying to find someone who can paint even a basic solid one color scheme without absurd waiting lists and pricing is almost impossible. I'm also getting impatient this close to the end, and the thought of spending several more months and hundreds of hours on make-pretty that isn't necessary to fly is not motivational. Procrastination may well win the day.

I considered deciding to polish so I could fly "naked" and tell myself that I'd get around to polishing it "one of these days" (but in all honesty I'd likely never do it), but even that requires finishing and painting the fiberglass :confused:
Before you polish your low wing bundle of joy. You need to go fly one in the sun. You my change your mind as you get blinded by reflections off the wing.
Paint softens the glare.
My luck varies FIXIT
 
I'm facing the same decision, though it seems trying to find someone who can paint even a basic solid one color scheme without absurd waiting lists and pricing is almost impossible. I'm also getting impatient this close to the end, and the thought of spending several more months and hundreds of hours on make-pretty that isn't necessary to fly is not motivational. Procrastination may well win the day.

I considered deciding to polish so I could fly "naked" and tell myself that I'd get around to polishing it "one of these days" (but in all honesty I'd likely never do it), but even that requires finishing and painting the fiberglass :confused:
If your project is still in the garage, you can hire a car guy to paint the individual parts. This is how the aircraft people paint airplane too. All the control surfaces are removed and they paint them like car parts. The one difference is the paint hangar is big enough to move the airplane inside for paint. But if your wings are still at home, the car guys can paint them too if you can build a support structure to hold the wings flat instead of vertical. This helps the paint to flow evenly on top and bottom of the wings when you rotate them. The same with the fuselage. You can truck the fuse to the to local car guy and get it painted.

It took me more than four months to paint my plane at home. Lots and lots of wetsanding, like 90% of the time is sanding and masking.
Also, some places have rental paint booths. Other than the logistics of transporting parts (and the wings and fuse would be the biggies), that's a great option. The OP might want to check with some local auto painters to see if A) they will paint the pieces for the builder. or B) They know of a suitable rental booth.
 
Just finished my 9A, so here's a data point.

It took me 14 months to build the plane. I enjoyed every minute of it.

I decided to paint it myself. It took me 4 months to paint it. (Before final assembly) I can't say that I enjoyed it, but I learned a lot and am very happy with how it turned out. Painting is a LOT of work.
 
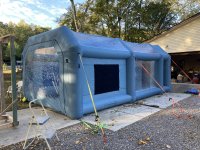
I’ve had good luck with an inflatable paint booth. Just roll it up until the next session.
 

Attachments

  • IMG_3946.jpeg
    IMG_3946.jpeg
    3.1 MB · Views: 37
  • IMG_4679.jpeg
    IMG_4679.jpeg
    1.8 MB · Views: 37
I have done it both ways, SNIP

Side note - the other big pro for flying then painting is if you end up with a weeping gas tank rivet. I only had one (first build) but easy to fix before paint.

Carl

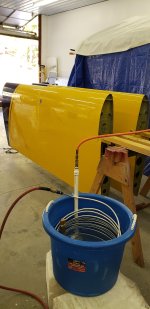
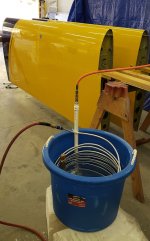
Carl what is the bucket and tube.... is that cooling your shop air?
20201023_110647.jpeg
 
Before you polish your low wing bundle of joy. You need to go fly one in the sun. You my change your mind as you get blinded by reflections off the wing.
Paint softens the glare.
My luck varies FIXIT
Most people who have been around know who Dave Anders is. He has the RV-4 that was test in one of the the Cafe Foundation's plane challanges. The results published in EAA Sport Aviation. The plane is fast, light and this RV-4 had the All-Time High Score for Combined Aircraft Performance for the “Cafe Triaviathon". (What happened to the Cafe Foundation?)

He flew for years polished. He had it at Oshkosh and was on display special spot on the flight line. Dave told the staff not to move it. Reason was sun. He had it oriented specifically relative to sun in partial shade..... They moved it and the reflection of the sun on his canopy melted it!!! He since has painted. He still posts in Kit Plane, did some fine tune cooling and engine stuff articles that is interesting. .... https://www.kitplanes.com/author/dave-anders/

If you go polished, when parking outside on sunny day, consider reflective canopy cover and how you park relative to sun.
 
Last edited:
I’ve had good luck with an inflatable paint booth. Just roll it up until the next session.
Yes that is last piece of the puzzle. Spray booth. If I did a larger inflatable it would have to go in back yard. Not loving that idea, A small one in the garage would work and lookeed at ones that fit. Most are +8' so it would just hit ceiling which may be OK. The good thing about being in garage I could tie it up. If you lose power and the booth deflates you are in deep trouble. I am most likely going to make my own booth in the garage, but the inflatable is on radar. Having a clean, well lit and ventilated booth is goodness. The booth size in garage would be limited.... A 20' L x 10' W x 9' H would just fit in my garage but tight. One wing at a time easy. Fuselage might be tight. They are sub $500. The larger ones are $1000. This is all painting sub components. Painting the whole plane needs a full hanger and inflatable booth is out. So painting parts separate gives you some control, less taping.
 
Last edited:
Yes that is last piece of the puzzle. Spray booth. If I did a larger inflatable it would have to go in back yard. Not loving that idea, A small one in the garage would work and lookeed at ones that fit. Most are +8' so it would just hit ceiling which may be OK. The good thing about being in garage I could tie it up. If you lose power and the booth deflates you are in deep trouble. I am most likely going to make my own booth in the garage, but the inflatable is on radar. Having a clean, well lit and ventilated booth is goodness. The booth size in garage would be limited.... A 20' L x 10' W x 9' H would just fit in my garage but tight. One wing at a time easy. Fuselage might be tight. They are sub $500. The larger ones are $1000. This is all painting sub components. Painting the whole plane needs a full hanger and inflatable booth is out. So painting parts separate gives you some control, less taping.
If you decide to build one. Look for some reinforced plastic sheeting. It has a netting laminated inside. I believe on Amazon. I bought 10' x 100' for my walls and it is enough to build just about any size.
Reason for clear is you can put the lights on the outside so they are not in your way inside.
Intake and explosion proof exhaust fans (possible belt drive with motor outside booth) and 4" furnace filters you have removed from your furnace.
My luck varies FIXIT
 
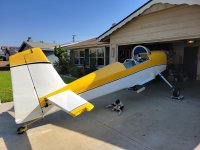
Lots of people have these complicated paint boot setup. I didn’t use any of it. The fuse was painted right in front of the garage. I sprayed down the driveway with water and by the time I started spraying paint, the driveway was dried. Yet the paint looked okay. All the empennage seen here was painted in the back patio where the grass were dead from the drought. I didnt make any special preparation other than spraying water on the dead grass and dirt. The paint came out okay too. There is an Eastwood video showing that you can paint a show car finish all in open air. My neighbor down the street painted his AC Cobra kit car on his driveway and it looks phenomenal. With the modern HLPV gun, there is very little overspray. There is a tint of yellow where the plane sat in the picture but there was zero overspray anywhere else
 

Attachments

  • fuse.jpg
    fuse.jpg
    756.8 KB · Views: 20
Last edited:
Lots of people have these complicated paint boot setup. I didn’t use any of it.
That might be what I wind up doing too. It's how I've primed everything and painted all the interior parts so far; other than the occasional bug landing on it the paint flaws are all my doing from rushing, losing focus, not being patient enough, etc.
 
If you decide to build one. Look for some reinforced plastic sheeting. It has a netting laminated inside. I believe on Amazon. I bought 10' x 100' for my walls and it is enough to build just about any size.
Great tip.... thin plastic will be unwieldy
Lots of people have these complicated paint boot setup. I didn’t use any of it. The fuse was painted right in front of the garage.
I did not want to admit but yes, done that, been there when I was a young guy hot rodding. If you are lucky, good weather, no bugs, you can get descent results. With that said painter skills are critical.
If your project is still in the garage, you can hire a car guy to paint the individual parts. This is how the aircraft people paint airplane too.

It took me more than four months to paint my plane at home. Lots and lots of wetsanding, like 90% of the time is sanding and masking.
Great tip but caution using a car guys. I know of horror stores with paint put on way to thick, to the point controls, elevator could not be re-balanced (not an RV a large plane). The aircraft repair shop hired a hot rod painter who never painted planes. Car painter needs to understand enough coverage not overkill. The car painter needs to understand this is a sheet metal plane, visible joints, seems, rivets are OK. Don't try to hide structure under a puddle of paint. Paint adds weight anyway. Also rivets and lap joints can cause runs you would not get on car sheet metal that is smooth. You have to go light medium. Car guys tend to go too wet. Goes with the weight thing.

Why all WET SAND.... I do NOT want to sand.... I'm likely going single stage. With base/clear system I know you can or do sand top coat before clear and reshoot some times, especially to fix a booboo. Also clear can be sanded and re shot. I rather not unless I need to fix or repair the paint. This is going to be avoided.

Likely going single stage (no clear) epoxy urethane, two coats min of epoxy urethane primer, two coats of top coat or as required. No sanding. Prime and paint in one session allowing time between coats to flash off. I know the advantages of two stage base clear coat system. The single stage is very good, and will last a long time if not abused or in harsh elements 24/7/365, but mostly hangered. I think two stage has better UV protection?
 
Last edited:
Aircraft specific paint has a better UV resistance than car paint. It is also slightly more flexible.
 
Yes that is last piece of the puzzle. Spray booth. If I did a larger inflatable it would have to go in back yard. Not loving that idea, A small one in the garage would work and lookeed at ones that fit. Most are +8' so it would just hit ceiling which may be OK. The good thing about being in garage I could tie it up. If you lose power and the booth deflates you are in deep trouble. I am most likely going to make my own booth in the garage, but the inflatable is on radar. Having a clean, well lit and ventilated booth is goodness. The booth size in garage would be limited.... A 20' L x 10' W x 9' H would just fit in my garage but tight. One wing at a time easy. Fuselage might be tight. They are sub $500. The larger ones are $1000. This is all painting sub components. Painting the whole plane needs a full hanger and inflatable booth is out. So painting parts separate gives you some control, less taping.
Another suggestion: Temporary carport from Harbor Freight - $200. Set it up in your backyard. Spray there, then carry the wet pieces to your garage to dry in a less windy/dusty/buggy environment.
 
Why all WET SAND.... I do NOT want to sand.... I'm likely going single stage. With base/clear system I know you can or do sand top coat before clear and reshoot some times, especially to fix a booboo. Also clear can be sanded and re shot. I rather not unless I need to fix or repair the paint. This is going to be avoided.
I wet sand the epoxy primer coat to provide a much smoother surface for the color coat. Also while wetsand the primer coat, I can see the various imperfections and they are covered with lightweight filler.
 
I wet sand the epoxy primer coat to provide a much smoother surface for the color coat. Also while wetsand the primer coat, I can see the various imperfections and they are covered with lightweight filler.
The local paint shop hits the aircraft with 600 grit (IIRC) after priming. That knocks off any junk that lands on the primer and smooths minor imperfections. They dry sand. Not sure why...
 
Another suggestion: Temporary carport from Harbor Freight - $200. Set it up in your backyard. Spray there, then carry the wet pieces to your garage to dry in a less windy/dusty/buggy environment.
Great suggestion, had one years ago when they were half price. Used it in a move when I could not put all the junk in the house temporarily. I sorted out my junk and sold it, but it was tired after 2 yrs. Yes it took me two years.
I wet sand the epoxy primer coat to provide a much smoother surface for the color coat. Also while wetsand the primer coat, I can see the various imperfections and they are covered with lightweight filler.
The local paint shop hits the aircraft with 600 grit (IIRC) after priming. That knocks off any junk that lands on the primer and smooths minor imperfections. They dry sand. Not sure why...
Great sanding tips. The paint manufacture recommends about 30-40 min for primer to flash off before topcoat, but in no case await more than 4 days.... I assume because it is fully cured and than sanding is mandatory. So can you sand epoxy urethane primer when it is part cured pr wait days? What ever I do I will waste some primer and paint and make a bunch of scrap aluminum very pretty doing test panels.

GREAT TIPS.... PS got two quotes... $22,000 and $20,000. They were 220 and 700 miles away respectively. No doubt painting it my self. It was nice last time I painted my plane, had a shop on field do it, just towed it over.
 
That is an air dehydrator. Air (after the inline filters and drains) goes in the top of the coil. The bucket is filled with water and a couple of milk carton blocks of ice. Water in the air plates out in the coil and drains via a blow down valve at the bottom of the coil (not in the photo).

This simple dehydrator worked surprisingly well. We drained a lot of water out of it during paint.

Carl
 
Great sanding tips. The paint manufacture recommends about 30-40 min for primer to flash off before topcoat, but in no case await more than 4 days.... I assume because it is fully cured and than sanding is mandatory. So can you sand epoxy urethane primer when it is part cured pr wait days? What ever I do I will waste some primer and paint and make a bunch of scrap aluminum very pretty doing test panels.
I think this is dependent on the manufacturer of the primer. I used the automotive epoxy primer so my wait time is at least two days before wet sanding. If the epoxy primer hasn't properly cured, then you can have problems with the sanding and you can tell it when your sandpaper got all gummed up.

On the topic of primer coat for fiberglass. I was only using the 2K epoxy primer on the fiberglass. Unfortunately, this primer will not fill all the pinholes in the cowl or the wingtips. It took a lot of time to fill in the pinholes after the fact. After learning my lesson, when I started to paint the RV8 canopy skirt, I used the thick polyester filler primer and then sand most of it down. That filled in all the pinholes in one go. Then you can apply the regular epoxy primer and the color coats on top.
 
Two tips. I used my DA sander with maroon scotch bright velcroed to the disc for scuffing the aluminum. Created a pretty nice scuff for the primer to stick. Clean and clean and clean the surfaces before primer.

I made a 2x4 stand for the spar end of the wings and made a swivel attached to the wing tip end and attached to a wall, so I could quickly flip the wing over and spray with the wing laying flat. My paint (PPG Delfleet, Evolution) layed out best on the flat surfaces.
 
Back
Top