What's new
Van's Air Force

Don't miss anything! Register now for full access to the definitive RV support community.

Oil pressure fitting - acceptable way to reorient it?

tass

Active Member
In fitting a new coil pack where the right magneto used to be, I found I'm intruding on what I believe to be the hose to the oil pressure sensor:

IMG_0886.jpg

Is it acceptable to just screw in the fitting which attaches to the engine a little more and point it upwards? Or unscrew it a little to point it downwards? Or, should I remove it and put something on it to seal it before reattaching it at the new angle? (I was unable to find any information on what, if anything, should go on the threads of this type of connection).

I don't want to introduce an oil leak, and don't want to risk breaking a wire by having the hose touching.
 
You can orient it to whatever point you want. Most use a 45* fitting, some with a restrictor. That certainly turns it away from the Mag.

Tom
 
Follow Tom’s advice. A 45 snubber fitting to remote sensor (and use one of his integral FS hoses. It will fit but will take some fineness.
 

Attachments

  • IMG_8999.jpg
    IMG_8999.jpg
    346.4 KB · Views: 152
  • IMG_8998.jpg
    IMG_8998.jpg
    320.2 KB · Views: 158
Thanks all for the (as usual) extremely fast replies!

To clarify, the fitting the hose currently attaches to can't/shouldn't be rotated, and I should attach a second elbow instead? I was assuming the existing fitting was removable/adjustable but I didn't want to risk creating a leak by rotating it before I really knew what I was doing.
 
The existing fitting should be removable. Normally when installing a fitting, Loctite 565 or 567 is applied to the fitting threads (but not the first and second thread) and then tightened.

In the situation where the fitting has been installed for some time, rotating it may break the seal. Therefore I would remove it and clean the threads and then re-install with new sealer.

Van's sell a fitting that has the restrictor in case that is needed.

https://store.vansaircraft.com/va-128-restrictor-oil-fuel-fitting-va-128.html

Check for potential interference with the engine mount before you start as this can sometimes be a problem.
 
Last edited:
Thank you!

I wish I took a less zoomed-in photo. But, I'll grab some loctite (looks like either one will work based on the data sheet) and see if I can readjust it.

BTW I don't understand the need for the restrictor - if there's not one there now, why would it be necessary?
 
The restrictor is there for added safety margin in case the oil line to the sensor fails. It gives a bit more time to make a controlled landing before all the oil pumps out of the engine, since the restrictor will slow down the flow.
 
You probably cant rotate it to remove it because the flare side would hit the case. I did one of these mods on a IO540 by cutting off the 90* flare side, and unscrewing the fitting. Cleaned the threads, and installed a 45* restrictor fitting, that WILL install without pulling the accesssory case!. Orient it how you want it--generally so it parallels the top of the MAG.

OH----and the restrictor----well when using a teflon hose assembly thats rated at 3000 psi, vs the old 306 style hoses from decades ago, you most probably will not have a hose failure. But the restrictor DOES dampen the pressure pulses for the modern avionics pressure senders.

Tom
 
I apologize in advance for any redundancy with the previous replies;

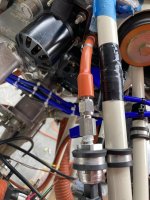
I think what I'm seeing in the OP's original picture is a steel 90 degree fitting like maybe a AN914, followed by a union, followed by a straight hose end. A AN822 elbow in steel would be a simpler solution here, but I'm guessing you can't screw it in because it will hit the accessory case, which is why you've got this setup.

If thats the case, and you just want to re-clock what you've got so that the hose comes at the fitting a little higher or lower, then yeah, you can do that without changing anything.

Remove the union so that you have room to unscrew the 90 without hitting the accessory case, remove the 90, clean the goop off the threads of both the fitting and the engine side, apply new goop, and reinstall it clocked however you want.

There is guidance on how to install fittings like this in Van's section 5 instructions, readily available on vans website. I would strongly encourage you to review these before you dig in.

Basically, apply the approved thread sealant of your choice to the fitting, NOT the hole that it's screwing into. Skip the first two threads so theres no squeeze out on that end to potentially get into the engine. Tighten finger tight, then wrench it 1.5 to two additional turns. Any less than that and you will potentially have a leak, any more than that and you can damage the engine side.

The end that's screwed into the engine is a pipe thread. They don't bottom out like an AN flare. Instead, they are tapered at the tip and get bigger toward the base to create an interference fit. This is why you can break stuff if you go all cave man and keep cranking them down more than 2 turns past finger tight.

Because of the design, there will always be a slight leak path around the threads, so you have to use thread sealant. Typically, it's bad form to readjust one after installation, because depending on the type of thread sealant used, you can break the seal (for lack of a better description) and it will start leaking.

Use one of the sealants called out in Vans section 5. Under no circumstances should you use teflon tape on a fuel or oil system because tiny particles of that tape can get cut off during insertion and find their way inside the engine where they can block passages and cause all sorts of havoc. There was a fatality RV10 crash a few years ago because the owner didn't know this or ignored it and used teflon tape on a fuel fitting.

FYI- a more elegant, but also more expensive way to redo this would be to just come off the accessory case with a steel 45 as Tom suggests. Whenever you have a 90 thats parallel to the crank shaft, the engine flopping around combined with the weight of the hose has the (admittedly small) potential to loosen the fitting causing annoying seeps. Using a 45 instead of a 90 will pretty much eliminate this.

They make a 45 restrictor fitting. As others have mentioned, it will dampen potential instrument fluctuations and also buy you extra time to get on the ground if you have a hose burst (also an admittedly small possibility with todays modern hoses). They aren't cheap, but I'm a belt and suspenders kind of guy, so all my oil and fuel sensor lines incorporate them.

Sorry for writing a book here, hope this helps.
 
Last edited:
I Or unscrew it a little to point it downwards? Or, should I remove it and put something on it to seal it before reattaching it at the new angle? (I was unable to find any information on what, if anything, should go on the threads of this type of connection).

.

NEVER loosen an NPT fitting for orientation. I would take it off, clean up the threads, reapply sealant and re-install, but go a bit further to orient it a bit up.
 
You probably cant rotate it to remove it because the flare side would hit the case. I did one of these mods on a IO540 by cutting off the 90* flare side, and unscrewing the fitting. Cleaned the threads, and installed a 45* restrictor fitting, that WILL install without pulling the accesssory case!. Orient it how you want it--generally so it parallels the top of the MAG.

OH----and the restrictor----well when using a teflon hose assembly thats rated at 3000 psi, vs the old 306 style hoses from decades ago, you most probably will not have a hose failure. But the restrictor DOES dampen the pressure pulses for the modern avionics pressure senders.

Tom

That will come off. It is one of those fitting designed for tight spaces. When you remove the AN fitting, it is just a small block. This is the same fitting that I use to avoid the issue you list.
 
You probably cant rotate it to remove it because the flare side would hit the case. I did one of these mods on a IO540 by cutting off the 90* flare side, and unscrewing the fitting. Cleaned the threads, and installed a 45* restrictor fitting, that WILL install without pulling the accesssory case!. Orient it how you want it--generally so it parallels the top of the MAG.

OH----and the restrictor----well when using a teflon hose assembly thats rated at 3000 psi, vs the old 306 style hoses from decades ago, you most probably will not have a hose failure. But the restrictor DOES dampen the pressure pulses for the modern avionics pressure senders.

Tom

Thank you Tom - you were correct. Looking at it from underneath I did see that the 90° block stuck out enough it would most likely hit the engine mount if I tried to remove it, so I didn't try.

This is a photo from below, and there is a small blue adapter changing the size of the connection. Is it better to order a hose with 45° which screws into the adapter? Or remove the adapter and get a hose with 45° which screws into the 90°? I'm not certain if the blue adapter is also a restriction, but the hole on the hose-side is very small.

IMG_0889.jpg
 
Back
Top