What's new
Van's Air Force

Don't miss anything! Register now for full access to the definitive RV support community.

Micro-bubble/pinhole avoidance. help please

Freemasm

Well Known Member
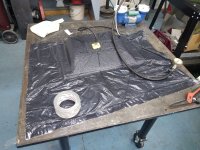
I suck at composites.

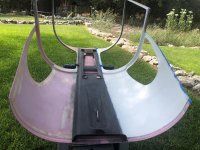
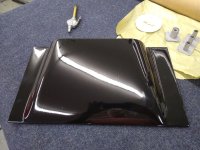
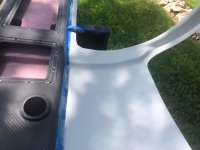
Trying to top coat some fiberglass. Getting tons of pinholes/microbubbles/whatever

The parts are clean. No doubt. It would seem that between the resin surface tension and my brush technique, I’ve got no chance.

Any way to thin the resin? Better application tools? Any advice, web link, video link, etc. would be greatly appreciated. Thanks.
 
Word of the day...squeegee. Rubber, plastic, an old hotel key card, whatever. Wipe wet epoxy back and forth a few times to work it into the surface, then make a pass or two with a throwaway foam roller. It eliminates the squeegee marks and leaves a nice orange peel finish. Why nice? Because when the epoxy is cured, it becomes a sanding guide. Block sand just until the orange peel is gone, and no further. If you do accidentally sand through the epoxy shell, start over with another coat of epoxy.

Brushes don't work so well for a shell coat with a laminating resin. You can brush coat if you use a very low viscosity resin. Low means like water. I like System Three Clear Coat, but I'm sure there are others.

Example below is a form over which I later vacuum bagged a carbon part with a Soric core. Time spent to create a near perfect form or mold is time well spent, as it eliminates a lot of sanding and filling on the flight article later. So, the foam was shaped very close to contour, then a single ply of 9oz glass was added to improve surface toughness. When cured, it got a layer of dry micro, later sanded to final contour. Then came the epoxy seal coat, ordinary West 105, pictured below. After sanding, it was primed, painted, waxed, sprayed with PVA, and bagged to make flight parts.

Sorry, picture progression is right to left.
.
 

Attachments

  • Under Vacuum.jpg
    Under Vacuum.jpg
    170.2 KB · Views: 127
  • Finished Form.jpg
    Finished Form.jpg
    138.2 KB · Views: 137
  • Form, Through Primer.jpg
    Form, Through Primer.jpg
    56.2 KB · Views: 129
  • Epoxy Seal.jpg
    Epoxy Seal.jpg
    137 KB · Views: 136
Last edited:
Sorry I didn't include these pics in the 1st response. But, found some good pics to show results of the Poly Fiber product. You can see the "before and after" sides of my canopy cover as well as the finished product after paint. This stuff is incredibly easy to sand to a very smooth paint ready finish.
 

Attachments

  • IMG_1466.jpg
    IMG_1466.jpg
    579.6 KB · Views: 155
  • IMG_1468.jpg
    IMG_1468.jpg
    308 KB · Views: 114
  • IMG_1528.jpg
    IMG_1528.jpg
    458.8 KB · Views: 126
  • IMG_1529.jpg
    IMG_1529.jpg
    392.9 KB · Views: 127
UV smooth prime is a great product. BUT you must let it cure per the instructions - I don't have the spec sheet in front of me, but I remember the cure time being a week or more. And (again, IIRC) you cannot wet sand it.

So, there are limitations with the product.

An epoxy wipe can be a 24-36 hour job, then you're ready to move ahead.
 
Much thanks to all. This learning curve isn't too expensive compared to others but the cycles lead to a lot of time spent. I'll get OK at it about the time I'm done, typical.

Thanks again.
 
Technique

Much thanks to all. This learning curve isn't too expensive compared to others but the cycles lead to a lot of time spent. I'll get OK at it about the time I'm done, typical.

Thanks again.

I use a variation to Dan's method.
-Skim with epoxy. Wait 30. Repeat. Cure. No roller.
-Wet sand.
-Brush unthinned epoxy primer. Cure 1 hour. Repeat
-Wet sand
-Repair any remaining pin holes with auto glazing
-Spray two coats epoxy primer
-Wet sand. Carefully examine and fix any imperfections
-Spray 3 coats final color. Cure
-Cut & Buff
Closeup of the oil door
20221028_160303.jpg
 
With the thin coat of epoxy, should something be done to help it cure? I haven't had luck with it fully curing. It remains slightly tacky even after three days.
 
Word of the day...squeegee. Rubber, plastic, an old hotel key card, whatever. Wipe wet epoxy back and forth a few times to work it into the surface, then make a pass or two with a throwaway foam roller. It eliminates the squeegee marks and leaves a nice orange peel finish. Why nice? Because when the epoxy is cured, it becomes a sanding guide. Block sand just until the orange peel is gone, and no further. If you do accidentally sand through the epoxy shell, start over with another coat of epoxy.
.

Dan, would you use the same method on a Pepto Bismol cowl?
 
In addition to all the above good advice; Most folks when they start mixing epoxy have a tendency to whip it like they're creating a whirlpool in a cup.

unless its the consistency of water, that will inevitably create air bubbles in the mixture that contribute to pinholes. The squeegee process will squish bubbles out, but you can eliminate a lot of them forming in the first place if you stir in your hardener/micro/whatever a bit slower. More like a folding action that beating it into submission.
 
Dan, would you use the same method on a Pepto Bismol cowl?

I have pretty good luck with the following:

sand with 80 grit
Shoot two coats of epoxy primer (to bridge pin holes)
wait 24-36 hours for it to harden some (keeps further epoxy coats from softening the bridge coat and sinking in to the holes) Direct sunlight helps.
two more coats of epoxy primer (this builds on top of the bridged primer)
3-4 coats of high build 2K primer
block sand dry with 180 or 220
coat of 2K (can skip this if you have enough primer layed down to be flat and remove all sanding scratches)
sand with finish grit and apply top coat.

This completely fills the pinholes.

Tried epoxy on the 6 and it was a PITA. Maybe was bad epoxy, but the real thin coats were gummy and wouldn't sand well. Seems the real thin coats didn't want to fully cure.
 
Last edited:
I use Dan's method (with one additional step) and have had good luck. Pretty rare for me to have a pinhole. My method below:

  • Sand smooth
  • Rinse with water let dry (small parts are put on top of the dehumidifier)
  • Wipe down with Prepall
  • Squeegee/wipe in and then roll with foam or close nap roller .I use West Systems epoxy (for small parts...the fast harder)
  • *(The additional step) After cure (never had a problem) I spray with cheap primer before doing anything. The primer doesn't stick well...and I don't care. The idea is that it helps me identify orange peel and not go through the epoxy coat.
  • Sand until the part looks like it did before I sprayed the cheap primer.
  • Wash with water again
  • Wipe down with Prepall
  • Prime with 1 medium coat of black primer
  • Prime with 1 medium coat of gray primer
  • Sand to make sure surface is perfect. Black primer will show through before you get to the epoxy.
  • Final coat of primer

A couple of notes:
  1. Using the roller after squeegee REALLY helps get a uniform coating and keeps from having to sand though high spots.
  2. Block Sand - Never sand with your hands. Sanding with your hands/fingers will burn though and open up pinholes.

Seems like a lot, but it really isn't. Beats having to re-coat with epoxy and wait for cure because you sanded through it.

Just my 2 cents.

Fred
 
There are many ways to achieve the same end. I would not apply resin over a layup as a finish coat. Use tear strip over the layup as a final layer. Then sand the layup to shape with 60 grit or similar. Now prime with your 2K hi-build primer of choice which will fill the sanding scratches. That will provide a good surface for priming and painting.
 
Post #10 talks about air in the Micro mix. Pinholes are formed from Air Bubbles. I had this same probelm.

The dryer I mixed the micro, the more air bubbles I had. And these can be extreamly small, and numerous bubbles that then become pinholes. When I mixed my micro so it is a bit wetter....not as dry, then I had zero problems with pinholes.

When the mix isn't so stiff it cant suspend air in the mix as well.
 
A technique I’ve used in the past is to literally pour epoxy primer on the surface. Then rub the primer in with my bare hand. It’s dirty, it’s nasty, may give me cancer but there won’t be any pin holes!
 
Primer

A technique I’ve used in the past is to literally pour epoxy primer on the surface. Then rub the primer in with my bare hand. It’s dirty, it’s nasty, may give me cancer but there won’t be any pin holes!

I use Dan's method of skimming with neat epoxy and block sanding. After that, I brush two coats of unthinned 2K Epoxy Primer. Black sand that and rarely see pin holes.
 
Back
Top