What's new
Van's Air Force

Don't miss anything! Register now for full access to the definitive RV support community.

Leaking radiator troubles - RV-12iS

The 12iS radiator has both fittings on the bottom.

View attachment 51512


I stand corrected. The Alloyworks https://www.alloyworksplus.com/prod...ralight-rotax-912i-912-914-ul-4-stroke-engine is a drop in for the standard Rotax radiator. https://www.rotax-owner.com/en/rotax-blog/item/25-newrad

Which is the same listed by Lockwood https://lockwood.aero/shop/engines/ROTAX_912ULS/21

Clearly the radiator on the RV12iS is a custom build specific to the plane not the engine. Not sure why other than maybe left hand cowl shape or width. The hunt goes on both for cause and replacement.
 
No radiator shops can repair it? Back in the day, it was possible.

:confused:

The top radiator shop in Lexington said they couldn't repair mine with any level of confidence it would perform sufficiently. Admittedly mine DID have Marine-Tex in the bottom two rows of fins.

Perhaps someone who has not corrupted their bad radiator could attempt having a radiator shop repair?
 
...
Clearly the radiator on the RV12iS is a custom build specific to the plane ....

This is correct. Rumors have it that Vans found out that some customers were attempting to go direct to their vendor to get a replacement. This triggered a "cease and desist" order so they maintain a monopoly on the sale and distribution of that part.

Not having ever built a custom radiator, I make some broad assumptions of how much material/labor is involved. It seems that $800 would make it worthwhile for a custom radiator service to crank out a batch and provide some competition in the market. Maybe?
 
The top radiator shop in Lexington said they couldn't repair mine with any level of confidence it would perform sufficiently. Admittedly mine DID have Marine-Tex in the bottom two rows of fins.

Perhaps someone who has not corrupted their bad radiator could attempt having a radiator shop repair?

I call BS!
If the rad is aluminum it can be fixed!
Silver solder and heat, even a plastic rad can be fixed.
Their is plastic that is used like solder and it holds.

Sorry for the rant! Find another shop and when asked its for your kids go-cart.
 
This is correct. Rumors have it that Vans found out that some customers were attempting to go direct to their vendor to get a replacement. This triggered a "cease and desist" order so they maintain a monopoly on the sale and distribution of that part.

I understand a bit better now. If that is a Van's supplied part, not Rotax, then Van's is constrained by the ASTM rules for LSA and part/kit supply. However, if built ELSA a different radiator could be used if (big IF) someone wanted to fashion the rather unusual mounting method after the AWC is issued. Given the propensity of radiator failure, seems to me there may be a small aftermarket demand for a better solution similar to that for the filter to bypass fuel line.

Yes, as an aluminum radiator, assuming its not full of pinholes from internal corrosion, a competent shop should be able to repair it. I suspect "aircraft" scares a lot of them off, don't need the risk.

JJR
 
radiator leak repair

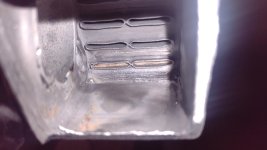
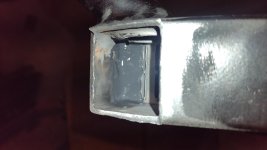
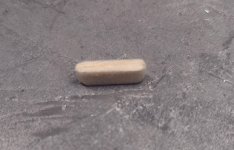
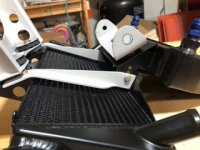
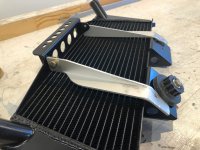
A friend of mine has an RV12 and has had 2 radiator failures. He's 87 and loves to fly, so I wanted to help him get back in the air. His newest radiator had a small pinhole leak on the lowest row of water tubes. It was coming from a spot where the tiny fins are attached to the tubes. The repair method I chose to use may not be long term. Only time in service will reveal if it's a good method to salvage an existing bad radiator. I cut out a small area of the outside of the tanks to gain access to the lowest water tubes. Once I had access I used a very small stainless steel wire brush to clean off the aluminum around the water tubes. After that I carved 2 small pieces of balsa wood to be inserted into the water tubes. The wood plug is slightly oversize. Balsa is soft and it's easily compressed using needle nose pliers. I squashed it to the size needed to fit into the water tube. The balsa expands once it's pushed into the tube to tightly fit the tube. I pushed the wood in about 1/8th inch below the end of the tube. I used regular overnight cure J B Weld epoxy to fill in those 2 water tubes and then built up a mound of epoxy over the 2 tubes to encapsulate them. By doing this on both ends of the radiator you prevent any water from going though those 2 lower tubes. After everything had cured for a minimum of 24 hours, I welded patches over the areas I had cut out. J B Weld is good for up to 550 degrees F. once fully cured. Do NOT use the Kwik Set J B Weld for this type of repair. It does not have the same tolerance for heat as the slow cure J B. When I did the welding, I did it in short increments and cooled the area immediately with a wet rag to keep the heat affected area below what would potentially damage the J B Weld epoxy. Once it cooled, I did more welding and repeated the procedure until everything was fully welded. My friend has only flown his RV twice since the repair, but so far it's OK. He flies at least 3 - 5 times per week. If it starts to leak again, I'll post something in this thread. He'll likely replace the radiator with the new improved version from Vans once they become available. For now, he's very pleased that he can fly again.
Cheers
Enzo
 

Attachments

  • IMG_20231125_144506632.jpg
    IMG_20231125_144506632.jpg
    165.6 KB · Views: 121
  • IMG_20231125_145646934.jpg
    IMG_20231125_145646934.jpg
    161.1 KB · Views: 125
  • IMG_20231128_165734290.jpg
    IMG_20231128_165734290.jpg
    226 KB · Views: 122
  • IMG_20231125_144000907.jpg
    IMG_20231125_144000907.jpg
    297.8 KB · Views: 108
Doing this looks he lost about 10% of the cooling capacity. Has he noticed any change in temps at high performance levels?
 
Don’t know about everyone else, but my coolant temperature barely moves above the minimum so I can’t believe losing that channel would have a significant impact on cooling.
 
radiator repair

My friend often has to add tape to the radiator opening to get his temps up. Even in the summer here at KSZP he told me that his RV never runs hot. I chose this repair method to get him back in the air as quickly as possible. He's 87 and knows his flying days are limited. In the old days of brass and copper radiators it was common to solder up both ends of a tube that may have received rock damage etc. A car radiator has more water tubes, but the principle of blocking leaking tubes is the same. He has another RV radiator that leaked in the same spot as the one I repaired, but we haven't been able to get it to leak again to verify the leak location. He will buy the improved radiator if it becomes available. He's a friend and I didn't charge him to make the repair, but it shouldn't cost a lot at most shops that can weld thin aluminum. The big tubes of the J B Weld cost $20, plus tax at our local auto store. He's flown about 8 hours since the repair and it's still leak free. Nothing was done to add stiffeners to the radiator core to make it stronger, so maybe it will fail again in another spot. If so, we're confident that it won't leak from the 2 lowest water tubes I blocked off with the epoxy. The images show how simple it is to do the repair. If you can weld or you have a friend that can weld, your cost will likely be just for the epoxy.The biggest issue is being careful in keeping the welding heat as low as practical to minimize affecting the cured J B Weld epoxy. It's good for 550F according to the label.
Cheers
Enzo
 
My 12 is an early SN and has ULS engine now with 900TT. If I had an RV12iS with leaking radiator, I’d incorporate your repair. There’s no telling how long it will take Van’s to issue a fix for this problem. Chapter 11 bankruptcy dilutes engineering efforts….
 
My radiator developed a small leak (see post 41 for details). I was able to stop the leak with radiator epoxy (8+ hours flying since fix), but ordered a new radiator as I didn't trust my "fix" to last very long.

The new radiator arrived yesterday and lacks the tabs to attach it to the oil cooler (see photo). I can't find any plan revisions or SB's that address this change. I'm assuming the change in design is intentional and to address leaks that I and others have reported.

Does anyone have information regarding installing the new design? Does it only attach at the top? I've contacted builder support but thought I'd check in here while waiting for a response.
 

Attachments

  • IMG_2712.jpeg
    IMG_2712.jpeg
    179.5 KB · Views: 56
My 12 is an early SN and has ULS engine now with 900TT. If I had an RV12iS with leaking radiator, I’d incorporate your repair. There’s no telling how long it will take Van’s to issue a fix for this problem. Chapter 11 bankruptcy dilutes engineering efforts….

A (potential) fix has already been engineered and the holdup was waiting for the Service Letter to be written up and published. Sadly this bankruptcy situation will likely delay this write up indefinitely. I can see why the formal procedure of publishing a Service Letter is necessary for the SLSA versions but I wish they would just share the improved mounting method with the rest of us (informally) without the long wait for engineering dept., legal dept., etc. approval of an official Service Letter.
 
Last edited:
I had added an $800+ radiator every 200 hours to my fixed cost budget.

Unfortunately I went to the hangar today and found a small puddle of orange coolant on the floor beneath the cowling. This is how it begins. It is not even 100 hours since the last replacement. I even balanced the prop to a very small vibration level so that isn't the culprit. The last radiator lasted almost 200 hours with the prop out of balance and this time not even 100 hours.

I guess I will have to budget an $800+ radiator each year.
 
Last edited:
Given the ongoing -12iS radiator issue I've been thinking of alternatives to continuing to buy an $800+ radiator every year. Here are the first two considerations:

1. Perhaps a custom radiator (by prchotrod.com or rondavisradiators.com for example) maybe 24" wide by just 4" high could be mounted to the airframe rather than the engine. It could go under the fuselage near the bottom opening of the cowling using a bracket extending down from the firewall through the lower opening of the cowling with additional support brackets on each side that attach to the foot steps. My concern is the introduction of additional drag.

2. Borrowing a design idea from the Zenith 750 by having an horizontal radiator mount frame under the fuselage just behind the lower opening of the cowling forcing all airflow into front cowling openings to exit by passing through the radiator fins. Less drag than an externally mounted radiator.

Commentary on these methods invited and additional ideas encouraged!

I'm sure that when working with the custom radiator manufacturers they can calculate the cooling capacity of the existing -12iS radiator and advise on exact dimensions needed for option 1. above to achieve the same capacity.
 
Last edited:
I wonder is there is a way to mount the radiator to the cowl instead of the engine. The ULS has the oil cooler mounted to the cowl and the coolant radiator to the firewall. You never hear of them failing.
 
RV-12iS Radiator

As of this date, the part number was EA RV-12IS RADIATOR and is now
EA RV-12IS RADIATOR-1. Plus there is an upcoming Service Letter (SL-00088) announcing the change to the radiator that modifies how the oil cooler is attached to the radiator.

I had mind repaired at the bottom henge where it connects to the oil cooler.
Waiting 2 months for a replacement.
 
As of this date, the part number was EA RV-12IS RADIATOR and is now
EA RV-12IS RADIATOR-1. Plus there is an upcoming Service Letter (SL-00088) announcing the change to the radiator that modifies how the oil cooler is attached to the radiator.

I just went to the Van's Store and a radiator is not even available, either with or without the "-1" change, for purchase!
 
A good quality rad shop can fix your rad. Thats if they still employ skills to repair not just replace.
 
Leaking RV-12iS Van's manufactured Radiator

Yep, Mind was leaking also at the bottom where it connects to the oil cooler. Had it repaired & tested.

Interesting... Van's now has a new RV-12iS Radiator ---Grin

The EA RV-12IS RADIATOR has been superseded by the EA RV-12IS RADIATOR-1, and it is currently backordered. I suggest you call and place a -1 on order so you get one from the next batch that is delivered. Be sure to tell them you are Grounded and need it ASAP.

These radiators are custom made to our specs in Europe and are not available from any other supplier or vendor.

There is an upcoming Service Letter (SL-00088) announcing the change to the radiator that modifies how the oil cooler is attached to the radiator. Additional parts will be required and they MAY be in a kit that includes a radiator, but you'll have to read the SL when it is released to know for sure. I can not supply a copy until it is released.

Tony

It appears that Van's design does not use the Rotax Radiator? The difference in Van's radiator is that it connects to the oil cooler... Rotax design has them in a frame each...?.

The Van's Engineering places mounting stubs attached to a plate. the plate twists on nasty landing? Grin.... Plus Van's hand picked European manufacturer does not repair there product or use Rotax radiators...
 
A good quality rad shop can fix your rad. Thats if they still employ skills to repair not just replace.

My last radiator was full of Marine-Tex repairs and was corrupted beyond repair. I will not make that mistake twice.

However I know that whether a new or suitably repaired radiator is mounted again in the original mounting method it will invariably begin leaking in 100 hours or less. I would like to reconsider new and improved mounting methods that do not include attaching the radiator to the engine.
 
New design radiators are shipping

I just received the new radiator and can confirm that Vans took our failure analysis seriously and changed the design to completely eliminate any torque or flex caused by having the oil cooler swinging off the lower mount bracket. I haven't seen the new instructions yet (not published yet), but there will be additional parts required to modify the oil cooler mounts.

Photo shows an old radiator on top of a new one. You can see they completely removed the oil cooler mounting and beefed up the lower cross-member so it can't flex. I'm not sure the bridge truss lower bracket is really needed without the oil cooler mounted there, but I'm guessing they wanted to make sure the fix is 100% fixed. The top mount is unchanged.
https://vansairforce.net/community/attachment.php?attachmentid=53032&stc=1&d=1703642394
 

Attachments

  • 35286.jpeg
    35286.jpeg
    585.6 KB · Views: 194
Last edited:
So the new one is mounted only by the two bolts at the top? Left dangling, and quasi-supported by the thick coolant hoses at the bottom?

I wonder what the retrofit solution will be.. I can't imagine that they'll want everyone to proactively replace the radiators for 745$ Maybe some sort of rubber bushing solution on the lower bolts.
 
RV-12iS radiator mount mod

This thread came just before I installed the radiator and oil cooler, so I fabricated some brackets to support the bottom radiator flange where the cooler attaches (one on each side). The local DAR approves (it's an E/AB). They are cut from 1/8 x 1 x 1" aluminum angle. Here's hoping they prevent cracking at the bottom of the radiator.

--CT Cole
 

Attachments

  • 29 Nov Oil cooler and radiator with b Small.jpeg
    29 Nov Oil cooler and radiator with b Small.jpeg
    31.1 KB · Views: 145
This thread came just before I installed the radiator and oil cooler, so I fabricated some brackets to support the bottom radiator flange where the cooler attaches (one on each side). The local DAR approves (it's an E/AB). They are cut from 1/8 x 1 x 1" aluminum angle. Here's hoping they prevent cracking at the bottom of the radiator.

--CT Cole

Great idea! This is the kind of thing I was hoping to be shared! Would having just one bracket that mounts diagonally work better or just as well? Or even weld a straight piece from the top corner of the radiator frame diagonally to the opposite bottom corner. This would take the entire radiator frame into account rather than just the narrow width of the attachment points.
 
Last edited:
This thread came just before I installed the radiator and oil cooler, so I fabricated some brackets to support the bottom radiator flange where the cooler attaches (one on each side). The local DAR approves (it's an E/AB). They are cut from 1/8 x 1 x 1" aluminum angle. Here's hoping they prevent cracking at the bottom of the radiator.

--CT Cole

I believe you've isolated the majority of the forces there. I look forward to reviewing this thread in about 3 years and seeing if this ends up protecting you from a failure. I expect that it will.
 
This thread came just before I installed the radiator and oil cooler, so I fabricated some brackets to support the bottom radiator flange where the cooler attaches (one on each side). The local DAR approves (it's an E/AB). They are cut from 1/8 x 1 x 1" aluminum angle. Here's hoping they prevent cracking at the bottom of the radiator.

--CT Cole

That looks like a good idea! I am about to install the radiator in my 12iS and I would like to protect against early failure of the radiator. Can you supply any more details of those brackets, such as a larger photo or a drawing?
 
I didn't draw up plans, but made them to fit the radiator and oil cooler when they were off the engine -- now everything is assembled.

I cut the 1/8 x 1 x 1 stock freehand on a bandsaw so that top and bottom each had a tab for drilling & dressed the edges.

I bent the tab at the bottom so the top tab would fall outside of the rubber bushing used where the radiator mounts to the engine. The tab at the top of the bracket was bent to match the radiator/cooler angle, and I also cut an arc in the top tab for clearing the bushing.

At the bottom, I match-drilled through the radiator mount to make the hole in the bracket. After bolting the bracket & radiator together, I drilled the top tab through both the bracket and upper radiator mount.
Doing that made the fit exact.

I'll attach another photo, at higher resolution, that may show the details better
 

Attachments

  • 29 Nov Oil cooler support brackets before painting - 1.jpg
    29 Nov Oil cooler support brackets before painting - 1.jpg
    395.9 KB · Views: 85
Thanks. I've ordered some aluminium angle with a view to replicating your design.

The other idea I had was to add some stainless steel cable ties around the radiator, with 3D-printed nylon pillows to spread the load of the cable ties on the top and bottom parts of the radiator instead of it being concentrated on the edges. However, it wouldn't have been clear how much the cable ties should be tensioned. Too little and they would not be effective; but too much could damage the radiator fins and/or tubes.
 
Last edited:
My power plant kit arrived a few months ago with a few parts missing that were on back order. All of those parts have arrived except the radiator. I was told a few days ago that an SB or SL is being worked on for the radiator and mounts. The new mounts are in but the radiators are not. I was also told that there is a long list of orders for the new radiator and mounts.
 
Back
Top