Does anyone have some suggestions, words of wisdom, or photos showing how they installed the Dynon pitot mast on an already built RV8? Thanks in advance for any help you can provide.

Van's Air Force
You are using an out of date browser. It may not display this or other websites correctly.
You should upgrade or use an alternative browser.
You should upgrade or use an alternative browser.
Dynon Pitot mast
- Thread starter Rich Pulman
- Start date

Majorpayne317641
Well Known Member
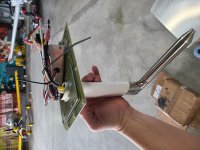
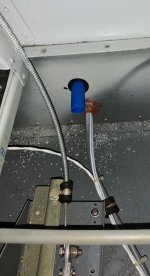
This was how I mounted my Dynon pilot tube.
The location of the mount assembly is next to the rib outboard of the last access panel.
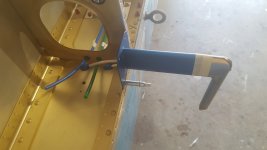
The forward edge of the mount assembly is riveted to the wing spar flange, shown in the 2nd picture. The 2nd picture also shows the routing of the pitot and the AN fittings that are needed to connect to the air tubing.
The end result is a very stiff structure that doesn't move because of the solid connection to the flange and the location next to the wing rib. BTW, this location is also recommended by the manufacturer of the mount assembly
The location of the mount assembly is next to the rib outboard of the last access panel.
The forward edge of the mount assembly is riveted to the wing spar flange, shown in the 2nd picture. The 2nd picture also shows the routing of the pitot and the AN fittings that are needed to connect to the air tubing.
The end result is a very stiff structure that doesn't move because of the solid connection to the flange and the location next to the wing rib. BTW, this location is also recommended by the manufacturer of the mount assembly
Attachments

Toobuilder
Well Known Member
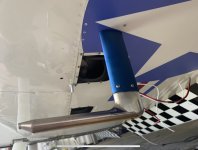
Installed on the inspection panel of the -8 and the Rocket.
Pilot135pd
Well Known Member
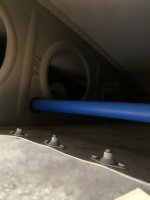
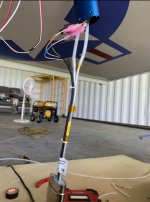
My Dynon Heated AOA Pitot tube was installed right beside an inspection panel so that I would then have the space to install the heating system. I also installed the OAT probe there. I placed a PEX tube from that inspection panel to the wing root and passed all wires and both AOA tubes through it so I would be sure none got cut or sliced or rubbed against. PEX is super hard to cut even when you want to so no worries there.
Attachments

Toobuilder
Well Known Member
To clarify, I installed my Dynon AOA heated pitot, the control box and OAT sensor entirely on the inspection panel. Tight, but fits.
My Dynon Heated AOA Pitot tube was installed right beside an inspection panel so that I would then have the space to install the heating system. I also installed the OAT probe there. I placed a PEX tube from that inspection panel to the wing root and passed all wires and both AOA tubes through it so I would be sure none got cut or sliced or rubbed against. PEX is super hard to cut even when you want to so no worries there.
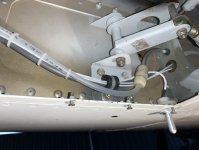
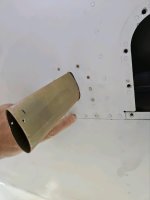
Mine looks like this.
Looks great! How did you determine where to cut the hole for the mast? I have the template, but need to get the alignment correct from outside the wing. I’m trying to figure that out without messing it up.
Looks like you removed some rivets along the spar. Did you replace them with solid or pulled rivets?
Thanks for your help.
Looks like you removed some rivets along the spar. Did you replace them with solid or pulled rivets?
Thanks for your help.
My Dynon Heated AOA Pitot tube was installed right beside an inspection panel so that I would then have the space to install the heating system. I also installed the OAT probe there. I placed a PEX tube from that inspection panel to the wing root and passed all wires and both AOA tubes through it so I would be sure none got cut or sliced or rubbed against. PEX is super hard to cut even when you want to so no worries there.
Pilot135pd
Well Known Member
Looks great! How did you determine where to cut the hole for the mast? I have the template, but need to get the alignment correct from outside the wing. I’m trying to figure that out without messing it up.
Looks like you removed some rivets along the spar. Did you replace them with solid or pulled rivets?
Thanks for your help.
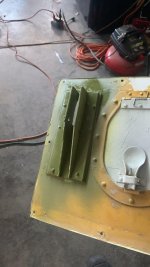
We used pull rivets to later replace but you know how it is, if it's not broken don't fix it, or if it's below the wing and you can't see it, what rivets were used? So a temporary thing became permanent.
We just installed a new AOA pitot tube in my current plane and this time we used solid rivets from the get go. I'll be painting the panel white tomorrow.
Attachments

To clarify, I installed my Dynon AOA heated pitot, the control box and OAT sensor entirely on the inspection panel. Tight, but fits.
The Glasairs have used this method from at least the later 1980’s & you are correct it is a tight fit with the control box but doable.
The benefits are you can remove the whole assembly to do bench work rather than overhead maintenance below the wing &
It prevents accidental mast damage (Vans version) when moving the wing/s for painting etc - I’ve always wondered how many left wings have damage from ‘bumps’ in the building/painting process?
Last edited:
Looks great! How did you determine where to cut the hole for the mast? I have the template, but need to get the alignment correct from outside the wing. I’m trying to figure that out without messing it up.
Looks like you removed some rivets along the spar. Did you replace them with solid or pulled rivets?
Thanks for your help.
Drilled the four spar rivets out,clecoed the template and taped it to the wing
Looks like you removed some rivets along the spar. Did you replace them with solid or pulled rivets?
Thanks for your help.
I don't think it matters. There are only a few rivets so you can use any type of rivet that makes your job easier. This is in the low stress area of the wing and you aren't saving any weight with your rivet selection. My posted picture shows how it is mounted. others too. It will be scary cutting holes into a perfect part for the first time. We all went through this. You will be desensitized when this part is completed.
Looks good!
Thanks for taking the time to show me all this. I will take my time and do my best.")
Thanks for taking the time to show me all this. I will take my time and do my best.

