

Desert Rat
Well Known Member
At least on the 7, the way the horizontal and vertical fiberglass tips come from Vans, they are open on the back side. Vans gives you the option of leaving them that way, but one of the prints has a couple of suggestions on how to close them which involves bonding a balsa plug in there or a fiberglass plate or whatever. According to Bob Axom, he picked up a couple of kts due to the drag reduction of stuff like this, plus they just look better closed up so it seemed like it would be worth the effort.
There appears to be a jillion different ways that people have skinned this cat. I used a simple foam plug on the h/s tips and laid up glass in place with these clecoed on the airplane then the next day had to go back in round 2 and take them off the plane, dissolve the foam plug, clean the back side up and prep it to make sure new epoxy would stick, then add reinforcing plied on the inside. Basically a bunch of different steps over a couple of days. After thinking about it for a while, I modified my process for the v/s tip and eliminated bunch of that monkey motion. This may be old news for some of you fiberglass pros, but I thought I'd pass it along.
1- cleco the tip on, trim the aft end to final size. Once you're 100% sure you've got the gap between the tip and the rudder/elevators where you want them go to step 2.
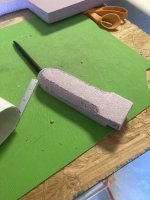
2- cut/sand a 1" thick plug from pink insulation board that will tightly fit recessed about 1/4" inside the cavity. You want it snug so the tip holds it's proper shape when removed from the plane (don't want the ears to come together).
3- chamfer a recess about 1/4"-3/8" " deep on the face of the foam, then re-insert the plug into the tip in the previous position.
4-lightly squeeze the sides of the tip to the foam plug with a wood clamp. The object isn't to crush the foam, just to make sure that there isn't any gap around the non-chamfered part of the sides.
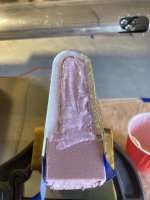
5-fill the chamfered edge gap with epoxy/flox
6-lay 3-4 plies of fiberglass cloth on the face of the foam plug, wet with neat epoxy, not with flox, so you can be sure it's wetted out. These can be simple flat plies of heavy cloth or whatever scraps you have laying around as long as the edges are imbedded into your flox slurry. Let the spirit guide you, as long as you end up with a layup thats thick enough to be rigid, but still doesn't stick up above flush.
7-With your finger or a popsicle stick, apply a fillet of any left over flox on top of the layup to the level of the finished edge of the faring
7-apply a skim coat of epoxy/micro.
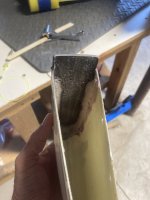
8-once all that dries, Dissolve the foam with acetone, block sand flush. done.
By doing it this way, you don't have to mess around with multiple batches of epoxy, adding reinforcement layers to in inside, etc. All the layup is done on one session, from one side and all at once. Plus, due to the flox fillets, the fiberglass aft edge of the fairing is hard as nails, while the face is relatively easy to sand micro. Super easy to block sand it to a 100% flat finished product.
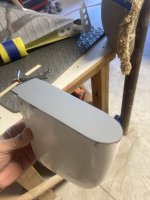
Here's a picture of the foam plug (yeah, I know what it looks like), a couple in process, and the finished product.
There appears to be a jillion different ways that people have skinned this cat. I used a simple foam plug on the h/s tips and laid up glass in place with these clecoed on the airplane then the next day had to go back in round 2 and take them off the plane, dissolve the foam plug, clean the back side up and prep it to make sure new epoxy would stick, then add reinforcing plied on the inside. Basically a bunch of different steps over a couple of days. After thinking about it for a while, I modified my process for the v/s tip and eliminated bunch of that monkey motion. This may be old news for some of you fiberglass pros, but I thought I'd pass it along.
1- cleco the tip on, trim the aft end to final size. Once you're 100% sure you've got the gap between the tip and the rudder/elevators where you want them go to step 2.
2- cut/sand a 1" thick plug from pink insulation board that will tightly fit recessed about 1/4" inside the cavity. You want it snug so the tip holds it's proper shape when removed from the plane (don't want the ears to come together).
3- chamfer a recess about 1/4"-3/8" " deep on the face of the foam, then re-insert the plug into the tip in the previous position.
4-lightly squeeze the sides of the tip to the foam plug with a wood clamp. The object isn't to crush the foam, just to make sure that there isn't any gap around the non-chamfered part of the sides.
5-fill the chamfered edge gap with epoxy/flox
6-lay 3-4 plies of fiberglass cloth on the face of the foam plug, wet with neat epoxy, not with flox, so you can be sure it's wetted out. These can be simple flat plies of heavy cloth or whatever scraps you have laying around as long as the edges are imbedded into your flox slurry. Let the spirit guide you, as long as you end up with a layup thats thick enough to be rigid, but still doesn't stick up above flush.
7-With your finger or a popsicle stick, apply a fillet of any left over flox on top of the layup to the level of the finished edge of the faring
7-apply a skim coat of epoxy/micro.
8-once all that dries, Dissolve the foam with acetone, block sand flush. done.
By doing it this way, you don't have to mess around with multiple batches of epoxy, adding reinforcement layers to in inside, etc. All the layup is done on one session, from one side and all at once. Plus, due to the flox fillets, the fiberglass aft edge of the fairing is hard as nails, while the face is relatively easy to sand micro. Super easy to block sand it to a 100% flat finished product.
Here's a picture of the foam plug (yeah, I know what it looks like), a couple in process, and the finished product.
Attachments
Last edited:

