What's new
Van's Air Force

Don't miss anything! Register now for full access to the definitive RV support community.

Checking -A model nose tire inflation during preflight

Draker

Well Known Member
Whenever I read an article or thread about nosegear-related accidents, a common theme is to keep the nose tire inflated. I want to get better about checking this during preflight. Currently, I just eyeball it, which I don't believe is sufficient. Unfortunately, in order to get at the -7A nose tire valve stem (probably also the -9A and others too?), you need to remove both halves of the wheel fairing, and even then, it's behind the metal fairing support bracket, so there really isn't ready access to it.

Has anyone figured out a good way to get a gauge on the nose tire valve stem that is convenient enough to do during your walk-around?

For my mains, I cut little doors in the fairings that I can remove with a single camlock, and stick a valve stem extension in to check/inflate. The nose stem seems too much buried behind stuff to do this.
 
It sounds like you're unscrewing the aft fairing from the support bracket. If so, the correct way to remove it is to unscrew the large internal-hex bolts (where the tow bar goes) and remove the *entire* fairing along with the supports as one piece.

But yes, it is a pain to check the nosegear tire pressure, even if you remove it that way.
 
We use a go/no-go gauge that one of our members made. It is a U-shaped piece of 3/8" plywood cut so that the size of the U will *just* slide over the tire, on a smooth floor, when it is properly inflated. If the tire is deflated then the gauge will not fit and the tire needs air. This process works for mains and nose wheel, one gauge for each.
 
Checking -A model nose tire inflation

Has anyone figured out a good way to get a gauge on the nose tire valve stem that is convenient enough to do during your walk-around?

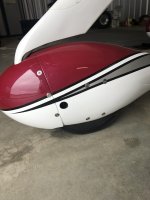
Here's my solution for all the wheel pants, not just the nose wheel shown here:

20150924_130215.jpg

Sorry, I don't have any photos with the pant off to show the bracket underneath, but I think you'll get the idea. The 4x screws on the main pant hold the mounting bracket to the fairing....they never come off. The bracket/aft fairing slides aft to come off the wheel, after removing the socket head cap screw (that doubles as a Bogart tow bar attach point). Socket head cap screw is the large hole, to the left of the 4x bracket attach screws and just aft of the front cap seam.

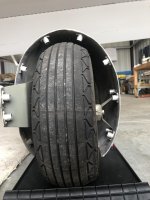
As for adding air: the hole to the right of the 4x bracket attach screws lines up with the valve stem when the stem is at the 3 o'clock position. (This did require putting a half circle cutout on the edge of the wheel pant attach bracket on the valve stem side of the tire....again, sorry no photo of the bare bracket.) I use a 10mm socket to remove the (hex head) cap from the valve stem. Then, use a straight air chuck/gauge that has about a 10 inch reach, to put air into the tire. (No idea where you can get the air chuck/gauge I use, since mine came from Avery Tools...and I don't know of anyone else that sells one like it).

So that's it. No fancy Cessna/Piper style pant door. No snap plug to cover the hole. No spring loaded door to have to hold inward while trying to slide the air chuck in. That stuff might look good....but it's kind of a PITA when it comes to checking tire pressure. (The harder you make a maintenance task....the less often that task is likely to be done.) Sure, I probably loose a whopping 0.01 knots, but this system works well for me on all 3 tires.

Semi pro tip: how to know when the valve stem lines up with the fairing hole? Once the stem is aligned with the hole, put a white china marker (aka: grease pencil) mark on the tire side wall, perpendicular to the ground contact point. Then, to find the stem the next time, simply move the airplane forward/aft until the white mark points to the ground. The white mark stays put for WAY longer than any paint mark, about a year if I recall. And, when it starts to turn the same color as the tire...just mark it again.

Finally, the secret location of white china markers seems to be.......Amazon, since none of the usual big box office supply stores near me stocked them, or even listed them in their online stores. You have to buy a whole box.....but you can pass them out to fellow RV owners suffering from "where's the valve stem" syndrome. :D
 
Never liked the idea of screws in the wheel pants. I used Skybolts, smaller than those used for the cowl, on all 3 wheels. Can remove em in about a minute each.
Nose wheel shows installed. Main wheel shows the underside of the rear pant:
 

Attachments

  • IMG_7267.jpg
    IMG_7267.jpg
    272.6 KB · Views: 166
  • IMG_7264.jpg
    IMG_7264.jpg
    297.4 KB · Views: 166
RV14A wheel pants

With the 14 I can take off the front half of the wheel pants and inflate using a pump with a 90-degree fitting. I only have to do this once every 8 to 12 months. It is a pain and have the Berringer SensAirs to monitor. The wood gauge sounds like a decent idea. I don't think adding a pressure monitor on top of the valve would allow enough clearance but worth a look.
 
I can tell when the nose tire needs air when I start to get the hint of a shimmy on landing...

I like some of the other ideas here, too!
 
Make a U shaped chock from 1-1/2" PVC tubing (sch 40, not the thin stuff). Precise fit is key here, as you are essentially make a fixed dimension caliper. It should just slide around the tire when inflated to the desired level. When you start feeling drag when checking, the tire has lost pressure. I can tell when the mains are low on my 6, just by how the chocks come out.

Larry
 
Last edited:
A quick look to see if the outer rib of the tire is touching the ground indicates it needs air.
 
My airplane, not built by me, has a hole in each of the three fairings directly opposite the valve stem. It's covered by a disk-plug, easily popped out and tire pressure easily checked and inflated if necessary. I thought this was standard practice...I can't even imagine the inconvenience of pulling the fairings just to check tire pressure, and certainly not on every pre-flight. While I do periodically check tire pressure, getting on the ground to do so is enough of a PITA that I am much more inclined to just eyeball the inflation state and check/inflate when they look suspicious.
 
So many great ideas here, thank you all. The hard part will be choosing which one to go with!
 
I can tell when the nose tire needs air when I start to get the hint of a shimmy on landing...

I like some of the other ideas here, too!

Interesting - this is the opposite of what most experience - shimmy goes with too much pressure.

I use Walt's method of looking for the very edge of the tire tread to just be touching, which is about 30psi for the tire I have.
 
When I notice it harder to push into the hangar, I service the tires..... About twice a year.

You can eventually tell just by looking at the profile.
If you have an O360 and a C/S prop, the nose tire pressure is very important.
 
Now Gasman just gave away my method. It really works for me. When I find the plane pushing harder than ( ) I know I need to find the gauge an go at it.
Art
 
Back
Top