What's new
Van's Air Force

Don't miss anything! Register now for full access to the definitive RV support community.

A little cowl help?

Weefle

Well Known Member
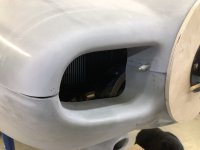
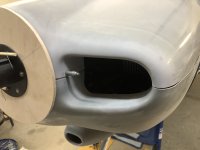
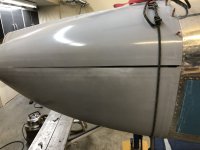
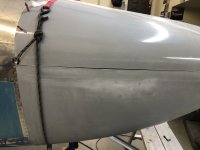
Started on the stock cowl today. Top went very well. I’m using Skybolts for the firewall and hing for the horizontal split. Set up the bottom cowl and trimmed it to fit. I thought there was supposed to be excess material to remove for the split. Not so with my cowl. The right side is just barely going to make it but the left side I have a 1/2” gap at the aft end. Not sure what the best move fwd is. Install the hinge and lay some flow between hinge and cowl scarf a slice into the lower cowl and then cut the line? The front corners all fit quite well.

Any advice appreciated .IMG_8711.jpegIMG_8706.jpegIMG_8713.jpeg
Keith


IMG_8714.jpeg
 
The gap at the side can be fixed by extending the sides using a scarf joint and layup of an epoxy glass extension. This should definitely be done before fitting the hinges and with the lower cowl on the bench. But first, is the bottom of the cowl tight up against the lower firewall? While fitting my cowl (-6A) I used duct tape to pull everything together and hold it in place while checking and marking.

Also, is the disk that simulates the prop flange in the right position? It looks like you are using EZ-cowl tool, whereas I used the extension for the fixed prop, so maybe that is why it looks a little bit different.

There were gaps at the front on my cowl also, it takes a lot of filling and sanding to get the parts into a decent state.
 
If you look at the second picture, the bottom of the cowl isn’t flush with the fuselage. It s sitting low. Not sure fixing that’ll give you enough to close the whole gap, but it will help.
 
It looks like in the picture that the line (or cut) on your upper cowl is wavy. That should be a straight line. Can be fixed with a long sanding block. After that is perfectly straight on both sides and the lower cowl is added on to when you transfer the “cut” line onto the lower cowl, it will be straight. Good luck 👍
 
It looks like in the picture that the line (or cut) on your upper cowl is wavy. That should be a straight line. Can be fixed with a long sanding block. After that is perfectly straight on both sides and the lower cowl is added on to when you transfer the “cut” line onto the lower cowl, it will be straight. Good luck 👍
I like the dimensioned hardwood (poplar) at the aviation department of Home Depot - usually a good flat/straight edge, and this sandpaper is great to use on the block: https://www.amazon.com/gp/product/B0000223SI/ref=ppx_yo_dt_b_search_asin_title?ie=UTF8&th=1
 
If you look at the second picture, the bottom of the cowl isn’t flush with the fuselage. It s sitting low. Not sure fixing that’ll give you enough to close the whole gap, but it will help.
Good observation. At both corners the cowl sits about .030 proud. But on the bottom it’s flush. It’s like the cowl radius is slightly off from the fuselage. Even at that there is not enough play to bring up the gap. I’ve sent a note to mothership but I’m sure im on my own to scarf the joint and build on. More dust in shop!

k
 
Back
Top