What's new
Van's Air Force

Don't miss anything! Register now for full access to the definitive RV support community.

RV6 Tail stinger bolt

Scott Hersha

Well Known Member
I have an RV6 that I built from a used kit that has gone through a couple builders (or more) before me. My tail stinger rod was the original bent rod that came with RV3, 4, and early RV6’s. I modified it for a full swivel Doug Bell tailwheel unit. One thing that bothered me was that the stinger rod seemed to rotate slightly when bolted into the tailwheel weldment. I installed a close tolerance AN4 bolt to make it more secure. That helped, but it still has some slight movement rotationally. What I would like to do is ream the hole for the bolt oversize and install an oversized bolt. The bolt as called out in the plans is an AN4-14A. My research has told me that an oversized replacement for this might be an NAS2904-18 bolt. The grip diameter is .2641-.2651 on this NAS bolt. The AN4 bolt as called out in the plans has a diameter of .246-.249. So the NAS2904 bolt is between an AN4 & an AN5 (5/16).

Has anyone here dealt with this situation? Any recommendations? Where can I get a reamer of an appropriate size? I’m pretty sure the hole inaccuracy is in the weldment, not the stinger.
 
Some of us are using taper pins in place of bolts in that area.
 
Thanks Mike for that info. I thought about using a taper pin, but didn’t think I could get a TP reamer down in that area to make it work. Assuming it needs to be reamed from the top down In assembly (this is a flying airplane)……. And well….. I’ve never done it. But that would be the best solution - I agree. I will be researching that now. Your link to past history with parts/tools advise is great.

Unfortunately, none of those links to the tools needed work anymore, but it gives me a starting place.

Thanks.
 
Last edited:
At the risk of ridicule: Some of us ignored best-practices and Reamed it from the bottom.
 
Thanks Mike for that info. I thought about using a taper pin, but didn’t think I could get a TP reamer down in that area to make it work. Assuming it needs to be reamed from the top down In assembly (this is a flying airplane)……. And well….. I’ve never done it. But that would be the best solution - I agree. I will be researching that now. Your link to past history with parts/tools advise is great.

Unfortunately, none of those links to the tools needed work anymore, but it gives me a starting place.

Thanks.
Just a few weeks ago I installed a taper pin in this location in the F1 I am building, and did it from the bottom up - should work just fine, and frankly it was the only way to actually do it. I have no fear that the lock nut will fail and the pin fall out…
 
Thanks Paul. That’s what I was just thinking. Much easier vs impossible. There were some negative reviews on ACS about the B&S reamers. What reamer did you use?
 
Just did this last week in my Rocket. Cut an access hole in the lower skin, reamed the hole and used an oversize Hi Lok. Also injected some JB Weld to act as a shim for the socket.
 
Yep, we replaced a tailwheel spring on a RV-6 last month and went to an oversize bolt (because we had one) however its still not right. It's better, but not 100%. It seems to us that the taper-pin is the best way forward and we're presently heading down that road. As reported by others, it will be from the bottom up!
 
I ran into a similar issue on an RV-7 -- the tail spring would "thunk" and move a bit if the tail wheel assembly was rotated. Added an AN960-416 washer under the bolt head (top side), changed the nut to an MS21042-4 and reassembled using the higher torque values for the MS21042. Thunk gone. YMMV.
 
https://cdn.shopify.com/s/files/1/0...e_Changing_a_Mounting_Socket.pdf?v=1692739405 includes tapered pin info

And here's some other useful tailwheel maintenance documents for your amusement:
 
Can you of you guys share a pic or to of the pin installed in your stinger?
I replaced a bent spring non-castering tailwheel with the Fly Boy Accessories spring and lightweight tailwheel on our 6 earlier this year - Not because there was a problem with the spring or socket being loose, but because the end of the bent spring would catch on the edge of the hard stand and other divots in the taxiways, and I was worried I’d damage the tail structure of the plane. I had maybe 3/4” of clearance between the ground and end of the spring.

This is what I ended up replacing:
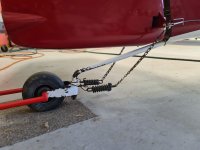
20240121_140811_Original.jpeg

The old spring was held in the fuselage weldment with a standard AN4 bolt put in from the top. (I had to remove the Elevator to get sufficient access to the bolt. It was just as well I did as I also found the left elevator spar cracked from the outboard rod-end rivet.)20240121_170725_Original.jpeg
(I had to ease out the whole in the skin a little to get a thin wall socket over the nut as the skin hole and weldment hole weren’t concentric)

Old tailwheel and new
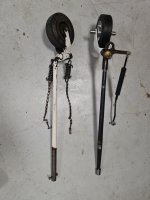
20240121_175029_Original.jpeg

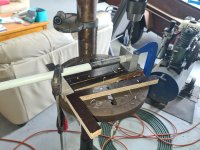
Match drilling the new spring to the hole in the old spring meant making a jig to clamp around the old spring, drill one half of the jig, then with a 1/4” diameter pin through the first half of the jig and old spring, I clamped the other half of the jig in place, removed the pin and drilled the second half of the jig through the first half and old t/w spring. Drilling back through the first half of the jig and old T/W spring:20240126_123645_Original.jpeg

I then clamped the Jig around the new T/W spring and drilled the new spring from each side of the spring to meet in the middle. I used a brand new carbide drill for the hole in the new spring.
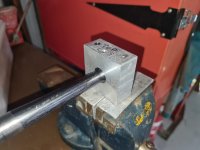
20240126_125730_Original.jpeg

The alignment of the holes in the weldment and new spring wasn’t quite perfect enough to drop the bolt back in 😔. I had planned to use a taper pin in any case and the slight misalignment was taken care of by the taper pin. Access in from the top was not going to happen with the ream so it went in from the bottom, (very Slowly!)
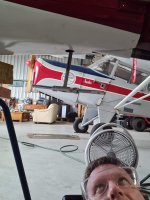
20240126_162152_Original.jpeg
(a lot of breaks and cooling fans in the Australian summer)

I checked the aircraft was level in roll, and tyre pressures were even & then used the hangar floor to make sure the tailwheel yoke was square and then drilled holes for it in-situ.
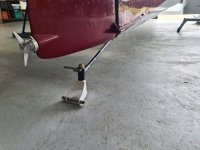
20240127_144237_Original.jpeg
Using the Brown and Sharpe close to hangar floor was quite awkward and on the second hole in the tailwheel yoke I snapped the taper off 🤬. Thankfully being a tapered ream I could knock it back out the hole and it only cost me a week and a new B&S #1 tapered ream.


I painted the spring & tailwheel socket as a unit
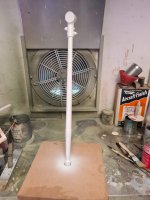
20240203_175247_Original.jpeg

Job done and definitely one of the better value upgrades for our RV-6. Ground handling and in particular directional control while taxiing is worlds apart from the old sloppy slack chains and springs.20240204_121221_Original.jpeg

I don’t have any specific photos of the taper pins in the fuselage, but I hope some of the above is helpful.

Don H
Sydney, Aus
 
Back
Top