
Van's Air Force
You are using an out of date browser. It may not display this or other websites correctly.
You should upgrade or use an alternative browser.
You should upgrade or use an alternative browser.
Tapping rear window & roll bar: cutting oil?
- Thread starter SabreFlyr
- Start date

I used boelube on all of the rest.
Good thought. Was that dry boelube or liquid?
RVbySDI
Well Known Member
I am posting as an additional data point. Use the information as you see fit.
I drilled the glass and roll bar per instructions. That is, with the plexiglass clecoed to the roll bar and tapped through the plexiglass and the roll bar. Made it through 3 or 4. 5, not so much. The tap broke off in the roll bar. Now I have a broken tap half way through the plexiglass holding it firmly to the roll bar. Well, as one might surmise, I cracked the plexiglass. $700 and several weeks later I had a new plexiglass shipped to me from Vans.
So, from my experience, I suggest you NOT tap the roll bar while the plexiglass is on. Maybe you are better at it than I am but I don’t really see much advantage, and a great amount of risk, by having the plexiglass on while tapping. On the new plexiglass I tapped all the holes on the roll bar without having the plexiglass on. It worked just fine.
I am posting as an additional data point. Use the information as you see fit.
I drilled the glass and roll bar per instructions. That is, with the plexiglass clecoed to the roll bar and tapped through the plexiglass and the roll bar. Made it through 3 or 4. 5, not so much. The tap broke off in the roll bar. Now I have a broken tap half way through the plexiglass holding it firmly to the roll bar. Well, as one might surmise, I cracked the plexiglass. $700 and several weeks later I had a new plexiglass shipped to me from Vans.
So, from my experience, I suggest you NOT tap the roll bar while the plexiglass is on. Maybe you are better at it than I am but I don’t really see much advantage, and a great amount of risk, by having the plexiglass on while tapping. On the new plexiglass I tapped all the holes on the roll bar without having the plexiglass on. It worked just fine.
As is most other details in the construction manual, the instruction to tap through the holes in the plexi window is for a very specific reason based on a lot of experience working with builders
To put it bluntly, tapping a hole in aluminum is something that a large percentage of builders don’t seem to be able to do.
You admitted yourself that you broke a tap after only four holes.
6–32 taps are somewhat fragile, but if somebody is doing this process with some proper instruction and practice, a broken tap should not happen.
For some extra insurance, don’t ever use cheapo three or four flute taps from a hardware store. Get a high-quality to flute tap from someplace like MSC or similar.
Anyway, the problem that is being solved by tapping through the window, is that the hole actually gets tapped with proper alignment. Now this is assuming that when the holes were originally drilled, the instructions were followed.
The window helps maintain alignment of the tap.
I think there has been way more windows cracked from people trying to install screws during window installation, into holes that were tapped crooked.
The bottom line is that there is no process that will 100% prevent people from getting a negative result when they are using poor technique, but tapping through the window was found to be a way that greatly improved the odds of success, even if it doesn’t work 100% of the time for 100% of the builders.
RVbySDI
Well Known Member
Scott, I fully understand what you are saying. I have tapped my share of holes but will admit I am not an expert. I would wager most builders, as you noted, are not that experienced with taps. Which is what I am eluding to with my comment about tapping through plexiglass. It is a high risk/marginal reward (at best) method. All for the purpose of hopefully correctly aligning the taps. I was able to align the tap successfully without using the plexiglass because I was extremely careful to align the holes when drilling them. That piece of plexiglass is extremely fragile and VERY expensive. It is a lot to ask of inexperienced tappers to use an expensive piece of plexiglass as a guide for alignment. I am pretty good at aligning holes. I am not that good at running taps through a piece of expensive plastic.
That is my opinion. Readers can head my warning and advice, or not. As I stated in the first sentence of my post. “I am posting as an additional data point. Use the information as you see fit.”
Live Long and Prosper!
That is my opinion. Readers can head my warning and advice, or not. As I stated in the first sentence of my post. “I am posting as an additional data point. Use the information as you see fit.”
Live Long and Prosper!
After I broke off my Ace hardware tap from Irwin I went to McMaster Carr and bought a few tap extractors and some nice quality taps. I used liquid Boelube and I did the remainder (most of them) very easily. Not sure if my problem was a cheap crappy tap or lack of lube or probably both, but I can't stress enough, buy some good quality taps. They aren't that expensive.
What about enlarging the holes in the plexi to slightly larger than #6 so that the tap can pass through and be aligned, but without actually cutting the plexi? If the tap breaks then the plexi can simply be lifted off. Would that work?
The risk with that plan is that if the tap still tilts slightly as it starts, you will be slightly cutting threads on the inside face of a finished size hole, which would not be a good idea to leave it that way.
I guess you could inspect all the holes afterwards and any that had marks from the tap could be further enlarged.
After I broke off my Ace hardware tap from Irwin I went to McMaster Carr and bought a few tap extractors and some nice quality taps. I used liquid Boelube and I did the remainder (most of them) very easily. Not sure if my problem was a cheap crappy tap or lack of lube or probably both, but I can't stress enough, buy some good quality taps. They aren't that expensive.
I do a fair amount of machine work and have tapped a lot of holes in some pretty tough and thick materials with Irwin taps, even the 6-32's and 4-40's. I know there is better stuff out there, but am not a pro with a large budget. Cutting fluid can help, but if you are breaking taps on 1/8" aluminum, the issue is technique. Yes, a stronger or a different design (i.e. two flute) tap will lessen the need for good technique, but I can assure you that an irwin 6-32 will tap 1/8" aluminum repeatedly if a proper technique is used. I have broken a few, but EVERY time it was me rushing or pushing (i.e. poor technique). Properly using a tap is more of a skill than most realize, but it can be mastered.
Scott raises a great point. The most common amatuer error in tapping is not jigging for correct alignment and getting a non-perpendicular thread, so see why the recommendation is there.
Larry
Last edited:
mountainride
Well Known Member
I too broke off a tap in the rear canopy. If this happens you can use a solder iron to lift the canopy off. After replacing the cracked rear window I used Sikaflex the second time around. Very happy with the results and black "targa" strip look. I only Sika'd the forward portion. I went by the plans on the after rear window.
JonJay
Well Known Member
Since it hasn’t been mentioned, you must “break” the chip by rotating the tap backwards, each time, until you are well into the tapping process. On a two flute, this means rotate 180 deg. or until you feel pressure from the chip on the tap, then back off to clear the chip. You should feel the chip break. Repeat.
Aluminum is more difficult as the chips can stick to the tap and not clear. If this happens, you can feel it. You may need to remove the tap, clear the chip, and go back in being careful to set the tap properly in the hole.
Once you are well into the process you can feel things get easier and can rotate the tap fully if you’re careful. If you feel any excess resistance, stop, remove the tap, and clear. Manual tapping is a slow process.
Last edited:
And for those of us who failed to apply "an ounce of prevention" here is "a pound of cure" -
I posted these photos about a year ago after breaking my hardware store (Irwin) tap and failing to remove the stud with a variety of tap extractors. I learned that:
1. The soldering iron works very well for detaching the rear window, only requires a little patience.
2. The damage to the window is within the area to be countersunk for a no. 6 flathead screw.
3. The damage to the roll bar is within the area to be countersunk for a no. 6 rivnut.
4. After touch-up paint and with the window installed, the repair is undetectable.
Attachments

BillL
Well Known Member
HHS, high speed steel taps are what you want . . . .
No one really mentions what a high quality tap is. You want HSS not carbon steel taps, high speed steel is 52100 - bearing steel. Being hard, strong and tough, it is sharp and will stay that way longer. It is especially a factor with softer aluminum like the 6061 roll bars.
Also, oils do less than you might think for lube, "tap magic" is particularly good with aluminum. With plexiglas maybe mineral spirits is close, but you should test with a piece of scrap
mc607
Well Known Member
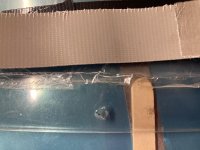
Just about ready to drill and tap the rear window and roll bar (pg 38-03, step 4). Is cutting oil compatible with the plexiglass? I'll be using a 2-flute, chip clearing tap but expect that I should probably still use cutting oil if it's compatible.
I used the following technique with no issues,
-fine tip Sharpie to locate hole on plexiglass and mark it with a dot. Double checked hole location visually from two angles 90 degrees apart. Amazing how much the plexiglass distorts the layout.
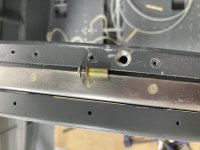
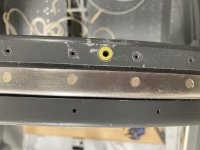
-used a #40 plexiglass bit and drill guide block to drill through plexiglass. Inserted bit into guide and held guide off plexiglass to start hole. The main reason for the plexibit was that I found the pointed tip easier to line up with the sharpie dot. Then I slid the guide down on to plexiglass and checked that the bit was squared and still in starter hole. Then I drilled through plexiglass. Same procedure with #40 jobber bit to drill through aluminum roll bar. Note the wooden skids on bottom of drill guide. This was to keep it square on the radius.
-upsized hole to #36 using tapered reamer and drill guide.
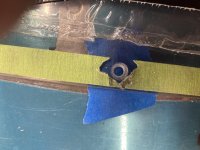
-buttered boelube paste on quality tap and using drill guide again I tapped the holes. 2-3 turns inward and then one backward as previously mentioned.
-used 526 screws to secure in place, I was worried the 507 screws might chip the edge of the un-countersunk hole.
Drill guide holes were all done on drill press.
The glow is from a light bulb which helped keep the window warm, very important to use some method to keep window warm.
Upsized plexiglass to #27 with tapered reamer.
I believe the whole procedure took about 4 hours for the roll bar tapped holes. Take your time.

Last edited:

