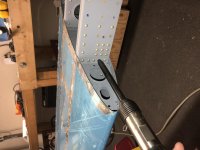
I'm looking ahead to section 08-11, and wondering about riveting the horizontal stabilizer inboard nose ribs/spar/inspar ribs stack. The plans suggest deferring this to the last thing to do. However, I'm wondering if these can be done ahead of time, similar to how the outboard stack is done on pg. 08-10, and then just dropped into place when the spar is inserted.
If done early, I should be able to use a squeezer to get those 10 470AD4 rivets. The modified plan would be:
Did anyone else do it this way? Is there any reason why this is a bad idea, and that I will be much better off just following the plans as written?
If done early, I should be able to use a squeezer to get those 10 470AD4 rivets. The modified plan would be:
- Prior to pg 08-09, where the inspar rib/stringer web/stringer assembly is put together, rivet together the 2 modified HS-1004 inspar ribs, forward spar, and 2 modified HS-905 nose ribs.
- Return to page 08-09, and carry on as written.
Did anyone else do it this way? Is there any reason why this is a bad idea, and that I will be much better off just following the plans as written?

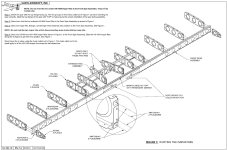
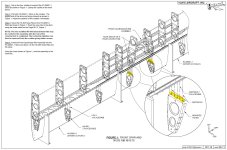
") ), I think I'd run into problems accessing the end rivets connecting the stringers to the stringer web (they're hidden behind the flanges of the inspar rib). I guess it's best (as usual) to follow the plans, and hope that by the time I get there I'll have figured out how to get acceptable results using the double-offset rivet set.
), I think I'd run into problems accessing the end rivets connecting the stringers to the stringer web (they're hidden behind the flanges of the inspar rib). I guess it's best (as usual) to follow the plans, and hope that by the time I get there I'll have figured out how to get acceptable results using the double-offset rivet set.