What's new
Van's Air Force

Don't miss anything! Register now for full access to the definitive RV support community.

Page 29-20 How in the world do I set this rivet???

bertschb

Well Known Member
Friend
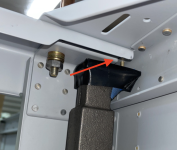
I'm riveting the gussets on page 29-20 and I've run into a rivet that has me stumped. I've been staring at this thing for an hour trying to see if any of the tools I have will work. I still can't figure out how to set it. None of my four squeezer yokes will work. None of my bucking bars will fit under there. How in the world did you guys set this rivet?
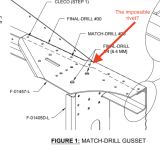
Screenshot 2024-04-12 at 1.40.30 PM.png
 
I'm riveting the gussets on page 29-20 and I've run into a rivet that has me stumped. I've been staring at this thing for an hour trying to see if any of the tools I have will work. I still can't figure out how to set it. None of my four squeezer yokes will work. None of my bucking bars will fit under there. How in the world did you guys set this rivet?

View attachment 60556
Maybe a stack up of bucking bars? One to reach in then another at a small distance to add mass? Add a little, non scuff, spacer (wood block) to the one that is "reaching in"?
 
There seem to be similar rivets on the RV9A fuselage. For mine, I used the head chisel with a bucking bar agaainst the chisel part. It may not look pretty, I cant tell.😜
 
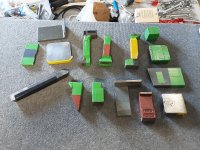
Perhaps a bucking bar something like the one on the lower left in the attached pic? I'm not familiar with RV-14 details but it appears you need to get into the corner between 2 channels and so an angled bar may be required. Otherwise if you can visualize what the bucking bar would need to look like then you can shape one using some scrap or bar steel.

20240413_151229.jpg
 
CS blind rivet. Since interior and I assume will be painted - a dab of filler in the mandrel hole and sand. After painting, it will never be noticed. My concern is the impossible rivet can result in damaging the surrounding area when trying to buck it and you can also avoid a poorly set rivet by using a countersunk blind rivet.
 
Last edited:
I'm riveting the gussets on page 29-20 and I've run into a rivet that has me stumped. I've been staring at this thing for an hour trying to see if any of the tools I have will work. I still can't figure out how to set it. None of my four squeezer yokes will work. None of my bucking bars will fit under there. How in the world did you guys set this rivet?

View attachment 60556
I think this is the one you are talking about? I used a footed bucking bar.

 
I think this is the one you are talking about? I used a footed bucking bar.

Yes, that's the one! My concern with using the footed bucking bar (or any of my other bucking bars) for this particular rivet is the bracket shown below looks to me like it's thicker than the shop head should be. I was concerned it would prevent me from fully setting the rivet.

Bad rivet.png
 
Yes, that's the one! My concern with using the footed bucking bar (or any of my other bucking bars) for this particular rivet is the bracket shown below looks to me like it's thicker than the shop head should be. I was concerned it would prevent me from fully setting the rivet.

View attachment 60586
I don’t have a photo of the set rivet unfortunately, but I don’t recall it was an issue. It was close from memory but worked.
 
While it's nice to strive for 100% compliance with MilSpec, that's a very high bar. I'm of the opinion that a single slightly underset rivet among 20,000 properly set rivets is probably not going to lead to catastrophic failure. These forums would sometimes lead you to believe that every plane is a Lindy award winner. I don't think that's the case. Do the best you can and move on.
 
...My concern is the impossible rivet can result in damaging the surrounding area when trying to buck it and you can also avoid a poorly set rivet by using a countersunk rivet.
That's my concern as well. The plans call for an AN426AD4-5 rivet here. I've had to get pretty creative in setting some rivets but this one is a doozy. My hat's off to folks who set it properly without damaging anything.
 
Last edited:
At this point it looks like a Cherry Max might be your easiest option.

Or, find an appropriate chunk of steel and start machining/grinding away the bits that interfere with things like the flange below and the already riveted on angle to the left. Once the bar fits in and sits on the rivet shank....duct tape is your friend for protecting the nice paint job.
 
That's my concern as well. The plans call for an AN426AD4-5 rivet here. I've had to get pretty creative in setting some rivets but this one is a doozy. My hat's off to folks who set it properly without damaging anything.
Had to correct my post and add countersunk BLIND rivet.

I suspect you have one on the other side too. if you pop them both, it looks like the plans called for it! if you buck it, you can sing to buck the impossible buck to the tune of To Dream the Impossible Dream.

onward thru the fog…..
 
I used a tungsten bar on edge . BTW is that bolt temporary? Spec. Is no more than 3 washers otherwise need a shorter bolt.
 
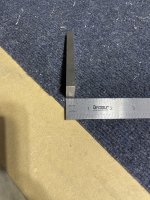
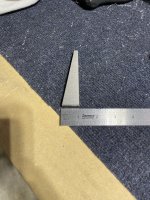
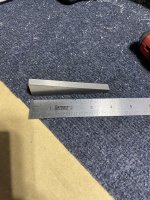
I'm not on that step, but I have a trailing edge tungsten bar from Cleaveland, I've used it in some pretty tight spots on the rear fuse. I don't see it on their site anymore, and I don't see it at ATS or Brown either. Maybe someone close by has one to borrow?

After more searching, it looks like Cleaveland has a thin one that's 3/8"x1"x4", so it's this one but without the angle cut it seems.

IMG_6338.jpegIMG_6337.jpegIMG_6336.jpeg
 
Last edited:
BTW is that bolt temporary? Spec. Is no more than 3 washers otherwise need a shorter bolt.
The picture I posted (post #7 above) is from a screen shot of another builder's blog (not my airplane). Looks like a temporary bolt to me.
 
I'm not on that step, but I have a trailing edge tungsten bar from Cleaveland, I've used it in some pretty tight spots on the rear fuse. I don't see it on their site anymore, and I don't see it at ATS or Brown either. Maybe someone close by has one to borrow?

View attachment 60674View attachment 60673View attachment 60672
I've never seen a bucking bar like that but it might work. It looks narrow enough. You'll find out when you get to that step! I ended up just using a blind rivet. Anything I would have cobbled together with screwdrivers, chisels, scrap metal, etc would likely have ended up doing more harm than good. I'm working on my rotisserie now :)
 
Back
Top