What's new
Van's Air Force

Don't miss anything! Register now for full access to the definitive RV support community.

Need help with cowling cheeks!

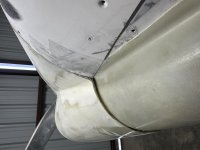
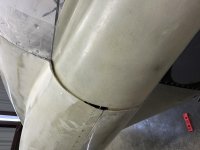
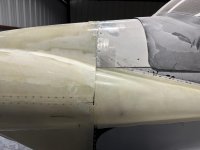
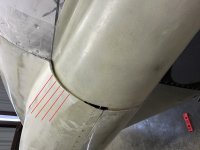
I’m working on installing new cowling cheeks on my -4. As you can see in the pictures, when slid into position, they need between 3/16 and a quarter inch more thickness to mate up to the cowling. I see a few options here but thought I would consult the brain trust on the best path forward.

Option 1: Split the cheek in half length wise and slide the newly cut top and halves into the correct position and then reglass over the gap that is created in between them.

Option 2: Extend the existing profile of the cheeks to effectively lengthen the cheek so that the added length makes it mate up to the cowling correctly. The only gotcha here is that extending them to far my make the cheek so long that the rear of the cheek doesn’t following the contour of the plane anymore where it starts to narrow.

Option 3: Get rid of these cheeks and make my own.

Any thoughts/ideas/opinions are greatly appreciated. Thanks!
 

Attachments

  • IMG_5283.jpg
    IMG_5283.jpg
    282.7 KB · Views: 114
  • IMG_5282.jpg
    IMG_5282.jpg
    259 KB · Views: 89
  • IMG_5280.jpg
    IMG_5280.jpg
    290.4 KB · Views: 108
A lot of builders, at least on the RV-3, make their own, usually from fiberglass. The stock RV-3 uses aluminum with pre-formed flanges. Since the RV-3 cowl is a few inches shorter than the RV-4 cowl, the cheeks are bigger. If you want my unused -3 aluminum cheeks, you can have them... if so, send me a PM. I'm using -4 cheeks and had to extend the bases a bit.

CF Fit Check S.jpg

You can see the extensions here. The rest of the photo shows how I was setting up to make a hatch for the battery that's stored there. The fiberglass overlay and the aluminum Bandaid hold the hatch in position so that I could lay up the hatch support inside the cheek after I had it back on the bench.

The extensions would be shorter for yours if you did that. As I recall, it wasn't hard. I think I taped a flat piece of wood to the outside of the cheek, using packing tape for a mold release. Then I laminated the extensions from the inside. Once off the mold and cured and trimmed, I put them in place on the fuselage and used the fuselage sides as a mold for the flanges, with more packing tape for a mold release.

Dave
 
Make new ones. You can go to my cowl section (check signature) and see what I did. Good luck building.

ADCreHdBCgUEAQnqKgj1v5jdX03JKMlixrrvpVYjRHC6BBxbFhCuwGNDeRZSNs4Nb2g0QsvzPXv-4ouafONkoZRu3xV97XscFLBUxa_zVLGPhu5JrUSf1iJX3JRZofRfvFsXyv779xEnOFOmVvens0MDO7OU=w2592-h1944-s-no-gm


ADCreHe4HAlA2dReKC9iwD92E4C4y4Cfe3metNLGknQzR8S0HmMbr8kNNL-MuduX3Ahit3aqnpIFKYaH2Uqy4C2M0E-XIKnugpw3gSQvT0bMEHV4fw0qQBl-U4jXW0qbhGk_o3_or9p8OXFUpNmgFYql0RyQ=w640-h480-s-no-gm


ADCreHf3LgJCBSeYPoRTz8vfadwQ2ubjwRBQDIt5ZZmOXGVSnMk2Omv_2aID2Cm1wBhOu5MT5ogw3EMxqoXxxAwYl6hH1-7nQJfiw0ZmNvmv5kziNAv_K7Hmmm5cH7Qy02y8viASxPEtctIyiAyfrpvaQLZT=w640-h480-s-no-gm
 
What Axel said..

Unfortunately, at this point you likely need to build your own. When I built my -4, I made sure the cheeks were clecoed in place then trimmed the upper and lower cowl edges at the hinge line to close-up the gap prior to installing the hinges. In your case, spend some time to clean-up the inside mating surfaces and square up the aft edge of the cowling where it will lap over the cheek extensions and then build new extensions to match (or rework your new set, but that will take a bit). that joint/interface is a high wear area and needs to be smooth and snug.
 
Looks like the cowling is not properly mated to the fuselage.
If you fix the cowling so it fits flush with the fuselage, the cheeks will fit much better.
 
I had the same issue with my 4. I would suggest you drill out the hinges and trim the cowl to get a better fit to start with. Then after you get it close as you can you might need to cut a couple of slits to get it just right(I did). Not fun but might be an easier solution than trying to make new cowl cheeks depending on how comfortable you are with working with fiberglass. fixing slits and rivet holes is easy(er)
make sure no small children are within hearing range, you will say bad words trying to get the thing to fit right!
Skip RV4/6
NC
 
My Method to Shrink Fiberglass

I have used this method to shrink the oversized fiberglass shell to fit into the established curve. This method worked for me when doing the -8 canopy skirt and the intersection fairing.

Using the angle saw, cut slits in the direction of the red lines. Cut a couple lines at first and see how well you can shrink the part. Having more lines cut will make it easier to shrink the curve. Longer cuts help too. Do one line at a time.

when you get the conformity that you desired, tape the outside with Gorilla tape to keep the shape. Epoxy micro the voids that were formed by the saw curf. Lay the fiberglass inside and fair when cure. Now you can remove the Gorilla tape on the outside. Fiberglass and fair the outside surface. You should get the perfect matching curves on the two abutting parts.
 

Attachments

  • Capture.JPG
    Capture.JPG
    532.3 KB · Views: 35
Definitely going to get the cowling to fit better. I had the same cowling fit problem on the right side of the plane. I resolved it by cutting a slit along the cheek line where the cheek and the upper round section of the cowling intersect which allowed me to pull the cheek down and push the upper portion of the cowling in to match the fuselage profile. I then re glassed the two together it turned out well, planning to do the same on this side.

The original post is the side simply because the problem is most prominent here. I’ve considered the slit idea as well but it’s starting to seem like just making new ones to fit might be the quickest/most effective option.

Thanks for all the insight!
 
I’ve considered the slit idea as well but it’s starting to seem like just making new ones to fit might be the quickest/most effective option.

if you do the slits, you will end up with miss match profiles. the side profile can match, but when you look from the top, the cowl profile angle will not match. My first -4 was like that.

making new ones is fairly easy. I made my flanges on the inside of the cheek. much cleaner look. Not sure why my pics are so big.

ADCreHfCmpTU17CqQA5BcPrtNbdmCC52IbagWa2ozhl0cwRjp66tn7YKqES7BePNr5fush_TrVcHqqDktpHfXcuOp0XVEkwYST0ePMerE1MyapVLsiljpbn9K9sUTyWFXrqUBLDyvHsDdIclIFgV1gup_Xl4=w2560-h1440-s-no-gm
 
Back
Top