The nose gear fairing on my RV-10 moves up and down in a forward and backward direction (like a seesaw). It moves about an inch in each direction, causing the fairing to rub on the nose gear strut and wear down the paint. All the hardware is tight. Not sure why it has so much play. Has anyone else experienced this? Any clever solutions?

Van's Air Force
You are using an out of date browser. It may not display this or other websites correctly.
You should upgrade or use an alternative browser.
You should upgrade or use an alternative browser.
Loose Nose Gear Fairing RV-10
- Thread starter AmontgoRV
- Start date

The aft half has some internal washers and spacers - as you put it on, moving from aft to forward, they should slide on a ‘track’. Take it off and compare to assembly instructions.The nose gear fairing on my RV-10 moves up and down in a forward and backward direction (like a seesaw). It moves about an inch in each direction, causing the fairing to rub on the nose gear strut and wear down the paint. All the hardware is tight. Not sure why it has so much play. Has anyone else experienced this? Any clever solutions?
Mine does something similar. I've chocked it up to flex in the mount, as that's the only thing that makes sense. It bounces during taxi on rough areas and makes noise. I did rtv some thin rubber edge guard around the nose gear leg hole that helped a little, but, just a little.The nose gear fairing on my RV-10 moves up and down in a forward and backward direction (like a seesaw). It moves about an inch in each direction, causing the fairing to rub on the nose gear strut and wear down the paint. All the hardware is tight. Not sure why it has so much play. Has anyone else experienced this? Any clever solutions?
Richard Connell
Well Known Member
Thats not right.
Make sure you understand what bob is saying about the aft mount washer/spacer stack up that is designed to make it easier to remove.
If this is installed properly and the tow point bolts are installed properly with the stand off trapezoidal block, there is no mechanism for the wheel pant to move at all laterally or vertically. Let alone 1”.
I agreeThats not right.
Make sure you understand what bob is saying about the aft mount washer/spacer stack up that is designed to make it easier to remove.
If this is installed properly and the tow point bolts are installed properly with the stand off trapezoidal block, there is no mechanism for the wheel pant to move at all laterally or vertically. Let alone 1”.
Rich,Thats not right.
Make sure you understand what bob is saying about the aft mount washer/spacer stack up that is designed to make it easier to remove.
If this is installed properly and the tow point bolts are installed properly with the stand off trapezoidal block, there is no mechanism for the wheel pant to move at all laterally or vertically. Let alone 1”.
I agree. However, the mounts are in the track, and they are a nice fit. The forward bolts are in and line up nicely with the holes, and are tight. If you grab the back it is very firm side to side, but if you pull up and down, it moves a bit. Mine isn't an inch, but maybe half an inch at the very back. At the nose it moves maybe a an eighth, but enough to bounce a little up front and make noise. I've double checked everything multiple times, and with the nose cone off pull up and down you can see the outer shell flex a little which is what is allowing the back to move. Not sure what else can be done.
Richard Connell
Well Known Member
Hi Roy
I believe you. In my mind, the only way that there can be any up and down movement is if the slot in the u1013 is wider than the diameter of the inner most an960-616 washers on the axle bolt.
I’m sure that’s the case by a very small amount. 1/32 I suppose is possible. And the geometry then would allow maybe 10/32 or 5/16 total movement at the pant TE.
Which could be what you are describing.
But I don’t have that. I know that when I grab my wheel pants there is negligible movement. There is barely discernible flex if I muscle it but no play. 250h too and plenty of gravel and grass so it’s had a chance to loosen up. I generally give all 3 pants a push/pull on walk around so it’s familiar.
One possibility is wear in the screws that hold the pant to the U1013.
As this isn’t my first rodeo, all my pants have a few layers of CF plus another layer or 2 of BID between the pant and the bracket. This adds a fair bit of thickness.
So countersinking the wheel pant for the #8 screws goes nowhere near creating a knife edge in the fiberglass. It’s rock solid.
Maybe check for play there.
Cheers
Rich,Hi Roy
I believe you. In my mind, the only way that there can be any up and down movement is if the slot in the u1013 is wider than the diameter of the inner most an960-616 washers on the axle bolt.
I’m sure that’s the case by a very small amount. 1/32 I suppose is possible. And the geometry then would allow maybe 10/32 or 5/16 total movement at the pant TE.
Which could be what you are describing.
But I don’t have that. I know that when I grab my wheel pants there is negligible movement. There is barely discernible flex if I muscle it but no play. 250h too and plenty of gravel and grass so it’s had a chance to loosen up. I generally give all 3 pants a push/pull on walk around so it’s familiar.
One possibility is wear in the screws that hold the pant to the U1013.
As this isn’t my first rodeo, all my pants have a few layers of CF plus another layer or 2 of BID between the pant and the bracket. This adds a fair bit of thickness.
So countersinking the wheel pant for the #8 screws goes nowhere near creating a knife edge in the fiberglass. It’s rock solid.
Maybe check for play there.
Cheers
Totally possible. My pants only have about 60 hours on them, and I didn't notice it until after paint. After looking at it and contemplating, I chose to live with it, and applied the rubber around the gear leg hole, to kill any sound of the hole area rattling on the gear leg, and a bit for aesthetics. I haven't seen any wear in the rubber, but that only has about 25 hours on it. I painted over the set screws for the mount, because, hey, I don't need to mess with those anymore, right????
So I'm reticent to go full throttle on what I deemed a minor nuisance, and add all that repair work for the paint. For me, it's a monitor for now. But like I said, I don't have major movement, and I'm not bumping my gear leg fairing like the original poster. I just wanted him to know that I have seen something similar, maybe not as extreme, but similar. I should add that I have to provide a fair bit of force for it to move, but I think it's less force than say the break out for the nose wheel to turn, it's a pretty long lever arm.
For the original poster, I did have to increase the gap between the leg fairing and the nose pant (taken out of the fairing) because I found that when taxiing in a tight turn near the stops the pant would rub the bottom of the leg fairing. Maybe that's your culprit for the paint rub?
I have looked at the track and don't see any wear that would have created the movement, nor scarring, or brightening or deformaties in the aluminum. But you bring up a good point in that I could replace those an washers pretty easy and see if that makes a difference. Or at the very least micrometer them against a new washer and see if there is any difference. It wouldn't take much play to create the movement I see, but they are pretty tight during install.
I didn't add layers when fabricating.... man, hindsight... so I definitly don't have the rigidity you do. I don't think the screws are moving, as I'm not seeing any deformation in the paint, but like I said, you can see the whole part flex a bit if you push on it vertically. If you can imagine, pushing down on the TE causes the front top to move up and the front sides to pinch in, not a lot, but it's there. I filled per plans, and used a pretty rigid flox, but I didn't add layers to the wider area. That alone is probably a bit of the difference.
Last thought for the original poster is to double check break out force for the nose wheel turning. Basically checking the clamping force on the pinned nut on the bottom of the gear leg, I know that I had to tighten that nut twice while flying the 40 off to keep the force correct, and is really apparent when it's not correctly set on the loose side, as that nosewheel can and will flutter back and forth when setting the nosewheel down. I don't know if that looseness can translate to the seesaw motion described, but it's worth checking. And if you have a rub when the wheel is hard over in taxi, then that flutter will definitly cause it to happen.
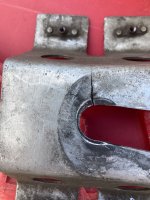
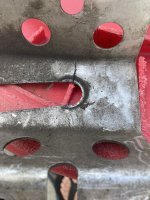
Thanks for posting. That's exactly where I was talking about not seeing any indicators or damage. Was that spot loose or rounded out prior to the damage? If so, how much? If not, what was the cause? How much up and down were you seeing?If you allow play/movement to continue, expect this result.
Mconner7
Well Known Member
I didn’t not notice any significant movement. I suspect that I had the washers stacked wrong and they did not capture the bracket snugly as it slid forward at some time. I fly from bumpy grass and am sure it is hard on these type of components. The airframe is just over 1000 hours and is 13 years old.Thanks for posting. That's exactly where I was talking about not seeing any indicators or damage. Was that spot loose or rounded out prior to the damage? If so, how much? If not, what was the cause? How much up and down were you seeing?
My solution was to replace the brackets and rework the washers to capture it firmly when slid forward. I am sure that any movement is inviting fatigue and eventual cracking. It is such a simple thing, please address it before it breaks.
I inspected mine today and sure enough I have that exact same crack in my brackets due to excessive fairing movement not being addressed early enough.If you allow play/movement to continue, expect this result.
Mconner7
Well Known Member
Sorry it cracked but at least you found it before you lost the fairing. The bracket was easy to replace, I did both.I inspected mine today and sure enough I have that exact same crack in my brackets due to excessive fairing movement not being addressed early enough.

