What's new
Van's Air Force

Don't miss anything! Register now for full access to the definitive RV support community.

Filtered air box to cowling connection

Vansconvert

Well Known Member
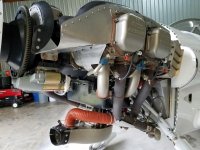
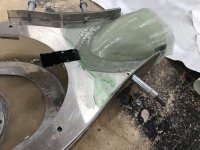
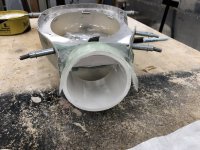
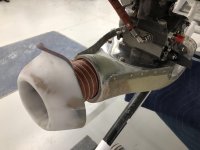
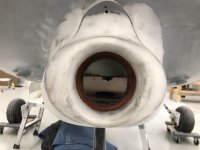
Fuel injected engine with the filtered air box set up from Vans. Connects to the intake on the lower cowing with baffling type material. The question is should the baffling material be on the outside of where it connects to the lower cowling air scoop or should it be on the inside of the air scoop?
 
RV-4 (similar)

Here is a picture of my RV-4 FAB inlet, and how I did my baffle/snorkel seal. On the cowling itself I bonded an aluminum ring shaped like the inlet to the fiberglass inlet so the seal would rub on it rather than the fiberglass which can wear away. Initially, I had the fit too close and experienced loosening of the carburetor due to engine movement during start-up and rapid power changes. I have seen that on other RV's as well. I now have a bit more gap between the cowling and the airbox and the baffle material seals just fine without transferring engine movement to the induction system. It also allows for easier cowling removal.
 

Attachments

  • O320 left side.jpg
    O320 left side.jpg
    339.8 KB · Views: 385
  • 4-Pipe.jpg
    4-Pipe.jpg
    324.1 KB · Views: 353
Baffle seal

When I bought my -9A it had no seal/baffling in this area. I added some baffle material, very similar to what’s in your photos. It got torn a few weeks ago due to wear over time, presumably from removing and reinstalling the cowling. I removed that baffling and, before replacing it, flew the airplane for a while. I noticed zero difference in any measured engine or performance parameters.

Is this seal actually needed? I’m starting to think no, but obviously I may be missing something. What’s the intended purpose of this seal (other than making cowling removal a bit fussy)?

Here is a picture of my RV-4 FAB inlet, and how I did my baffle/snorkel seal. On the cowling itself I bonded an aluminum ring shaped like the inlet to the fiberglass inlet so the seal would rub on it rather than the fiberglass which can wear away. Initially, I had the fit too close and experienced loosening of the carburetor due to engine movement during start-up and rapid power changes. I have seen that on other RV's as well. I now have a bit more gap between the cowling and the airbox and the baffle material seals just fine without transferring engine movement to the induction system. It also allows for easier cowling removal.
 
Okay, thanks. Just to be sure, your baffling material does not insert into the inside of the snorkel correct? It wraps around the outside of the snorkel, correct?
 
Outside is correct

Definitely on the outside..if on the inside it would likely collapse and cause restriction.
 
If you want to get fancy, have ease of lower cowl removal, and no leaks...

I did fly without the intake nosepiece installed once because I forgot to reinstall it when fitting the cowl. No comparison data were collected as I was unaware until after landing. It ran fine.
 

Attachments

  • IMG_1367.jpg
    IMG_1367.jpg
    427.8 KB · Views: 171
  • IMG_1368.jpg
    IMG_1368.jpg
    475.9 KB · Views: 184
  • IMG_1587.jpg
    IMG_1587.jpg
    212.4 KB · Views: 221
  • IMG_1616.jpg
    IMG_1616.jpg
    184.2 KB · Views: 191
Is this seal actually needed? I’m starting to think no, but obviously I may be missing something. What’s the intended purpose of this seal (other than making cowling removal a bit fussy)?

Depends upon how tight it fits. I did some remediation for a guy's 6A. The PO crammed a 360 into a 320 cowl and the airbox was horrible with large leak points. Carb heat was ineffective and CHTs were high. I added the 360 scoop and built a new, well sealed FAB. His CHTs dropped about 40*+ and has never needed his cowl flaps since. If you send too much ram air into the lower cowl, it spoils the cooling airflow, which is based upon pressure drop from top area to bottom area. One key to effective air cooling is to keep pressurized air out of the lower cowl.

Larry
 
If you want to get fancy, have ease of lower cowl removal, and no leaks...

I did fly without the intake nosepiece installed once because I forgot to reinstall it when fitting the cowl. No comparison data were collected as I was unaware until after landing. It ran fine.

Nice work!
 
If you want to get fancy, have ease of lower cowl removal, and no leaks...

I did fly without the intake nosepiece installed once because I forgot to reinstall it when fitting the cowl. No comparison data were collected as I was unaware until after landing. It ran fine.

I have an almost identical setup top you Bill, although I think you've done a slightly nicer job of the way that inlet transitions into the airbox. Nice work. On mine, the forward end of the flexible hose its clamped to a nylon ring that sits inside the removable cowl inlet. It's early days for my machine yet but so far its been great.
 
Here is a picture of my RV-4 FAB inlet, and how I did my baffle/snorkel seal. On the cowling itself I bonded an aluminum ring shaped like the inlet to the fiberglass inlet so the seal would rub on it rather than the fiberglass which can wear away. Initially, I had the fit too close and experienced loosening of the carburetor due to engine movement during start-up and rapid power changes. I have seen that on other RV's as well. I now have a bit more gap between the cowling and the airbox and the baffle material seals just fine without transferring engine movement to the induction system. It also allows for easier cowling removal.

Nice job Bill! Where did you get those red clamps and hex machine screws for the baffles? I see a sort of jacket over starter cable what is that?
 
Terminal boots.... Any good auto parts store..
boots.JPG

Should be on battery + post. Master, both sides. Starter solenoid, battery side.... Just incase you are wrenching with the master on.

Not needed on Starter solenoid, starter side. Or on the starter because they are only hot when cranking the motor and not subject to shorting with a wrench unless you are wrenching on the engine as someone is cranking the motor at the same time....:eek:

Or you have SCAT very close to a + terminal like at the firewall and starter solenoid.
 
Terminal boots.... Any good auto parts store..
View attachment 48048

Should be on battery + post. Master, both sides. Starter solenoid, battery side.... Just incase you are wrenching with the master on.

Not needed on Starter solenoid, starter side. Or on the starter because they are only hot when cranking the motor and not subject to shorting with a wrench unless you are wrenching on the engine as someone is cranking the motor at the same time....:eek:

Or you have SCAT very close to a + terminal like at the firewall and starter solenoid.

On the second picture over the intake tube there is a red clamp holding a jacketed cable. Heat shrink, firesleeve or optical illusion? :)
 
Nice job. FYI, you might consider adding a support on the forward end of the airbox up to the engine. Keeps the carb plate from cracking due to up / down movement.
 
Slight stray from the thread..

For those who asked, the red rubber Adels are rated for slightly higher temp, liberated from day job overstock. The wire sleeving is Kevlar anti-abrasion sleeving ..also throw away materials I saved from the trash bin. The internal wrenching SS capscrews are from Southern Fasteners, a local hardware mecca.
 
Thanks!

This makes good sense to me. Mine must be tight enough to cause no problems.

Depends upon how tight it fits. I did some remediation for a guy's 6A. The PO crammed a 360 into a 320 cowl and the airbox was horrible with large leak points. Carb heat was ineffective and CHTs were high. I added the 360 scoop and built a new, well sealed FAB. His CHTs dropped about 40*+ and has never needed his cowl flaps since. If you send too much ram air into the lower cowl, it spoils the cooling airflow, which is based upon pressure drop from top area to bottom area. One key to effective air cooling is to keep pressurized air out of the lower cowl.

Larry
 
Back
Top