Hi Irv
The Flyleds tail light needs two wires to operate, plus and minus or positive and negative if you like.
Note that I didn't say ground in that sentence... The light is operated by the Flyleds controller board using 'negative switching', so if you add any extra grounds to the light you will jam it on at full power.
The third (black) wire shown going into pin 7 in the diagram in the first post is the cable shield. Pin 7 on the PCB is connected to ground, so as the comments above say this enables the cable shield to act like a pipe and contain any possibility of any noise 'leaking out' into any other adjacent wiring.
Essentially not required with the Flyleds kit but good practice anyway, whereas your old school xenon strobes would wreak havoc without this shield.
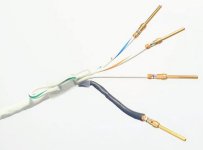
This is an example of how we terminate the shield wire.

We split the criss-crosses apart in the shield wire with a small screwdriver, which takes about 30 seconds, and exposes the wires within. We then cut away 10-20% of the shield strands and twist the remainder together, which is then thin enough to fit into a typical 20AWG crimp pin.
We then cover this with a small piece of heatshrink and you then have a wire to work with.
We're not using the white/green wire in this picture so it's folded back out of the way.
I reckon this takes less time than mucking around with solder sleeves, and it costs less and looks neater in this guy's opinion!
As per our instructions, at the tail light end you should trim the shield wires off and not connect the shield to anything.
<Knowledge sharing continues:>
Similarly with your headphone wires, the shield stops electrical noise getting
in to those wires.
You might see diagrams like this in other manufacturers instructions:

The oval surrounding the three wires represents the cable shield surrounding those conductors, and in this case with the S in the triangle they're telling you to connect the shield to ground. Garmin has you connect the shield to the plug backshell, for example. There's lots of assumed knowledge in that picture; now you know!
Note also that the shield is not connected to anything at the headphone socket end. There's no oval (but probably should be), and no S in a triangle or ground symbol.
In this picture (also stolen from the net somewhere) the shield is shown as connected to ground at both ends:

<Knowledge sharing ends!>


