Latech15

Well Known Member
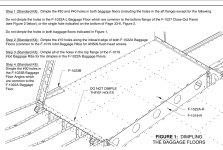
I’m baffled as to how I’m supposed to dimple these holes. They are right next to the side skin on the passenger side and in front of and behind the baggage door.

Unless somebody has some trick I’ve never imagined I’m going to have to drill out the 25 or so skin rivets and take these out in order to get them dimpled.
 
Last edited:
There are many places during an RV-10 build that you need to look ahead - and perhaps not well covered in the plans.

Here I suggest not dimpling and just use LP4-3 pop rivets instead of CS4-4.

If you already dimpled the F-1023B then you can machine countersink the underlaying floor enough to accept the dimple.

Carl
 
Are you sure you’re looking at the right part? The two F1023B shouldn’t be riveted to anything yet. They’re small (< 6”) long triangular plates that fit in your hand with #30 holes going into the baggage floor and #40 holes to match the side skins. I dimpled them outside the airplane with a squeezer. Note that there is some good advice on riveting them on the RV-10 wiki (https://rv10.org/index.php?title=SECTION_33:_BAGGAGE_AREA).
 
Got it. Looks like those got dimpled on page 29-8 step 3. The easiest way to avoid a drill out would be to use a #30 close-quarters dimple set (https://cleavelandtool.com/products/3_32-close-quarters-die-set?variant=31450327318590). Another idea - call vans and see whether countersinking would be acceptable, and if they concur, do that very carefully with an uncaged cutter or a modified cage. If you plan to cover the baggage area with carpet consider using.LP4 rivets instead, as someone else suggested (again, I would ask vans if this is acceptable).
 
I talked to the support team today and we came to the conclusion that I can use flat head pulled rivets in most of this area. The majority of them will be behind side cover panels anyway. I’ll be able to use countersunk rivets in front of the baggage door where I was able to dimple those parts anyway.

Thanks for the help gentlemen.