What's new
Van's Air Force

Don't miss anything! Register now for full access to the definitive RV support community.

Broken Tap in rollbar - UGH!!

jfisher

Active Member
Major bummer tonight.

Step 4 of 38-03 calls for tapping 6-32 threads through the rear window into the rollbar. Going well until number 8 when I managed to snap off the tap. RRRR!

Not a happy camper. Been reading lots of google searches, but can't find anything that would work with plexi on top of aluminum.

The tap is broken flush with the top of the plexi about halfway down.

Couldn't find anything in the forums for broken taps. Anybody got any ideas??

I'm stuck.
 
same thing happened to me but the plexiglass cracked too. I had to order new plexiglass and start over. I ground off the broken tap flush with rollbar cause i couldn't remove it. Drilled a new hole next to it. The second time I removed the plexiglass before tapping. That was a hard and expensive lesson learned.
 
Stop, pause, don't make any sudden moves. It will be there tomorrow and the next day.

From what it sounds like, the tap isn't actually broken off inside what you were tapping. Any such event is definitely time consuming, but this is a little "craftsmanship" test that you can absolutely succeed at.

Noodle it long enough and I assure you that you will be victorious. Sometimes it is even acceptable, as a very last resort, to complete a "fix" by abandoning in place and moving on.
 
That happened to me on an RV-12 canopy. I had a small cone shaped grinding tool for my Dremel. I used the tip of that to grind the broken tap down below the upper surface of the Plexiglas. Doing that ended up heating the plexi enough so a helper could actually gently raise the plexi off of the broken tap. I ended up with a hole slightly larger than the others but that wasn't a problem.
 
one option, cover hole with RTV and move on. I have one like that. I notice it once in awhile and smile now.
 
Is it not possible to get a tap extractor in there? You can get relatively inexpensive sets of extractors.
 
Tap extractors are not that expensive. Mcmasters. When you tap, always use a quality tap and tapping fluid. When you extract, use tapping fluid and slowly work out and in until it is free. They work well.
 
Dissolve it,

Dissolve it. Google and see what acids will do this, it will only take a few minutes with the right fluid. Nitric acid is one, household ALUM is another. It will only dissolve high carbon steels, or at least much faster, and no aluminum at all.

Otherwise, leave it or punch it through.

Tap Magic is a good tapping fluid for aluminum, not the best, but more available. That bar is 6061 alloy and softer and more prone to galling. Tap magic is good for drilling that allow as well.


Edit: The ALUM works, but is slow and requires emersion. Not a good candidate, sorry.
 
Last edited:
If it is flush with the plexi, can you remove the canopy and expose the end of the broken tap? If so you might be able to get some vice grips on the stub.

Not familiar with the 14 roll bar. Is it aluminum or steel?

Good lubricant for aluminum or steel - Boelube.
Good cheap lubricant for aluminum - kerosene.
 
Thanks everyone for the feedback. Lots of really good options!

I will be sorting out a priority of things to try (buy) tomorrow when I talk to Vans and a few vendors.

Feeling much better today. Big lesson learned yesterday. What a humbling experience this building stuff can be.

- Jim
 
Final update - success!!

Talked to Sterling @ Vans' tech support today and he suggested heating up the broken tap with a soldering iron until the plexi melted enough to lift right off. Said I was not the first one to do this.

Worked like a charm. Only took a few minutes. Removed the window, and then had enough of the tap left sticking out of the rollbar to grab it with some pliers and work it loose and unscrew it.

Goes to show it's never as bad as it seems.
 
Final update - success!!

Talked to Sterling @ Vans' tech support today and he suggested heating up the broken tap with a soldering iron until the plexi melted enough to lift right off. Said I was not the first one to do this.

Question - why wouldn't the plans have you drill the plexi and the rollbar, remove the plexi, and *then* tap the rollbar? Obviously, I'm missing something.
 
I think it is because in a subsequent step the plexi is drilled a little bigger and countersunk. When you tap with the smaller plexi hole it tends to keep the plexiglass next to the frame closer and not pucker up; it also makes it easier to tap at the right 90 degree angle. Any scratches created by the tap are drilled away in the next step when the hole is enlarged.
 
Question - why wouldn't the plans have you drill the plexi and the rollbar, remove the plexi, and *then* tap the rollbar? Obviously, I'm missing something.

One of the more common canopy installation errors is screw holes that are not tapped straight.
This could be dealt with in many different ways but this was chosen as a simple method since the canopy is already in place to act as a guide.

BTW, don't use cheap-o taps. The best choice, especially for a novice to using them, is a quality two flute tap bought from somewhere like MSC.
3 and 4 flute taps have a smaller cross section and break much more easily if the torque gets high.
 
don't forget to advance half a turn, retract 1/4 turn or until you feel the chip break off. If the tap starts to be hard to turn, retract it and clean out the chips. And as another poster said, cheap tools will cost a lot in the long run. American tools (drill bits etc) cost a lot more, but there is just no comparison in quality most of the time. When I started buying $$$ drill bits I couldn't believe the difference in finish, ease of use, longevity and fewer broken bits.

Also, slightly off topic, the main reason drill bits break is not because of sideload, it is because the flutes get full and the bit jams. Not relevant to drilling aluminum sheet, but it's good general knowledge. IN the machining world, you drill down 2 diameters, then retract and clear the trips. It's called peck drilling and cnc machines do it. If you don't your holes won't be straight and you will break bits.
 
Someone should make a sticky note about 6-32 taps. Because of their combination of small diameter and (relatively) coarse threads, they are the taps most likely to break.
 
Get Spiral Point Taps

Spiral point taps work best because chips are pushed out ahead of the tap rather than filling up the flutes and causing binding.

Stewart Willoughby, 6 paint is next.
 
Major bummer tonight.

Step 4 of 38-03 calls for tapping 6-32 threads through the rear window into the rollbar. Going well until number 8 when I managed to snap off the tap. RRRR!

Not a happy camper. Been reading lots of google searches, but can't find anything that would work with plexi on top of aluminum.

The tap is broken flush with the top of the plexi about halfway down.

Couldn't find anything in the forums for broken taps. Anybody got any ideas??

I'm stuck.

Mine :

2poqgpx.jpg


With the other tap's end, a 8-32 nut and three little bits of piano string:

55fes9.jpg


2nh3w4j.jpg


and it came out slowly. (Don't forget some cutting oil)
 
Well, I'll vote for a lesson to be learned: by me! Cheapo tap or not, that is one goodly tool to put in my noggin' bag, time to invest in some piano wire of varying diameters. Thanks!
 
Add me to the broken Tap in the rollbar club. Wish I had used a higher quality tap and been more careful. 4 inch crack running back that I stop drilled. I am going to trying gluing it with Weldon #3 I guess. I wouldn't recommend tapping through the canopy, its just too risky and multiple people have messed it up. I would spend the time being careful keeping the tap straight or building a jig for it after #36 holes are drilled. I am a bit devastated and now need to decide what to do on my special order rear canopy. If I get a replacement canopy will I be able to line up the holes well enough without ruining the threads to get a good fitment? Who knows.

-Jason
 
There's something about 6-32 that causes both taps and screws to break, especially 6-32 into aluminum. Because of this I avoid 6-32 like the plague, and use 8-32 as a substitute if it's at all possible.

Even 4-40 taps/screws seem like they hold up better than 6-32.
 
. If I get a replacement canopy will I be able to line up the holes well enough without ruining the threads to get a good fitment? Who knows.

-Jason

It is possible to replace the rear glass after cracking it. Not cheap, but doable. Ask me how I know. :eek:. A bigger concern to me than the rollbar holes was aligning with the larger dimpled holes in the fuselage. I made up a special jig to be sure I hit the center of each hole when I drilled the window. Good luck.

28ryh1.jpg
 
Last edited:
My fix

I am going to order a new rear window. It will be easy enough to install as the last item. There is no way I could stomach installing the cracked window. If I get the same crack after 100 hours of flying I am sure it would be a different story and I would just stop drill, glue and fly on, but not for an initial install.

My tentative plan for a fix is to drill the #36 holes in the rollbar to #30, countersink and plug with a CS4 Rivet. I will drill new pilot holes #52 or smaller in the roll bar between the existing sets. This will allow me to get correct edge distance on my screws and install like normal. I think if I tried to match drill the new canopy into the existing holes I could probably get it to work but inevitably each screw being a little off would stress the window. This will make sure that the fitment, and more importantly, holes match perfectly between rollbar and rear window if I can pull it off on the second try. I will buy a much higher quality 6/32 tap. I will go slower and back out every few turns to make sure its cutting easily. Once I have match drilled #36 I will tap the holes with canopy off using an aluminum jig to keep my holes straight instead of a $500+ canopy! I haven't drilled the skins yet so that will be a normal match drill.

-Jason
 
Last edited:
What is a quality tap? .. . . . HSS

I will buy a much higher quality 6/32 tap.
-Jason

I am still learning well into Phase II (and retirement:eek:). Doing some research on taps, High Speed Steel (HSS) taps are expensive, cut faster, sharper and cut easier. Using carbon steel taps for critical locations is a bad idea. MSC will show the material.

I had to replace my 6-32 and got a HSS one from Travers. It is 10X better than the standard carbon-steel taps. Next look at geometry, most times the better geometry has the better steel. Note they are much more expensive than the carbon steel that comes in all hand tap sets, and so much better.

A must have for any build.
 
I, too, am on window #2. The first one broke off a 2" chunk in one of the first holes we drilled into the roll bar. My friend was running the drill while I sat in the baggage area to back up the aft holes. We used a pointy-tipped #40 plexiglass drill bit in a battery-powered electric drill because it could turn slower than the air drill. (That was a mistake in my thinking. The speed that matters is the feed speed, not the drill bit rotation speed.) The off-center weight of the drill made it hard to line the bit up perfectly with the hole while drilling it as well as hard to control feed pressure. So the bit was slightly off center when it got to the pilot hole in the roll bar, fed into the pilot hole, and moved laterally faster than the flutes could cut the plexiglass to make room, knocking out the chunk of window #1.

That was a hard day, harder for my friend because he used to do this (airplane construction) for a living where people got fired for scrapping expensive parts and because this was his first real contribution to my "pile of shame" in the corner of the basement. For me, it wasn't so bad because now I have a plexiglass window next to trim tab #1 and a handful of other parts. As I have said before when people say to practice techniques on scrap material, my shop is equal opportunity: every part that comes in has a fair shot at becoming scrap material.

Anyhow, we got the new window, improved our technique,[1] and carried on. I read this thread beforehand and let out a huge sigh of relief when we finished the tapping per the plans. Thanks to those who went before on that front!

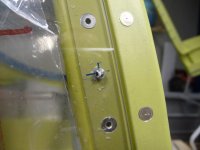
Then we removed the window and started drilling #27 the holes, thankfully starting with the aft center hole because the bit self-fed and caused a chip and a couple of small cracks.[2] I say 'thankfully' because whatever I do to solve the problem will be symmetrical, and that hole in the fuselage top skin is hard to reach to dimple anyhow. I used a step drill to slowly remove material until there is no damage remaining in the plexiglass, which ended up being 3/8". I have spent the past week debating how to fill that hole, which is just a matter of finding a piece of material I can use as a bushing and deciding whether to use a washer-head screw or the original flush-head screw, countersinking the bushing to fit.

I don't envy those who have had to remove broken taps from their roll bars, and I'm honestly shocked I didn't have to do that given my luck with things like that. I had a car where the rear license plate was held on by 3 bolts, because the previous owner lived in a salty climate and I broke an EZ-Out off in the bolt that held that corner of the license plate on. When I sold the car, it came with a half an EZ-Out because I never did figure out a solution. But the moral of the story is that there is more than one way to screw up your window, and we are all in this together.

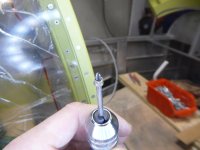
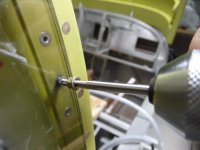
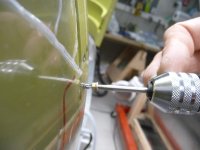
[1] Our improved technique for match-drilling the window/roll bar holes was to put the pointy plexiglass #40 bit in a Dremel, which is lightweight and nearly symmetrical, so there is no force trying to turn you off-angle and you have more fine control of the feed pressure. Once we got through the plexiglass, the howl of the bit tip on the aluminum being an important clue, we switched to a non-pointy #40 bit in an air drill to go through the aluminum. Combined with slowing down the feed of the bit into the hole and better hole alignment thanks to the Dremel step, this drastically improved our results and we had zero problems.

[2] It worked much better to drill the holes up to #36 and then #27. The roll bar edge will have been drilled to #36 and then tapped #6-32, so you can go directly to #27 there and you're barely removing any material, just the threads you tapped into the plexi. But the holes that you match drilled #40 from the aft top skins will still be #40, so going one step at a time worked better for us.
 
Broken tap

I drive tap out with a punch then drilled for a #8 and taped #8 and drilled plex as well worked great
 
I have the same question as Bret - why not use Sika instead of drilling and tapping and all the risks that vmes with it?
 
Will Sika Flex not work here?

It would probably be possible to glue the window into place. I'm no expert, which is one of the reasons I went with the plans-specified attachment method. I also like the plans method because it allows you to put the window into its final position and identify necessary trimming at that time, knowing it will go back to the same place when you permanently install it.
 
One reason for going with the plans method is, if you have the QB fuselage, the holes are predrilled. You would have to find a way to fill them that wouldn?t detract.
 
One reason for going with the plans method is, if you have the QB fuselage, the holes are predrilled. You would have to find a way to fill them that wouldn?t detract.
The holes that you'd need to hide are in the aft top skins, which are part of the empennage kit and prepunched regardless of what you order from Van's. The pilot holes in the roll bar are also prepunched but those are underneath the window so they would probably disappear once you glued the window down.

So, that raises the question of whether there is any logic in using screws on the aft/bottom sides of the window and glue on the front side. Match drilling the skins to the window is super-easy. The problems all seem to come from match drilling the window to the roll bar and tapping the window/roll bar. I already drilled and tapped mine so I won't be the guinea pig on this idea, but maybe some other brave soul wants to give it a shot.
 
I broke off my 6-32 tap in my rear window and roll bar tonight. Found this thread and felt a little better that I'm not alone. Someone mentioned using cutting oil while tapping the threads. I was contemplating using liquid boelube, but wasn't sure what it would do to my window. I was concerned with crazing so I cut them dry.

If anyone has a source or URL for a nice tap I would appreciate it. I found a plug tap, but don't know the pros/cons of each of the different types. https://drillsandcutters.com/1-32-h...nVjYwsycMPB6ExfGUlFtZaSKyKSVrSlhoCRjQQAvD_BwE

Jeff
 
For the picts (those in my message #22 are unvailable).


With the other tap's end, a 8-32 nut and three little bits of piano string.

and it came out slowly. (Don't forget some cutting oil)
 

Attachments

  • My RV14 0822.jpg
    My RV14 0822.jpg
    217 KB · Views: 213
  • My RV14 0824.jpg
    My RV14 0824.jpg
    187.2 KB · Views: 218
  • My RV14 0828.jpg
    My RV14 0828.jpg
    200 KB · Views: 220
  • My RV14 0829.jpg
    My RV14 0829.jpg
    214.9 KB · Views: 216
I have used a hammer and formed lengths of medium hard wire to fit the broken tap's flutes. These are then inserted into the tap and can then be turned and worked until the tap is removed. it's the same principle as the tap extractor, just not as good. I have used several tap extractors, and other techniques mentioned above, all with success. the extractors are the best way to go.
 
This happened to me as well at the same point. My bad for using a #40 rather than a #36 bit. It broke off just above the plastic, so I was able to remove enough material around the tap to grab it with a tool and back it out. Since it's countersunk anyway, you can't even tell.
 
Back
Top