What's new
Van's Air Force

Don't miss anything! Register now for full access to the definitive RV support community.

Show us the status of your 9/9A project!

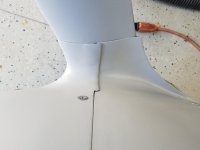
Fabricating a plug for a new snorkel. It will be removable to ease the difficulty of removing/installing the lower cowling with a three blade prop, and it will also house a custom FAB. I don't care much for the Van's FAB bolted to the bottom of the fuel servo. For experimental purposes, I am going to embed a copper tape VOR antenna in it and see how well it works since I already have the materials on hand. No big deal if it doesn't work well. I will just go with my original plan of an Archer style wing tip VOR antenna.
46601971882_7993b94108_z.jpg
[/url]fiberglass 3 by David C, on Flickr[/IMG]
 
Removable scoop is a game changer. You will find that with a removable scoop that it will be rare that you will have to remove the lower cowl.
 
Removable scoop is a game changer. You will find that with a removable scoop that it will be rare that you will have to remove the lower cowl.

I agree Bob. I put one on my RV-10 and loved having it. I really enjoy fiberglass work also.
 
James cowl update

Here's a few pics of the progress. I still have work to do on it, but it's coming along. It was pretty cool to see it on the plane and to be able to open the oil door and take out the dip stick.
6emzpy.jpg
[/IMG]
syrubb.jpg
[/IMG]
29vnjx4.jpg
[/IMG]
 
Finished assembling my FlyLED, "The Works". This is the first time I've had one of the wing-tips outside in the dark. Paul at FlyLEDs was a BIG help. Pretty impressed.

https://photos.app.goo.gl/123Apm9HwNmjvVbX7

Tom,
I'd be keen to know if you had problems fitting the lights into the wingtip fairings? I know that Paul at FlyLEDS has said they can be tricky to fit, and may need a fair bit of trimming. My interest lies in the fact that I've already built my flyLEDS kit, and my wings are on order, so I'll be going through this in a few months.

The lights are **** bright, even testing with a 9V battery you couldn't look at them for more than a second or so.
 
Goeff, it's a bit tight. I had to trim the PC boards a bit to make them fit. I used a belt sander mounted upside down on my work bench. That was a no brainer.
The biggest challenge was getting the mounting screws with the springs on them in place. Not a lot of room to get your fingers in there and I sent more than one spring flying across the shop :D. I replaced 2 of the short 6-32 mounting screws with longer ones. That made adjustments a lot easier. I used automotive double sided foam tape to mount the outward facing board to the wingtip - seems VERY solid. Once the forward facing wingtip surface is cut away for the landing lights, there's not enough surface area for foam tape so I used 3 nutplates and screws. Plan carefully where you want to place those nutplates so they don't interfere with anything. All in all I'm very pleased with the result, and they sure do seem bright.
 
Last edited:
Goeff, it's a bit tight. I had to trim the PC boards a bit to make them fit. I used a belt sander mounted upside down on my work bench. That was a no brainer.
The biggest challenge was getting the mounting screws with the springs on them in place. Not a lot of room to get your fingers in there and I sent more than one spring flying across the shop :D. I replaced 2 of the short 6-32 mounting screws with longer ones. That made adjustments a lot easier. I used automotive double sided foam tape to mount the outward facing board to the wingtip - seems VERY solid. Once the forward facing wingtip surface is cut away for the landing lights, there's not enough surface area for foam tape so I used 3 nutplates and screws. Plan carefully where you want to place those nutplates so they don't interfere with anything. All in all I'm very pleased with the result, and they sure do seem bright.

Thanks a lot Tom!!
 
No pictures, but I went on a bit of a spending spree the last 2 weeks ordering everything to finish up my 9A.

Engine paid in full now, due mid march, prop end of march, cowl/baffling in enroute from vans, exhaust ordered, and Dynon equipment is waiting for me to pick up at UPS in about an hour.

Time to get to assembling everything now.
 
Looking more like an airplane

Lots of things getting done since the plane was moved to the airport last March, including those dreaded spar bolts which are surprisingly easy to get in, but much harder to torque down (the bottom ones). Pulled the plane out today to test the nav antenna that is in the right wing. The Eastern Iowa Airport has VOR/DME 3 miles west of the airport and I was able to tune in and hear the morse code. Many more things to do but still hoping to fly in a couple months.
phUFjoU6KTpXi04PPw51XUiHEZvCopAaiVbsnA2IR9jANvJgcrKeZsmcawR-UGmHFSFALLl1XTO1lHod3qh2Ekjpsi9Y8aAmVSlt8IWpmaYH0QWhG3BsRSobGx5C4ndAi73wolRgtYKT0QD0bvOqMdVWWhTf-iYBsPCI9jFje3-y7V-poPxiuvkGcxCrDWT8sAhoOTWKWmRwb3GZpahYFTRzXtoDc8xNhugUVV3DhcTu4VjEkuVbDrlR3f-nC9X6zFOejT2NvAQo6sE-jZ7EspncCsehJlSlmuYSIC7LZyWLWW-giMVRFxXXwbp7eePBQCAJ155FKYHSJFDBdGy7B_GiCsck4CtIRin4e3nZhts4hldppI8zYrs0DWeBDsamvxE8IeF8x2pBpwxmtIdxaxF8KKeJer40g__yUc19-9Y4xLb5IjyZBcWCbFAVGz5E_SMG1ZC2Z-Gg12-VeOk0o3oDZWsfmNuYeaH0N3sE3zuqf6DX8RLIxKRI05Z_7qywFT5fuRJuWJfIJ8nRU6NqskRHIqMXscEbkVLAeyAc2K5UEWqWQuTlxwzSwWyKyh-RPr6SmlF6PCmD8y0RFvrN0d8mTB3q2MNNIvt1BiXoZtN4Hc3jZG8Q6eZiaUZ5PH9r8oqtBQ_ZqyunCivZ8LfxsNmj-qYJ2tU=w1280-h960-no

qWSI9NBaVkeXZRjEZTcJWxHsnKhUP3TorPY--GKdpA3F4yI57jPlmtpI9XFWNKcom2AIcC4Auxzx5_ZByIe_T5icSeh2sYQrYrwjkkCq5t4csr6w6KkUO4_L9Ji3uVaghutTNzjetRAUtmch70soYYJgXbmPLXBvQNbQYeh02ZjaG_nba6WVI5dvS6Z43BjDxKZSBTrLBsnAfIZsHEqoyS7q7HrygMuxMU7XFCI5WKZ1cKBp2BCrpz3SpNd_NdYbowdkJPO25aGLAMm0fuPeDdK3k177Rgcph_DiyST3P4x8ydtZ0yYZiVKgXgybZYaJyWTq2mYLgC6c-L03WTrKI_dWLIzyTfmhpKcNELdLj_1ugDRyxz032Lus7tCwYRh28Gw19AQCu3LH1SHDyndCHKqSN1TggKV-FbJTVUTq6BV07Tmuv_w6fCfnp-VPrcak7W8bQhc79hqQLxXWEFnFjKVW9ttN0mV-8OYMvzGGBMJuNoRmkWEDTdD7UcofpBjZGr_Jml9RhAP3Wfw0Mvufq40TOEtzQn7j6eCACVcgY0jTswO2mGCmGWy1w8oIXx1FZCTOEX9Z2TWvU_MwAz0GcDyf0FkrHk4oYqZ3rsVnXnLipIe_K7py7j719Jdgx_pBmjg21P1elzPtImypGi-ukE0acKHXzTU=w960-h1280-no
 
Panel Update

Finally getting around to cutting the panel. Going quite well with a jig saw and circle cutter

bdOTgigdMA_5vVrPqiu2CGDotnp1MrbO_QSMGjfvTnKzqO-MGtRWR-Yo217NcwKaMc_hh9urk8yKMm7_Z7oy6-erFwdcPLjQYa6q3iiUTwMTNx_p7g-m0FYsUWZJ5o_OSE5mchrp5wFryd_7GUWQn2sUqkZd9yGVnQ9gbxCJ-KIKajHO_WmGkg9J_pXtZ-NinGoX-tATBf3XrudaLvsLm7g_YGO2DqLMAUalLGdNMaxtwUbGYk5TtwmiO8UnS447kPb6_226a_p_gjVCKvtpTDTN-lKV6fj3zZUQazA_P2953j12wL8pFyOl4drHyLFa0yw1zCoJvEVYNWf82AG_QUvMvYKl0cu7BAqQ3D3qRSy7Je6OfaHEmu2J3njR21IHpQuhTqx8nmvUQTc8WINKAmFjBnzOxN9dxhDjtTyK2UvCweuvihWToFulCJw5c2HxO0WFVFTZ4i0kAzSJ9H8JC72oUg25WH7bi2K4HQJRsO2W7RQC5-fM38j4NOrm8lQESprVrIXov-JDyV4fnyeCavY2g8fJKXaaMBjCusuUkI3IzEZnQx3hiZ2YPjui3j1XHc625HfQbuwFz_UkyWZ_tMWsTZz0_wdMNqFsM_8x8wqNDuW9Tb6pDk3s_f8D0M7w4w8Rm1zA534RxKSDgurZsi0ioXVt7J4=w493-h657-no

89Y7SdVZ0q-uOsGKQjDl-rEysT6N38dqjscGDosz2sJ5VTD-r6xJNAre0U5vJlGN28VtjdYzm9DseUuqI2lvtimnIuLU7JW20rx9t-EoojbIiN6PvWljJIRZN7KauTs6-rfUZmfewqIKaDLTapMAzQ4nFZW0rrvKFgAM8_ooaMmB9W7d3Oaslt0DAEI_82jbGBvP52RbqDWEszLC2Bmf2o2EkBPeyYTpxsIdKg42atIwT5zwePd61kdG3GhJP8nqJwSR0nX-Pr_KbduLgQ5Wj7RpKnhxqKwxDEVtsrDt9Djj42Z1z0i1t-qw9VnO2dA9Kq4R_mKyyOclQJeF5VsX367fhkX7C8Z89dRMtpjr-M6Y8vA7evE2AqhkNtj1LsahIDChzCMMF7vCka_8aYAgLlBS82YzwQFXz7C63fyG21a5OK1VC4dMJjM1WkT3whKlTuyJT4ullEk_vzAPOWu-Y4S9JgVOJiECF2O7jcgB1Gh1CHqJ6ZVPa10H1Mhs6Aovx2ijr8uKzgs_nDM_mOCsvHI7ae-L83Ow5mL1kX-lpkgCwbAeiFmLMhjFbKAFDQ5MyRPa9lqSVDN6HnstxMXSQX-cS4_jUHB-7d41vAZBdJjjsBqjEcv_hZNQAiSApv_1-xBgHAdUsNAX2S9JZhGbXhIogewsylI=w876-h657-no
 
Get out of the workshop

Mission Windows successfully completed today.
The window frame had to get out so that the fuselage could leave my workshop in the basement. Now it goes to the painter.


nQIsysm.jpg

IPIC3VH.jpg

y4CXNiS.jpg

YSUaDhL.jpg

wVY1mQc.jpg

vGLLV0i.jpg

ySsfODs.jpg
 
Last edited:
At the airport (KTTN)

Finally the weather and my tow truck driver cooperated and was able to get the project over to the airport. I sometimes have trouble with google photos displaying images - forgive me if they don't show.

https://photos.app.goo.gl/M2yEEV8iiEnjbgzt7

[ed. Sorry Tom, I can't see your images. Looks like you've hosted on Google - check that they are in a 'shared' folder on your end. v/r,dr]

htOnsLFwQIAkUQkOJadsSxoPKj7HMwc2yFvN07pm4CNuTs6VKTnB9JcNfYOMMTuuxJKUPMbrHyJn6DstiOXF-N9xDRlbGQ9K0YMGzKwOhN6ZPogKgy64MDJmoA0eNdTqCC0ywenYiqyG_Us8TZcZBp48ZffV0MMCQWLw56bG8n9_FozizgvM_DobbR6k6-h1EGRjApWGFPdsciNq8WvQLQl7olekkPQk3J1AFnnEA7IN1aRluYzrSKHiCEvkgYyFdWoMfXPV1lC76aov5ob9j1kwJ3pOy7sRV5EydR24DMwwcd8DizviiGImvtm0GdiVv1ITHxhlZmvoNlfXzsicVUNynmIJ8qjljMBN3qp7WAUqaCka1aHR4zBHdIN2npQoWPqlvNBuop9kXvtT5YTGo8cRGa_O9lBSved5FUEwYR1MCzxwkwnCufqvcpsTR3EErzKqTQD7Zwd2RdnbYLN-XIdVmNq9WVaxn863W9vY68MlSTARqcvpDVAMxNQ6zceGE6npEI4FTaXW6VrfJjT72BHxueMe9ipkFzUjIqMWTeo5zIkrM8_2e6kqqRSXwq96LLliUYt3RfJZki7IKG2OjcHH1tYyFLTOMda4Hc0ubrHFzjY7L_dYrUPuoBkouOCp7gSzNP5o0h9gQhC3R_RIYFEvZytB2HJRKWRAQ_KcRUEsye4seZ0LVLE=w640-h480-no


1sMu188LV8eWqrtcXoYjgHGpipm1h9SvPMlv-x_HgbBlHHQcloRXxqHfxKHHAqhqmMrnWICVdp1wgzB-RjN8yROaoS0x7DrcDYW01PcLf0ddSDRp-GhCxVb6EP27xaWzbqUb0kC1lxtZ2Jlw8_2CRa2mNR_9P1bMRYTa0qrswDB2VecBe4VMbtV6tkvVt4UT-c-tHB1DuZGmaWsBsn7C7jQLZe7ZhKJBwyg1DsuNsjmAKtxvkk35j5QNXKmksKqeA4dgZRhy_pSpuK1BZtNXc_89NHi63o-6K4WHNNfdxLRK8hr-ZfUPg7jHSqSrimLour6njo0AXS0w9pdlowJ2yBM03XPf8O52qH9Hb9koOYSrwQZhQnB7NC91OkzevLSqQ-_Ggh3vzDypf9aKR_8DmMeKnr0lItYqQc5KpWmZSjeML8v1505wS2LMDGyI-Z5lr1CLBvWgKLt5rVBk4xkuro67bpUZPNCzYMk4ee1yoIgX2XFxbf13hSiW8RbitSR1WqzgDadxBizNggeG-KP5w9As0p_BNo5_GITukGxOjEofd-_JsN2m8sD4OD4FWtR31afbuehzgurYagt6OXDCxvJHKezf6d6knrg0Ja2ibr3lkD10il5bj26HkF47by5-DTaXf7tcswlFylshQMUnyLcocCz-TcX480Bz3mNjlZjz3UDyfsblKM0=w640-h480-no
 
Last edited:
Powder coated front wheel bracket

Having too much fun powder coating things. I took my baffles elsewhere since they wouldn't fit in my little oven. Now the wheels will go on. I could wait, but I'm excited to do it and I can work on the wheel pants etc while I figure out how I'm paying for my panel:D.
20200617-210347.jpg
 
Having too much fun powder coating things. I took my baffles elsewhere since they wouldn't fit in my little oven. Now the wheels will go on. I could wait, but I'm excited to do it and I can work on the wheel pants etc while I figure out how I'm paying for my panel:D.
20200617-210347.jpg

I think DIY powder-coating is cool, but I will offer one comment regarding something that a lot of people don't know about.

Highly loaded parts like a nose gear fork (engine mount, landing gear leg mounts, etc.) sometimes crack. Looking for cracks on these types of assemblies is one of the things done during a condition inspection.

Painting or powder coating these types of part with a dark color (black being the worst), makes cracks nearly invisible.
That is why all parts supplied pre-powder-coated in the kits have always been very light grey or white.

Well guess I made a rookie decision on the black powder! If i knew that a few days ago I would have picked a different color. Thanks for the info!
 
wheel pants done and primed

Finally got the wheel pants and fairings done and primed. They're not perfect but look great from 10 feet away:)
 

Attachments

  • 20201016_142221.jpg
    20201016_142221.jpg
    150.7 KB · Views: 640
  • 20201016_142248.jpg
    20201016_142248.jpg
    143.6 KB · Views: 577
  • 20201016_144909.jpg
    20201016_144909.jpg
    425.6 KB · Views: 689
Those look really good! I ran out of patience about 5 minutes before I started on my wheel pants. They fall under the category of "It ain't right, but it's right now."
 
Firewall Forward complete

Thunderbolt IO 360 M1B with piston squirts. Firewall mounted RV 10 oil cooler.
 

Attachments

  • Firewall Forward.jpg
    Firewall Forward.jpg
    723.5 KB · Views: 455
Thunderbolt IO 360 M1B with piston squirts. Firewall mounted RV 10 oil cooler.
Mike, if the paint on those baffles is a preview of the paint on the rest of the aircraft, I think you are going to have one beautiful RV! Very nice!
 
I have to ask why I see so many RV-9/9A builds installing 360 engines when the recommended maximum is a 320? You still should not exceed Vne, and it adds weight and fuel burn. The only advantage I can see would be on climb performance if you live up in Leadville. Am I missing something. Would like to know as I plan out a -9A. Thanks!
 
My understanding is that the cost of the 360 vs the 320 is not very significant, and the weight is not very significant. The cruise speed would be better with 180HP and climb performance would certainly be better. I'm not condoning or condemning.
 
My thoughts

I have to ask why I see so many RV-9/9A builds installing 360 engines when the recommended maximum is a 320? You still should not exceed Vne, and it adds weight and fuel burn. The only advantage I can see would be on climb performance if you live up in Leadville. Am I missing something. Would like to know as I plan out a -9A. Thanks!
I really thought hard about the 360; it is soooo tempting. but I put in the 320 because I wanted others to be safe. the 360 can fly real close to Vne and any push over during cruise risks exceeding Vne. For the conscientious pilot it is not a problem. But if my son or daughters were to fly my plane, or someone not as familiar, I am worried it would be a problem. Others have the need for the extra power, but i don't, so i didn't. The fuse is the same firewall forward as the RV7, so a 360 is not that hard to shoe horn in.
 
The throttle is simply one of many controls that the pilot must handle correctly to keep the airplane within its flight envelope. You can exceed Vne without the engine running at all with just the elevator.

Be a pilot, not a passenger.
 
Almost a 14 mod done and rear window installed

I just finished the install of the Almost a 14 mod. I had it done once, but I chose to install the aftermarket flap motor and that doesn't jive with the lower bar that's needed with the mod. I ended up installing the push pull cable. I had to make custom brackets to hold the cable on each side. I think it came out pretty good for an amateur. I also just got the rear window installed with sikaflex. It's not cosmetically perfect(look at Bruce Hill's and Bruce Swayze's sites and you'll see what my goal was) but is good enough. Thanks to the 2 Bruces for their great build sites!!
20210930-215540.jpg

20210930-215549.jpg

20210930-215633.jpg

20210930-215657.jpg

20210930-215754.jpg

20210930-215840.jpg

20210930-215849.jpg
 
One step closer. Should be flying spring 2022.

Your picture is pushing me to install my interior package. I thought I was OK leaving the side panels off and got used to it. Very nice work. I haven't seen the carpet on the areas around the seats and center. I may have to consider that.
 
Last edited:
One step closer. Should be flying spring 2022.

Very nice. I installed the AeroClassic seats and interior in my 9A, I was quite happy with the finished product.

Now go fly it!
 

Attachments

  • IMG_1881.jpg
    IMG_1881.jpg
    301.8 KB · Views: 210
Last edited:
Assembly Complete

Things left to do:
Calibrate fuel senders, calibrate magnetometer, run engine.
1121 lbs.
IO 360 M1B, Hartzell prop, full Garmin panel, Classic Aero interior.
 

Attachments

  • N357MA.jpg
    N357MA.jpg
    985.4 KB · Views: 213
Things left to do:
Calibrate fuel senders, calibrate magnetometer, run engine.
1121 lbs.
IO 360 M1B, Hartzell prop, full Garmin panel, Classic Aero interior.

Nice. It is a good feeling to be finished - well at least finished enough to fly! I guess we are never really finished. Have a great phase one. Good luck doing the fuel calibration with the g3x. I have done mine several times and still not as good as I would like. If you figure it out, let me know!
 
Things left to do:
Calibrate fuel senders, calibrate magnetometer, run engine.
1121 lbs.
IO 360 M1B, Hartzell prop, full Garmin panel, Classic Aero interior.

Feelsgood when the list of remaining steps fits on a single paper!
 
Congrats

Things left to do:
Calibrate fuel senders, calibrate magnetometer, run engine.
1121 lbs.
IO 360 M1B, Hartzell prop, full Garmin panel, Classic Aero interior.

Congrats.
I hope I am only a few months behind you.
Are you going to bump up the gross weight to 1750#?
 
Getting the Canoe finished

Spent most of the Easter Weekend eating chocolate and riveting the forward fuselage together.
 

Attachments

  • IMG_6428 - Copy.JPG
    IMG_6428 - Copy.JPG
    820.7 KB · Views: 300
Pretty much done

Only construction item left is to custom make the front gear intersection fairing since the one I bought doesn't fit at all. Also have to figure out any calibration items in my AFS panel. Waiting on my registration then it's inspection time! Love my interior!
20220924-162732.jpg

20220924_162736.jpg

20220924_162741.jpg

20220924_162750.jpg

20220924_162757.jpg
 
Weighed

Weighed the plane yesterday. Came in at 1108 lbs. Guess I'm happy with that since I have the bigger engine and beautiful interior.
20220930-121324.jpg

20220930-122328.jpg
 
Received my Empennage kit today. I am taking the EAA sheet metal class next week and will get started after that.

You will love the process and results Brian! The Empennage kit is the most memorable the feel of accomplishment will be unmatched.

I would suggest ordering wings right away if budget allows, followed by fuselage order to be ahead of the game.

Good luck happy riveting you won't regret a second. Don't ask me how I know :D

Ted1.jpg
 
Thanks. I ordered the wings at the same time as the Empennage I should have it early February. I figure I will get started on the wings and then order the fuselage. I am a bit space constrained so I don't want to get the fuselage until after i get the wings finished.
 
Most excellent Captain! I didn't noticed at first your signature details. I hope interior priming won't slow you down :D Come to Wild West 2026 lots of cool stuff to see... and you have a place to stay...
 
The empennage kit arrived Monday, and I completed inventory and storing the parts. The light box practice kit was started today, 2 of the airfoil practice kits to go, then on to the H stab. Learning lots.
 

Attachments

  • IMG_0091.jpg
    IMG_0091.jpg
    404.5 KB · Views: 151
Back
Top