Another suggestion for Jack's new call sign could be "Punch". That's almost a nice clean hole.
Rob that sounds better. Jack "the Punch"


Another suggestion for Jack's new call sign could be "Punch". That's almost a nice clean hole.


This week we started our first annual on our RV10. We had inspected the wheels and brakes and decided to replace the tires and brake pads and service wheel bearings all in one shot after initial inspection. During the build we had the RV10 up on the stands numerous times with these wing jacks with no problems.....Well today we had a problem

I am not exactly sure what went wrong but a few thoughts so this doesn't happen to others if you are using the same system.
1. Do Not lift both sides up at same time, Block the tires on opposite side and nose to prevent the aircraft from moving the aircraft.
2. Do Not lock the homebuilt pipe cap to the stud bolt...oversize the hole and leave the nut above the pipe cap slightly loose to allow the cap to pivot as you lift and lower the aircraft...mine was tight.
3. Use Grade 8 bolts for the stud and keep cap as close to wing skin as possible.

The fix is somewhat simple with installing a stall warning inspection kit in the place of the hole.
This ruined my day but no one got hurt...hopefully this prevents any future incidents.


If I'm not mistaking though, the tie down is not flush against the bottom wing skin on any of the RV models if built according to plans (I know this to be the case on the 2 seat RV's, don't recall on the 10) so if you screw the "jack pad" up against the wing you will bend the skin.
If I'm not mistaking though, the tie down is not flush against the bottom wing skin on any of the RV models if built according to plans (I know this to be the case on the 2 seat RV's, don't recall on the 10) so if you screw the "jack pad" up against the wing you will bend the skin.
This makes using adapters like this not really an effective option.
I used these for many years, as supplied by Vans. Only recently did I notice one of them had a slight bend to it. I switched over to a bolt. I don't know what the shear strength of that plastic is, but it must be way less than any grade of steel bolt.
If someone made a steel version of these plastic devices, I would buy it right now. They fit perfectly into the socket on top of my jacks.
If I'm not mistaking though, the tie down is not flush against the bottom wing skin on any of the RV models if built according to plans (I know this to be the case on the 2 seat RV's, don't recall on the 10) so if you screw the "jack pad" up against the wing you will bend the skin.
I use these with similar modified concave hydraulic jack ends as Ron_RV8 but I put an additional short vertical pin in the hole. I countersunk the hydraulic jack end slightly deeper into the modified concave to fit the pin. The vertical pin is LOOSE and only restricts lateral movement if for some reason the ball unseats. The lift load is on the ball not the pin. I made the pins from old drill stock. The ball end is $25 from Cleveland Tool. Less drag than the standard tie down ring and you can leave them in place.


These are from Bogert Aviation and have a steel stud but they are 5/16 for the Mooney, I contacted Richard at Bogert Aviation (Bogibar) to help us come up with a better/similar adapter for the RV.


These are from Bogert Aviation and have a steel stud but they are 5/16 for the Mooney, I contacted Richard at Bogert Aviation (Bogibar) to help us come up with a better/similar adapter for the RV.


My engine came from an aztec that slipped off its wing jacks and totaled the plane.
After hearing that story I have been hesitant to use wing jacks, so I bought the Flyboy jack points. I was all ready to install them and do some wheel work when I read the instructions that say in order to install them, I needed to jack up the plane at the wing. :-(
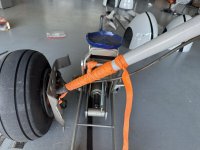
I looked at the gear for about two hours and finally came up with this method. It only takes about 3 minutes to string up the webbing, and uses equipment I already had in the garage. It's super stable since it is hanging from the jack, and not at risk at breaking any metal.