What's new
Van's Air Force

Don't miss anything! Register now for full access to the definitive RV support community.

Fuselage clarification

HeliCooper

Well Known Member
Really stupid question.

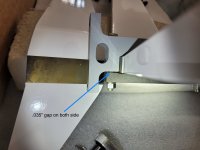
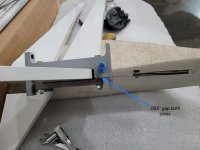
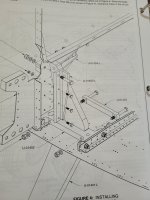
Page 29-03 step one says "Mask off the forward and aft mating surfaces of the U-01402 Lower Gear Braces and prime"

Do they want you to prime the mating surfaces or the the entire thing except the mating surfaces? Why do they not want you to prime the entire gear brace?
 
I painted all but the mating surface. I assume they want steel on steel for a tight clamping force. The surface on the gear leg is also without powdercoat at that contacting area.
 
Mask usually means to cover so that it doesn't get primed/painted. The mating surfaces are the ones that come in contact with each other.
Translation.... Cover the surfaces that contact each other and then prime/paint the remainder.
 
I painted all but the mating surface. I assume they want steel on steel for a tight clamping force. The surface on the gear leg is also without powdercoat at that contacting area.

I'm not building a -14 so I'm confused by this post. I just want to make sure you are not having unpainted steel surfaces touching aluminum. If you are, then you are going to have corrosion issues sooner than you would like.
 
I'm not building a -14 so I'm confused by this post. I just want to make sure you are not having unpainted steel surfaces touching aluminum. If you are, then you are going to have corrosion issues sooner than you would like.

Steel on steel, bracket is steel and so is gear.
 
Now I am confused because the fore and aft surfaces of the 1402 butt against aluminum. It mates with the spar carrythrough and the gear brace brackets.
 
I think I finally have my head wrapped around this. It is the fore and aft surfaces on the inside of the cutout of the 1402.
 
I'm resurrecting this thread because I still need some clarification. As the original poster mentioned, page 29-03 says to "Mask off the forward and aft mating surfaces of the U-01402 Lower Gear Braces and prime". I think I skipped primer on the wrong part of the lower gear braces. I will prime the areas I wrongly skipped (what I consider the forward and aft mating surfaces) but do I need to remove the primer I inadvertently added to the "other" forward and aft mating surfaces? Sorry, I don't understand why the plans call for no primer on these four small areas. I thought primer was a good thing :)


IMG_7172.jpg
 
The instructions say “Mask off the forward and aft mating surfaces of the I-01402 Lower Gear Braces and prime”
then it says “Use Bolube to lubricate the mating surfaces of the lower gear braces for installation”

There is no way to think you need to lubricate any surface “for installation” except the ones on each end.
But I am now really wondering why?

Can’t wait to hear the answer (and mine will need to come out for LCP replacement anyway)
 
I got a super fast reply from Van's builder support. The diagram below (courtesy Vans support) highlights in yellow the surfaces that should NOT be primed. I didn't ask but he also said to use wheel bearing grease rather than the Boelube which is specified in the plans.

Screenshot 2024-03-11 at 6.32.26 AM.png
 
Last edited:
Well, those things aren’t coming out now. Hopefully the boelube and the primer on the aluminum side keeps things from corroding.
 
Yes, this instruction was ambiguous. It does not tell you which mating surfaces to lube and the fact that there are two sets of mating surfaces is where the ambiguity lies. I did find putting a little Boelube on the ends enables them to slide into position a lot easier. It's a bit of a tight fit otherwise.
 
...the fact that there are two sets of mating surfaces is where the ambiguity lies.

That plus the fact that on this page in the plans we are mating this part to the true (outside) fore and aft surfaces. We don't mate it to the inside surfaces with the landing gear until much later. But it gets worse, that one long side of the part Vans says to skip priming does NOT run fore and aft and the plans say "Mask off the forward and aft mating surfaces".

I didn't describe that very well but basically step 1 on page 29-03 is written so poorly that I'll bet 95% of RV-14 builders get it wrong.
 
Thanks for posting this Brian. I did it wrong as well, but after reading this thread this morning I spent a couple hours removing them and priming them where they should be and sanding off the primer where it shouldn’t, as shown in your post #16. I also dry fit the two braces (page 40A-04) as shown in my pictures. There is approx .035” gap when fitted up. As per Kevin at vans support, this is by design and should not be shimmed. You should not attempt to over torque the bolts to close this gap. Standard torque values only. Prudent for these to be on the annual checklist for checking torque as well.
 

Attachments

  • 20240311_131319.jpeg
    20240311_131319.jpeg
    1.4 MB · Views: 33
  • 20240311_131240.jpeg
    20240311_131240.jpeg
    1.7 MB · Views: 33
  • 20240311_131431.jpeg
    20240311_131431.jpeg
    1.3 MB · Views: 32
Back
Top