What's new
Van's Air Force

Don't miss anything! Register now for full access to the definitive RV support community.

Tip: Match drilling for Aviation Products tailwheel

DanH

Legacy Member
Mentor
My tailwheel spring came drilled with two holes for the stock Van's tailwheel. Some folks just drill a new hole through the tailwheel socket and spring to mount an Aviation Products tailwheel, but I prefered to match drill for the existing holes.

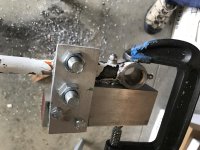
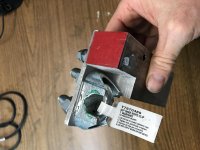
This is a clamp-on drill guide block. Clamp the block to the spring and drill it using the hole in the spring as a guide. Then position the tailwheel, flip the drill around, and drill the tailwheel socket using the block as a guide.

Tailwheel%20Jig1.JPG


Tailwheel%20Jig2.JPG
 
Last edited:
Good idea Kevin. I found that this was a good time to install the taper pins instead of the bolts too. That way, your hole can be a fraction off and the taper pin reamer will fix it.
 
I found that this was a good time to install the taper pins instead of the bolts too. That way, your hole can be a fraction off and the taper pin reamer will fix it.

No need. A drill guide block gives you perfectly matched holes....which is not to say taper pins are a bad idea.
 
Last edited:
Very old thread, I know, but is this drill guide commercially available or am I going to have to get creative?
 
Very old thread, I know, but is this drill guide commercially available or am I going to have to get creative?

DanH is a very do it yourself builder and I think this is a guide he made himself. I'm sure you can make one relatively easily as Dan has.
 
Another one

Here is my drill guide. The c-clamp sets the vertical angle of the block of aluminum. The two large nuts are part of a large cable clamp that clamps firmly to the tailwheel spring to prevent any movement. You may notice there is one bolt through the tailwheel socket. This was to guarantee it was held in position when I drilled the guide holes in the large aluminum block. Also I had to cut a notch out of the corner of the aluminum block to clear the cable clamp.

IMG_3052_zpswrplxozb.jpg


1A54B64A-8052-4EDD-A8AA-6FAA7350E577_zpsb0eprezs.jpg
 

Attachments

  • IMG_3052.jpg
    IMG_3052.jpg
    280.8 KB · Views: 246
  • IMG_3084.jpg
    IMG_3084.jpg
    261.8 KB · Views: 230
Last edited:
Being a die hard wood worker this was how I arrived at a drill guide using some scrap hardwood and a clamp from the local hardware aviation department:)
tailwheel2-M.jpg


And after much much patience, patience, patience as someone already stated, 2 taper pins installed!
tailwheel3-M.jpg


Ah...but worth the effort and knowing that whenever things loosen up back there all can be cinched down again and OH yes, there is peace of mind knowing the tailwheel can handle uneven pavement much better. Thank you Vince Frazier & Doug Bell!
tailwheel4-M.jpg
 
Last edited:
Photos are not showing...

That's odd as they showed up in preview and online look good to me, I am kinda new to this stuff so am not sure where the problem is. Thanks

OK, even a blind squirrel finds a nut once in a while, pics now fixed.

Update on thinking it was fixed...Am going to have to change image hosting, Google Photo software automatically changes the URL link pretty often to the Shared photos and I didn't know that. It must be one of those "you get what you pay for" things.
 
Last edited:
Back
Top