What's new
Van's Air Force

Don't miss anything! Register now for full access to the definitive RV support community.

RV-7 #74023

Miles, I am glad things worked out so well for you in the move. Great news on finding a house - on an airport. Thats as good as it gets. I thought I was going to have to fit you in some of our student housing! Ha!

I will be in East Lansing much of the time between now and mid August. Let me know if you need a hand with anything.
 
Now that most have had time to get home from KOSH...

... can a moderator please delete "Tehachapi" from the title of this thread? [ed. Done! dr]
 
Last edited by a moderator:
The title is changed.

That is interesting - I found how to change the tile line in the first post thinking that would change the database listing title, but it did not (not as a moderator). Then later, I assumed a moderator saw it and fixed it. Maybe it happens when the database gets reindexed.

The title line in your first post has been changed, just not the listed title.
 
Last edited:
Congratulations on finding a house on Hyne Airport. Welcome to Michigan.

FYI- Ray Community airport, northeast of you, has something like 15 RV's based there.
 
Congratulations on finding a house on Hyne Airport. Welcome to Michigan.

FYI- Ray Community airport, northeast of you, has something like 15 RV's based there.

Thank you John! You must be a long-time Michigan resident, as I first heard 45G referred to as Hyne Airport only yesterday at a gathering of aviators at Grand Ledge who've been around significantly longer than I have. All of the residents and tenants at 45G that I've met so far simply call it the Brighton Airport.

Thanks for the info on Ray Community airport. All I need now is an airplane...
 
I don't have my shop totally set up after my move yet, but I've gone ahead and restarted my build after about a 10-month layoff. I've become a mentor on the Brighton Build-A-Plane project, and it's inspired me get cracking on my -7 again.

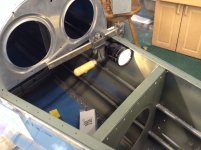
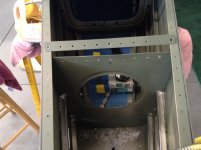
When I fabricated F-710C spacer last May I noticed that I had fabricated the F-710B angle from 3/4" x 3/4" stock, as opposed to the 1" x 1" called for in the plans. This would cause edge distance and structural strength issues on the horizontal stabilizer attachment, so I took the necessary step backwards and drilled out 11 rivets to replace the angle. My rivet drilling skills have deteriorated over the last 10 months, and I'm not particularly proud of the job I did, but a few 5/32 rivets should save the day.


Too lazy to go buy a new bulb for my work light. Whatever works....
20160319-1.JPG

The bulkhead holes are not as egg shaped as those in the removed angle. A few 5/32 rivets will be required.
20160319-2.JPG[/IMG]
 
Last edited:
That F-710B Angle

Miles, I just had a little adventure of my own with that F-710B angle. Make sure yours fits snugly into the radius of the longerons on each side. Mine were just a little short and I had edge distance problems with the outside bolt holes when mounting my horizontal stabilizer. Look at page 8-16 in the plans for the details on fitting the HS.
 
Last edited:
Thanks for the heads-up, David. I fabricated the new one yesterday using plans dimensions (before I saw your post...), and it fits with about 1/32" to 1/16" side-to-side play.
FP26032016A0003V.jpg
 
Last edited:
Letting a little long overdue sun shine on the project. It's 45 degrees here in southeast Michigan, but with the overcast melted away and the wind near calm, it was time to open the hangar door and enjoy a cool one (the criteria is that the day is warmer than the beer :D)
316n1gp.jpg


Not a lot of progress lately on the -7. My excuse (and it IS just an excuse:eek:), is that I've been spending a lot mental energy on the fact that my Cessna 170B is almost ready to return home. Some may remember that in the summer of 2014 '98C was savagely attcked by a renegade hand-propped Cherokee.
jhcuiv.jpg


A slightly generous insurance settlement got the lions share of the repairs done, and kicking in some coin of my own got her a few upgrades, cosmetic repairs, and new paint and interior. 32 months later she's within a week or two of coming home. All she needs are a few touchups, a static system check, and a weight and balanceYIPPE!
2s5xlkj.jpg
 
I MUST have done something wrong...

...because things rarely work out for me as well as they seem to have for the initial fitting of the wings on my RV-7.

After plugging the wings into the fuselage, putting two 7/16? hardware store pins in each side, then clamping the rear spar fittings where they fell, we hung two plumb bobs off each leading edge and stretched a string along the floor. The sweep is within 1/8 inch all the way across. Measuring for square from the rivet in the forward outboard corner of he outboard main skin back to a point on the centerline of the aft deck just forward of F-711, the two sides are within 1/16 inch (out of 187-5/8?). Checking incidence, both wings measure 0.1 To 0.2 degrees nose high at the root and tip, and about 0.3 degrees nose high midway between.

I can?t help but think I?ve done something wrong:). I?ve marked the rear spar bolt holes in the center of a 1/4? x 1/8? rectangle that will give adequate edge distance on all the parts, and will walk away until tomorrow when I?ll clamp a drill bushing in place and remeasure everything.
 
Hi Miles,
I don?t think you?ve done anything wrong, I think your numbers are excellent. A tenth of a degree will be unnoticeable and could be random variation. I bet even the temperature you measured it at could create tiny changes in the metal. At least both wings are identical in measurements and I?m sure your plane will fly excellently. I?d say drill the holes and build on!

Bruce
 
Good to hear from you Bruce!

Since that post I test fit the flaps, and the inboard end of the lower skins lacked about 1/16? touching the fuselage. I had about that much spar stub extending below the forks on both sides, so I bumped the trailing edges up that far, remeasured about a half dozen times, and today finally committed drill to metal. I have both sides up to 1/4?, and will see if I can borrow a 19/64 drill bit and 0.311 reamer from one of several local builders who have done this before.

If I had known it was going to be this easy I would have done it some time ago.;)

FP31122017A00051.jpg
Good help, and they didn't even visit the kegerator. (that might have something to do with it being 12*F outside...)

FP31122017A00053.jpg
Inboard edge of upper flap skins need to be trimmed slightly.

FP31122017A00057.jpg
My Rube Goldberg Wing Incidence Measuring Tool.:D

FP31122017A00056.jpg
Left side. Right side looks pretty much the same.
 
Last edited:
First RV-Grin From Inside the Future N904KM

I needed to remove the control column to adjust the stick angles, and couldn't reach it from outside the airplane, so I took the opportunity to document the first time sitting in the airplane.
FP16022018A0003U.jpg
 
Last edited:
Thank you Jereme! This should have happened 2 years ago. There is NO excuse for this airplane not being done, being retired and having a heated hangar less than 30 seconds from the living the room couch...:eek:
 
Thank you Jereme! This should have happened 2 years ago. There is NO excuse for this airplane not being done, being retired and having a heated hangar less than 30 seconds from the living the room couch...:eek:

Heated hanger! Lucky! Man, that looks like great work!
 
DR, thanks for the shoutout on the front page today! It moved the motivation meter to the right a notch or two.

PS: I didn?t notice the typo until I read it on the front page, but I was in the airplane because I couldn?t remove the control column from the outside...
 
I've had the SB 14-01-31 repair kit for a couple of years now, and thought I'd get it installed before attaching the horizontal stabilizer to the fuselage. The number of enlarged holes in the spars, ribs, and angles (some of which date back to the original construction) has been bugging me, so I sent an email to Vans. Sterling concurred, so I am replacing the front spars, attach and reinforcement angles, inboard ribs, and new pre-drilled doublers.

I ordered parts Monday, and they are due Saturday. Yesterday I started drilling out the front spars. 3-1/2 hours into it, I have the left front spar removed, and am about 2/3 the way through the right.

Enlarged holes in the attach and reinforcement angles:
FP17042018A00060.jpg


Left front spar removed:
FP25042018A00034.jpg
 
Good Choice

Hey Miles.....I did the same thing. I started doing the SB and got some elongated holes. So I ended up drilling skins and replacing anything that
was needed.....got a great HS and confidence that all is in great shape. Not worrying about those egg shaped holes in the back while I will be flying in the front:) Replaced both front spars and one reinforcement...the other one came out real nice and could be reused.

Also saw the pics of the C-170.....very nice!!!
 
Another 30 minutes in the shop Friday, and I had the right front spar out of the horizontal stabilizer, completing the first "R" in this R&R project. That blinding light in the upper left of the photo below is sunshine streaming through an open hangar door, something we've seen precious little of around here this year...
FP28042018A0003Z.jpg


Saturday, while awaiting delivery of new parts for the HS, I spent several hours finishing up steel flap pushrods to replace the aluminum ones I wasn't particularly happy with (threads too loose on at least one). After tapping these new ones, I now have a better appreciation on just how tough 4130 really is. I used the same setup I used with the aluminum tubes, removing the handle and cone from my RoloFlare tool and squarely but loosely mounting it on my drill press to make it self-centering, but with the steel, I could only get about 2-3 full turns or so with the tap (drive belts removed, turning the chuck by hand), and had to clamp the flaring tool with tube and tap in the bench vice, and turn the tap with a wrench. I had to break chips about every 1/4 turn, so it was quite a tedious process, but well worth it IMHO.

FP23032018A000H5.jpg


FP28042018A00043.jpg


FP28042018A00044.jpg


As expected, I received the repair parts for my horizontal stabilizer Saturday afternoon, as well as a flash drive containing the RV-7 manual and plans. Vans even cut the HS-00001-1 spar doublers in two for me so everything would fit in a 5-inch diameter mailing tube!
FP28042018A00041.jpg


After inventorying the parts, I printed out the pertinent pages of the manual and sections of DWG 3 that differ from the original plans and drawing, but didn't have time to get started.

After a breakfast flight this morning with 5 airplanes and 7 folks from Brighton (including an RV-6A and my 170), I spent about 4 hours in the hangar cleaning up about 6 months of disorganization and saying "I'll get to that later". (Check the workbench in the background of the first photo in this post. :eek:) I even found several items that I forgot I owned, including a fire extinguisher, which I promptly mounted. I now have my workbench to the point that there's room for working on the stabilizer repair.

FP29042018A0004I.jpg


Just about the time I got the new stabilizer parts laid out on the freshly cleaned bench, neighbors noticed the hangar door open and started showing up, so the beer light went on. Of the three that showed up, two had also been spring cleaning in their own shops, and the third had spent the day on some long-delayed exterior maintenance on the airport clubhouse. I was glad to point each one of them to the fresh pint glasses on the kegerator (currently Killian's Irish Red)... they had earned it!

No shop time logged today, as I have a 8-hour bottle to tool rule...;)
 
Last edited:
I took delivery of the finish kit late Saturday afternoon. On Sunday morning I had an hour or so to get started on unpacking and inventory before getting ready for Fathers Day festivities. So far I?ve found the wheel fairings, empennage fairing, wing root fairings, canopy latch bar, and some hinge material, but mostly it?s just paper. I have laid eyes on the canopy, and what appears to be the wheel kit and tires (didn?t unwrap them yet). I assume the engine mount and a bunch of hardware are buried under the canopy.

IMG_3394.jpg
 
Last edited:
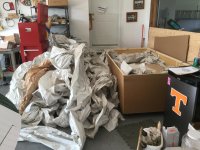
Even though it’s been 5+ years since I updated this thread, I continued to make progress until about 2 years ago. Several factors, including a few building mistakes requiring significant time and effort to correct, Lycoming’s big price increase, and a re-evaluation of my mission caused me to take a break from the project.

After about a year of little to no progress I posted a for sale ad here on VAF that drew essentially no interest. I took that as a sign that maybe I should continue with the project, but that hasn’t happened. I reposted the ad this past August, and didn’t get any significant interest until a few days before it timed out, when I got three serious indications of interest via PMs, and a couple of calls from folks who had heard about it through word of mouth.

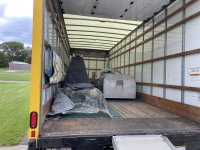
Today it got loaded up and headed out with the first person who showed a serious interest. It was harder to see it go than I thought it would be, but I keep telling myself it was the right thing to do. It’s going to a repeat offender who I believe will do the project more justice than it was becoming apparent than I was going to be able to give it. In the process I managed to make a new friend, and who knows, I may still get my first ride in an RV-7 in one I played a significant part in building.
 

Attachments

  • IMG_3372.jpg
    IMG_3372.jpg
    468.1 KB · Views: 55
I get it. Building this thing is a huge endeavor. Priorities change. But I’m sure you’re bummed nonetheless.
 
Back
Top